
This article was updated in August 5, 2025 with new products and information by Mark S. Taylor
My car quit on a hot day. I felt stuck and mad. The problem was a bad ignition module. It cost me too much cash. Then I learned how to check an ignition module myself. I’ve fixed cars for fifteen years. This guide will help you learn too. I’ll show you each step in simple terms. You can test the part with basic tools. You’ll save time and money. Let’s get started today!
Contents
What Is an Ignition Module and Why Test It?
The ignition module is like the brain of your spark system. It tells your spark plugs when to fire. Think of it as a traffic cop for electricity in your engine. I learned this the hard way once. My car wouldn’t start on a cold morning. I spent hours and $200 on a new battery. But the real problem? A faulty ignition module. I felt pretty silly that day.
So, what does this little part actually do? The ignition module controls spark timing. It coordinates with your ignition coils. This makes sure each spark plug fires at just the right moment. Without it, your engine can’t run right. Testing it helps find problems fast.
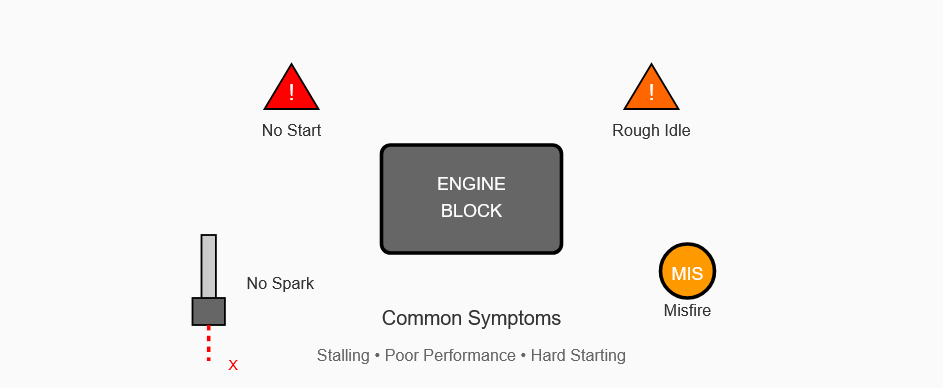
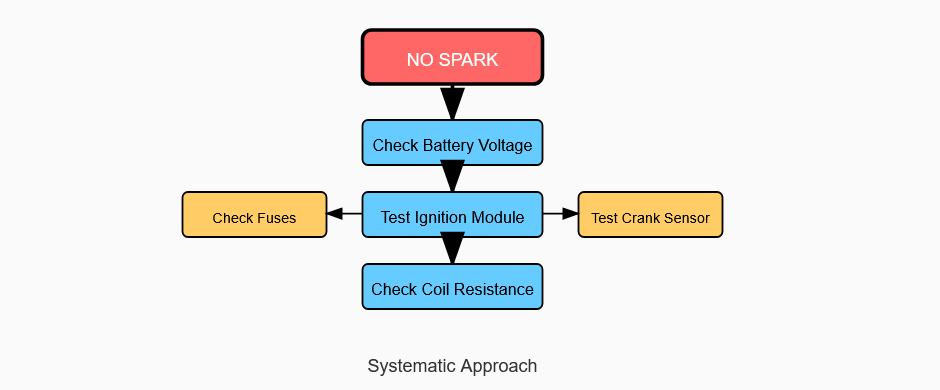
Bad ignition module symptoms can trick you. Your car might stall randomly. Or it could crank but not start. Sometimes it runs fine when cold but dies when warm. I’ve seen all these in my 15 years in the garage. Ignition system troubleshooting always starts here.
Here’s my best tip: Always check the ignition module first. Before you buy new spark plugs or coils. A simple test can save you time and money. I tell my customers this every week. Most are surprised how easy ignition module testing really is.
What Tools Do You Need?
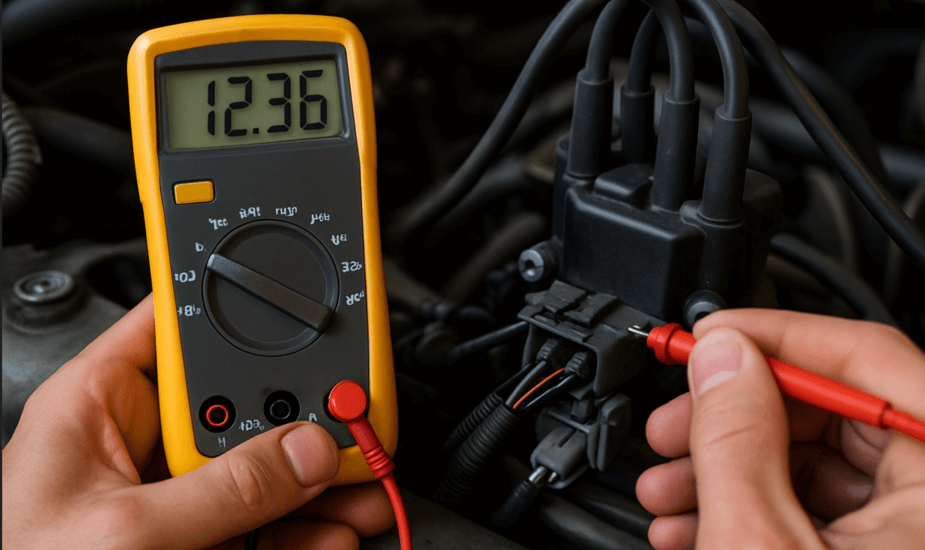
You only need a few simple tools. First, get a digital multimeter (DVOM). It measures electricity like a doctor checks your pulse. Next, grab some piercing probes. These are sharp needles that attach to your meter. They let you test wires without cutting them. Finally, find your car’s wiring diagram. This map shows which wire does what. I keep mine in my glove box.
Safety comes first. Always disconnect the battery before you start. A spark can hurt you or damage your car. Also, wear safety glasses. I learned this lesson when a wire sparked near my face. Trust me, it’s not fun. Work in a well-lit area too. Good light helps you see small connectors.
Now, about those piercing probes. I used cheap ones once. They kept slipping off wires. What a waste of time! Then I bought solid, insulated probes. They grip wires firmly. No more false readings. This small upgrade saved me hours on ignition module testing. Good tools make the job easier. They also keep you safe.
How to Test Ignition Module Voltage
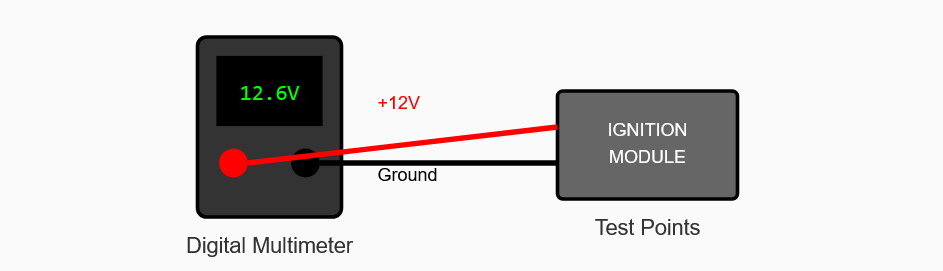
If your engine cranks but won’t start, voltage at the ignition module is one of the first things I check. This quick test tells you if the module is even getting the power it needs to work. No voltage = no spark = no start.
Step-by-Step Voltage Test:
- Turn the key to “ON” (but don’t start).
- Set your multimeter to DC volts.
- Connect the black lead to a known ground (like battery negative or engine block).
- Back-probe the power wire at the module with the red lead.
- Have someone crank the engine while you watch the voltage.
You should see battery voltage (12–13V) briefly while cranking. If it stays at 0 or drops too low, there’s likely a power supply, ignition switch, or wiring issue.
Red Flags to Watch For:
Fluctuating voltage: Loose connection or failing ignition switch
0 volts: No power reaching the module
Less than 10V during crank: Possible weak battery or bad wiring
Personal Tip:
I once had a car that cranked but didn’t spark. Turned out the ignition switch was worn and wasn’t sending voltage to the module while cranking. A simple voltage test exposed the issue—and saved me from replacing parts I didn’t need.
Answer: To test ignition module voltage, connect your multimeter to the harness and check for voltage during engine cranking.
How to Test Resistance & Continuity
Testing resistance helps you find internal failures in the ignition module or coil. If the resistance is too high or too low, it’s a clear sign something’s wrong. Continuity checks also help spot broken wires or poor connections—two things that often get overlooked.
Step-by-Step: Resistance Testing
- Turn off the ignition and disconnect the module.
- Set your multimeter to ohms (Ω).
- Touch the leads to the module’s terminals—check resistance between specific pins based on your wiring diagram.
- Compare readings to the manufacturer’s specs.
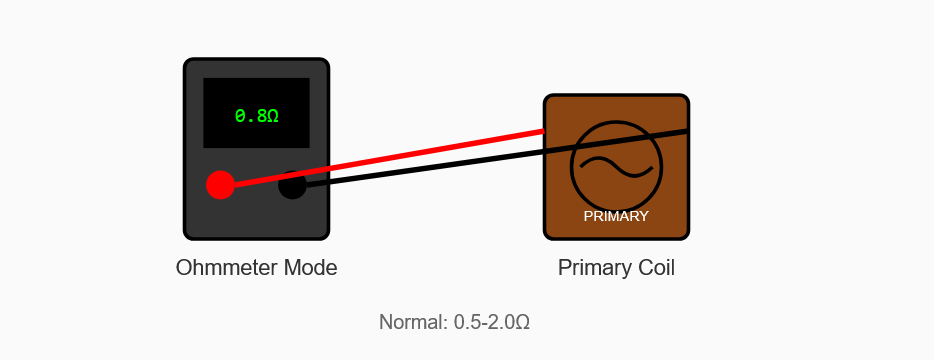
Primary vs. Secondary Resistance
| Winding Type | Where to Measure | Typical Range |
|---|---|---|
| Primary Winding | Between power and ground pins | 0.3 – 1.0 ohms |
| Secondary Winding | Coil tower to ground | 6,000 – 15,000 ohms |
Continuity Checks
- Set your multimeter to continuity mode (it beeps when a path is good).
- Test between module ground and chassis ground.
- Probe both ends of each wire in the harness—no beep means an open wire.
Personal Example:
When testing a 2008 sedan, I found 0.0 ohms on the power wire—looked fine. But the continuity test failed. The wire was corroded under the insulation. Replacing that one wire fixed the no-start issue instantly. Without continuity testing, I would’ve never found it.
Answer: Use an ohmmeter to measure resistance and compare the results to the values listed in your vehicle’s repair manual.
Symptoms of a Bad Ignition Module
When your ignition module starts to fail, your engine won’t always give clear signals. I’ve seen cars run fine cold, then stall when hot—or crank forever without firing. Knowing what to look for can save you from swapping out the wrong parts.
Key Symptoms of Ignition Module Failure:
- Misfires under load
- Engine cranks but won’t start
- Stalls randomly, especially after warming up
- No spark at the coil or plug
- Check engine light with ignition-related codes
How It’s Different from Other Issues:
| Problem Area | Key Symptoms | Quick Test |
|---|---|---|
| Ignition Module | Misfires, stalls, no spark, heat-sensitive | Check voltage and continuity |
| Ignition Coil | Weak or no spark, hard starts | Test primary/secondary resistance |
| Wiring/Fuse | No power to coil/module | Check fuses, inspect wires for breaks |
It’s easy to blame the coil or plugs, but if the coil gets power and ground, and still doesn’t spark—the module is suspect.
Personal Tip:
I once chased a misfire for days, changing coils and plugs. Turned out, the ignition module would overheat after 10 minutes and shut off spark. Swapping it fixed the problem instantly. Now, I always check module behavior when hot, not just cold.
Answer: Common symptoms include misfires, no spark, and sudden engine shutdowns, especially when the engine heats up.
Advanced Testing with a Spark Tester or Signal Probe
Voltage and resistance tests can pass, but that doesn’t mean your ignition system is working in real life. I’ve had modules that looked perfect on the multimeter but failed to create spark when it actually mattered. That’s why live spark testing is key.
How to Use a Spark Tester Safely:
- Turn off the engine and remove the spark plug wire.
- Attach the tester to the wire and ground the other end to a solid metal surface.
- Have someone crank the engine while you watch for spark through the tester window.
A healthy ignition system should give you a bright blue spark. No spark, or a faint orange flicker? That’s a problem.
Signal Probes for Coil-on-Plug (COP) Systems:
- If your car uses individual coils, use a COP probe to pick up signal from the coil directly.
- No disassembly needed—just hold it near the coil while cranking.
- If there’s no signal, the ignition module or PCM isn’t triggering it.
Real-World Example:
I once tested a module that passed voltage and resistance checks. Everything seemed fine. But when I hooked up a spark tester, there was nothing—not even a flicker. Turned out, the module couldn’t handle load. Swapping it fixed the issue instantly. I’ve trusted spark testers ever since.
Answer: Use a spark tester to check if the ignition module and coil produce a strong spark under load conditions.
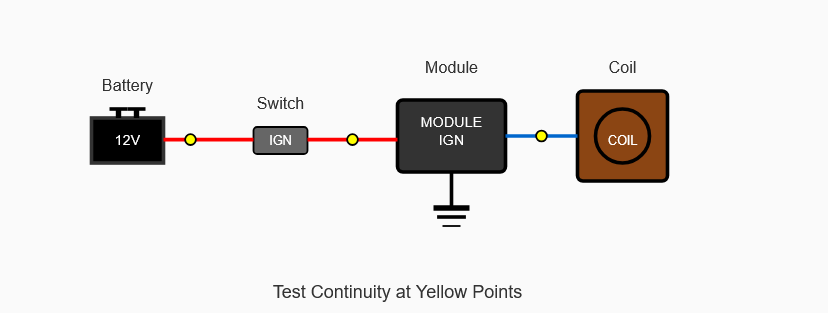
Reading Wiring Diagrams for Diagnosis
Wiring diagrams used to intimidate me. All those lines and symbols looked like a puzzle. But once I understood the basics, they became my best tool for finding faults fast. If you’re serious about diagnosing ignition issues, reading the diagram is a must.
What to Look for in the Diagram:
- Power wire: Usually from ignition switch or fuse box
- Ground wire: Tied to engine block or body ground
- Trigger/signal wire: Connects to ECU or crank sensor
- Coil wire (if separate): Sends spark to ignition coil
These wires are usually labeled in the diagram with abbreviations like “B+” (battery), “GND,” or “SIG.”
Continuity vs. Open Circuits
Once you identify each wire:
- Set your multimeter to continuity mode
- Probe both ends of the wire (e.g., from module to ECU)
- If you hear a beep, the path is good
- If there’s no sound, you’ve got an open circuit
Personal Tip:
On an older car I worked on, the ignition module had power and ground, but still wouldn’t fire. The wiring diagram showed a crank signal wire from the ECM. One quick continuity test revealed a break in the line. Splicing in a new wire brought the car back to life. Without the diagram, I never would’ve found it.
Answer: Use wiring diagrams to locate power, ground, and signal wires for accurate ignition module testing.
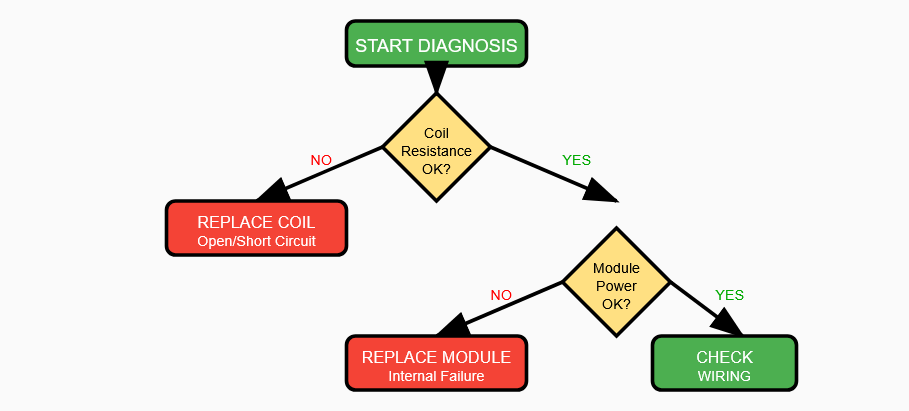
When to Replace the Ignition Module
Sometimes, no amount of testing will save a bad module. If your readings are off or there’s no spark despite proper wiring and power, it’s time to swap it. Modules don’t give second chances—they either work or they don’t.
When It’s Time to Replace:
- Voltage test shows 0V or weak signal during crank
- Resistance values don’t match the repair manual
- Spark tester shows no spark despite good power and ground
- Heat causes engine stalls or no-start when hot
- You’ve ruled out coil, plugs, and wiring
Matching OEM vs Aftermarket:
- OEM modules are reliable and match factory specs
- Aftermarket options vary—some are great, others not
- I stick with trusted brands or read user reviews before buying
- Always check compatibility using your car’s make, model, and year
Quick Steps to Replace an Ignition Module:
- Disconnect battery
- Remove screws or clips holding the module
- Unplug harness and inspect for corrosion
- Install new module and reattach connectors
- Reconnect battery and test for spark
Personal Tip:
I once installed a cheap aftermarket module to save money. It worked—for about a week. Then my car started stalling again. Replaced it with OEM, and the problem never came back. Now I don’t gamble with ignition parts.
Answer: Replace the ignition module if voltage or resistance readings fall outside the specs or if there’s no spark during cranking.
How to Use Continuity Mode to Test Wires and Ground
When I troubleshoot ignition issues, I don’t stop at voltage tests. I always switch my multimeter to continuity mode and check each wire—start to end. If there’s a break, no current flows—and no spark follows.
Step-by-Step: Testing Wire Continuity
- Set your multimeter to continuity mode (it should beep when the path is complete).
- Place one probe at the start of the wire (e.g., module plug).
- Place the other probe at the end (e.g., ECU or sensor connector).
- Listen for a beep—that means the wire is good.
- No beep? That wire has an internal break or corrosion.
Real-World Example:
I once tested a power wire that showed 12V at the plug. But the car wouldn’t start. I ran a continuity check—and found no beep. Peeled the insulation back and found a corroded green mess inside the wire. It looked perfect on the outside. One wire swap fixed the no-start instantly.
Ground Integrity Tips:
- Touch one probe to the module ground pin, and the other to battery negative or engine block.
- If it doesn’t beep, your ground is broken—often due to rust or loose bolts.
- Clean the contact point, tighten the bolt, and test again.
Answer: Continuity mode checks whether electricity can flow through a wire or ground path without interruption.
How to Confirm Ignition Under Load with a Spark Tester
Answer: Use a spark tester to visually confirm that the coil and ignition module produce a strong spark while cranking.
A spark tester tells you what a multimeter can’t—is the system firing in real-world conditions? Here’s how I use it:
Step-by-Step:
- Disconnect a spark plug wire.
- Plug the wire into one end of the tester.
- Ground the tester’s other end to the engine or chassis.
- Crank the engine and watch through the tester window.
You want to see a bright blue spark—strong and consistent. A weak or orange flicker often means the module can’t keep up under load.
When to Use a Coil-on-Plug (COP) Signal Probe
Answer: Use a COP probe when your engine uses individual coil packs with no plug wires to test directly.
Modern engines often use coil-on-plug setups, which hide the spark path. A signal probe lets you check for coil activation without disconnecting anything.
Best Time to Use:
- When there’s no spark but no visible plug wires
- To test coil signal without removing the coil
- During intermittent misfire diagnosis
Just place the probe on top of the coil and crank the engine. If there’s no pulsing light or tone, the coil isn’t firing—likely due to module or ECU failure.
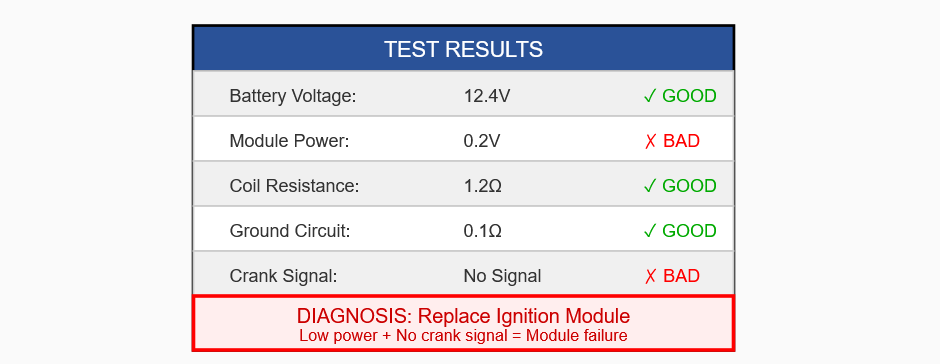
Real-World Case: Passed Multimeter Test, Failed Under Load
A few years ago, I had a car with a crank-no-start issue. The ignition module showed perfect voltage and resistance on the multimeter. Everything seemed in spec.
But once I used the spark tester? Nothing. No spark at all.
It turned out the module couldn’t handle real-world load. Internally, it was weak—but only failed when the coil was trying to fire. I swapped the module, and the engine started on the first crank. That experience taught me: never skip live spark testing.
How to Test Primary and Secondary Windings
Answer: Use an ohmmeter to measure resistance between coil terminals—primary checks input, secondary checks output to spark.
Testing the coil windings helps catch internal failures you won’t see with a visual inspection. Understanding the difference between primary and secondary winding tests is key to accurate diagnosis.
Key Differences:
| Winding Type | What It Does | Where to Measure |
|---|---|---|
| Primary Winding | Sends low-voltage signal from module | Between positive (+) and negative (–) coil terminals |
| Secondary Winding | Creates high-voltage spark to plug | From coil tower to negative or ground terminal |
Typical Resistance Ranges:
| Coil Type | Primary Resistance | Secondary Resistance |
|---|---|---|
| Conventional (distributor) | 0.4 – 1.0 ohms | 6,000 – 15,000 ohms |
| Coil-on-Plug (COP) | 0.2 – 0.6 ohms | 5,000 – 8,000 ohms |
Always check your car’s repair manual for exact specs. Too high = internal break. Too low = shorted winding.
How to Interpret the Results:
- No resistance (∞): Internal break
- Zero or near-zero ohms: Short circuit
- Higher than spec: Coil is failing under heat
- Within range: Likely okay, but test under load too
My 2008 Car Test Case:
Back in 2008, I had a sedan that misfired under load. Resistance looked fine cold—but when I tested again after warming up the engine, the secondary resistance spiked past 20k ohms. That’s how I caught a coil that only failed when hot. Replaced it, and the misfire vanished.
Frequently Asked Questions About check an ignition module
How do I know if my ignition module is bad?
You may have a bad ignition module if the engine stalls, misfires, or won’t start. Look for no spark during cranking and test for power, ground, and signal. If voltage and resistance are off, the module is likely faulty.
How to test an ignition coil module with a multimeter?
Set your multimeter to ohms. Check primary resistance between the two small terminals. Then check secondary resistance between the coil tower and ground. Compare readings to your car’s repair manual to see if it’s in range.
How to test an ignition control module without a multimeter?
Use a spark tester. Remove a plug wire, connect it to the tester, and crank the engine. No spark means the ignition control module might be bad. Also, listen for engine misfire or stalling after warm-up.
How to know if a module is bad?
If the engine has no spark, stalls, or misfires, the module may be failing. Check voltage during cranking. If it has power but no spark, it’s likely the module. Modules can also stop working when they overheat.
How to test ignition coil vs module?
To test the coil, use a multimeter to check primary and secondary resistance. For the module, test voltage at the harness during crank and use a spark tester. If the coil has spark but the engine still misfires, test the module.
What resistance values are normal?
Primary resistance is usually 0.3–1.0 ohms. Secondary resistance should be 6,000–15,000 ohms. Always check your car’s specs. Too high or too low means the coil or module might be damaged.
My Final Thoughts on How to Check an Ignition Module
If you’re a hands-on car owner who likes solving problems yourself, this guide is your new best friend. But if you’re short on tools or patience, a mechanic might save you headaches. I once fixed a stubborn stalling issue by testing a heat-sensitive module—something most guides miss. Think of the module as your engine’s brain: simple to test with these steps, but tricky when it acts like a gremlin. Trust your gut, use your multimeter wisely, and remember: some days, the pro’s diagnostic computer wins. You got this!