
This article was updated in June 3, 2025 with new products and information by Mark S. Taylor
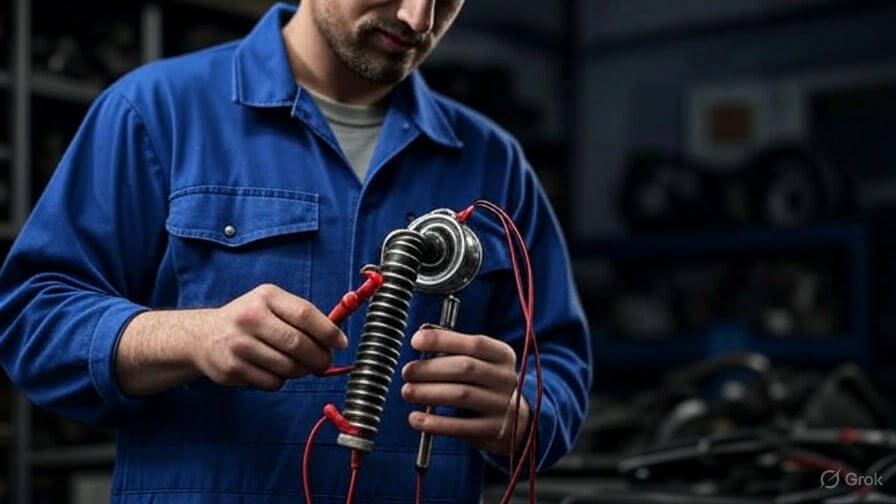
Last weekend, my old truck started acting up—jerky idle, no power, and that annoying check engine light staring back at me like I’d done something wrong. I swapped the spark plugs, but the issue stayed. Then I recalled a tip I’d heard in the garage: how to test an ignition coil can stop you from chasing false leads. A quick resistance check with my multimeter told the whole story—the coil was dead.
A lot of people skip this step because it sounds hard, but it’s not. Testing your ignition coil is simple and can save time, cash, and a big headache. Whether it’s your car, bike, ATV, or that old lawn mower that never starts when you want it to, knowing how to test an ignition coil at home puts you in charge.
In this post, I’ll show you exactly how I found the problem using tools I bet you already own—like a multimeter or a basic test light—and how to spot the red flags before your ride lets you down. Let’s get into it.
Contents
What Is an Ignition Coil and Why Test It?
Understanding the Ignition Coil
Picture your car’s engine as a beating heart, and the ignition coil is the spark that keeps it alive. This little powerhouse takes the battery’s low voltage—think 12 volts—and cranks it up to thousands of volts to fire up your spark plugs, igniting the fuel-air mix that makes your engine roar. Whether it’s a 2-pin coil in an old pickup, a 4-pin in a motorcycle, or a coil-on-plug in a modern sedan, a failing coil can leave you with misfires, rough idling, or lousy gas mileage.
Short answer: An ignition coil transforms battery power into a high-voltage spark for your engine, and a bad one causes misfires or poor performance.
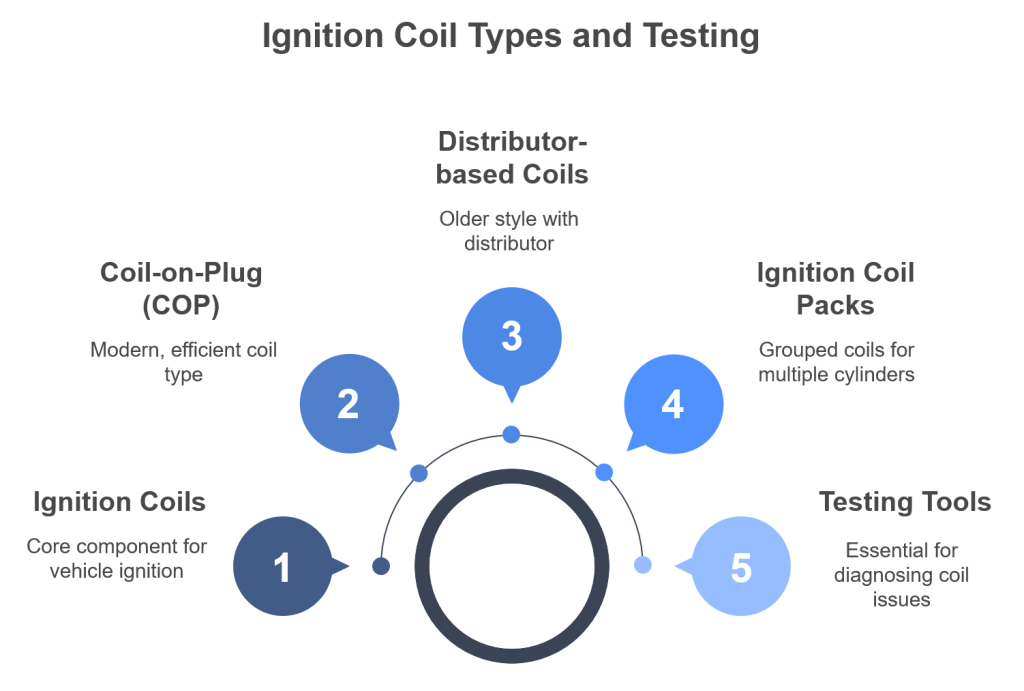
Now, not all coils look or work the same. Some older cars use a single coil that serves all cylinders through a distributor. But most modern rides have either a coil pack or coil-on-plug (COP) setups—where each cylinder has its own little lightning bolt machine. You’ll also see 2-pin and 4-pin ignition coils , which just means how many wires connect them to the car’s brain. Knowing what kind you’ve got matters when you’re trying to test an ignition coil the right way.
If your coil starts to fail, your car will let you know—usually at the worst time. Common signs include rough idling, missing on acceleration, poor gas mileage, or even stalling out mid-drive. I remember once pulling onto a busy highway in my old sedan, only for it to jerk like it was trying to say “nope.” Turns out, one of the COP coils had given up. A quick check saved me from a long tow and a costly guess.
Testing your ignition coil isn’t just about fixing a problem—it’s about avoiding bigger headaches. Too many folks replace spark plugs or fuel filters chasing a misfire, never realizing the real culprit is hiding under their nose. And if you ride a motorcycle, fire up an ATV, or wrestle with a stubborn lawn mower, this applies to you too. The system might be simpler, but the symptoms are the same.
So yes, testing your ignition coil can save money, time, and frustration. And the best part? You don’t need a fancy garage or expensive tools. With a basic multimeter or even a test light, you can get answers fast—and maybe even avoid being stranded somewhere you’d rather not be.
Understanding Different Types of Ignition Coils (and What Tools You’ll Actually Use)
If you’ve ever peeked under your hood and wondered why some cars have one big coil while others look like they’ve been wired by a robot, you’re not alone. The truth is, ignition coils come in different types—and knowing which one you’ve got can make testing easier and way more accurate.
Let’s start with the most common type today: the Coil-on-Plug (COP) . These are the tiny towers sitting right on top of each spark plug. They’re used in most modern cars and trucks because they’re efficient and cut down on moving parts. I remember working on my sister’s 2010 sedan and being surprised how easy it was to test each COP coil individually—no wires or distributor to mess with.
Then there’s the older style: distributor-based coils . These are the single-coil setups that send high voltage through a distributor cap to each cylinder. You’ll see them mostly in classic cars or older lawn mowers. They’re simple but can be tricky when things go wrong because one bad wire or cap can mimic a failing coil.
Many vehicles use an ignition coil pack , which is basically a group of individual coils housed together. They act like COPs but aren’t mounted directly on the plugs. If you’re trying to test an ignition coil pack, it helps to know which cylinder it serves so you can isolate the problem.
And if you’ve seen 2-pin vs. 4-pin ignition coils , don’t panic. The number of pins just tells you how many wires connect to the car’s computer. A 2-pin usually handles basic power and ground, while a 4-pin might include signal feedback or ignition timing control. Once you get the hang of it, it’s not as confusing as it sounds.
Now, to actually test any of these, you don’t need a full toolbox. Here’s what I keep handy:
- Digital multimeter – For checking resistance and confirming whether the coil’s internals are still good.
- Spark plug tester – Super helpful for seeing if the coil is producing spark without pulling the actual plug.
- Test light – Great for quick checks, especially on older systems.
- Battery or 12V source – Sometimes useful for manual tests (just be safe!).
- Safety gear – Gloves and eye protection are non-negotiable when dealing with live circuits.
I once helped a buddy test his ATV’s coil using just a multimeter and a screwdriver—turns out it was dead after sitting all winter. So even if you’re not in a shop, you can still get solid results with basic tools.
Knowing what kind of coil you’re dealing with and having the right gear makes testing faster, safer, and way less frustrating. It also helps avoid replacing parts you don’t need—because trust me, swapping coils only to find out it wasn’t the problem? Not fun.
Safety First – Working Safely with Electrical Components
Ignition coils might look small, but they pack a serious punch—sometimes over 20,000 volts. That kind of juice can give you more than just a scare. I learned this the hard way one afternoon when I skipped a few safety steps to save time. Big mistake. A quick zap later, and I was reminded why we always take precautions—even if it feels like overkill.
First rule: Always turn off the engine and disconnect the battery before touching anything. It’s not just about avoiding shocks—it also protects your car’s sensitive electronics from short circuits or surges. I’ve seen folks skip this step because “the car wasn’t running,” but trust me, that coil can still hold a charge like a sneaky little battery.
Second, never work on ignition coils in wet or damp conditions . Water and high voltage don’t mix. Moisture can cause shorts, false readings, or even lead to dangerous shocks. If it’s raining or your garage floor is damp, wait it out. Rushing a test isn’t worth the risk.
Also, avoid touching live terminals at all costs . Even with the battery disconnected, some parts can still carry residual current. Use insulated tools and wear gloves and eye protection. This isn’t just fancy advice—it’s what keeps you safe while testing an ignition coil at home.
Look, I get it. You’re trying to fix something fast and get back on the road—or finish mowing the lawn before dinner. But skipping safety steps is like driving with a loose gas cap: it might be fine… until it’s not. If you’re ever unsure, stop and consult a professional . Better safe than sorry.
Your body doesn’t need a lesson in high-voltage physics—and your car deserves better than a rushed repair done under risky conditions. Take the extra five minutes. It could save you a lot more than time.
Tools You’ll Need (And Why I Always Keep Them Handy)
You don’t need a full mechanic’s garage to test an ignition coil—just a few basic tools that most DIYers already own or can grab cheap. I used to think I needed some fancy gear until I realized everything I needed was already in my toolbox. Here’s what you’ll want before you get started:
- Digital multimeter : This is your go-to for checking resistance in the coil’s windings. It tells you if the internal wiring is still good. I’ve caught more than one failing coil just by plugging this in and reading the numbers.
- Test light : Great for a quick check to see if power is getting to the coil. It’s like a flashlight for electrical flow—no guesswork, just instant yes-or-no answers. I use mine all the time for fast checks under the hood.
- Spark plug tester : Want to see if the coil is actually sparking? This handy little tool simulates a spark plug without having to pull one out. I saved myself from pulling a perfectly good plug once just by using this instead.
- Screwdriver (insulated if possible) : Sometimes you need to loosen a bolt or remove a connector. Just make sure it’s insulated—it’s a small thing that can save you from a shock.
- Gloves and eye protection : Safety first! Even low-voltage systems can surprise you, and high voltage definitely will. I learned this the hard way after a tiny jolt reminded me why gloves are never optional.
Most of these tools cost less than a tank of gas, but they’ll save you hours of frustration—and maybe even a tow truck ride. If you’re serious about learning how to test an ignition coil at home, keep these close. They’re like your toolkit for speaking the language of your engine.
Step-by-Step Guide to Testing an Ignition Coil
Alright, let’s get into the meat of it—actually testing that ignition coil so you can figure out if it’s the problem or not. I’ve done this on cars, motorcycles, even my lawnmower. It’s not magic—it’s just methodical. And the good news? You don’t need a fancy garage or expensive gear. Just a few tools, some patience, and a bit of know-how.
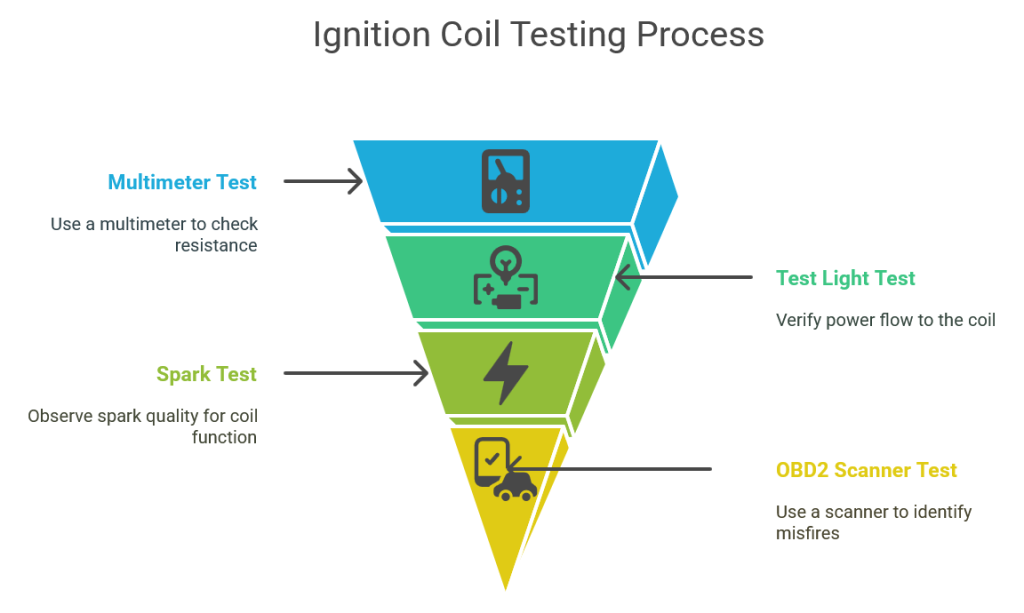
Method 1: Testing with a Multimeter (Ohm Test)
The Ohm test checks the resistance inside the ignition coil’s windings. Think of it like checking the flow through a garden hose—if there’s a blockage or a leak, water won’t move right. Same goes for electricity. Most coils have two sets of windings: primary and secondary.
For the primary winding , you’re usually looking at around 0.4 to 2 ohms . For the secondary , it’s way higher—anywhere from 6,000 to 15,000 ohms , depending on the model. If the numbers are way off, the coil is probably bad.
Here’s how I do it:
- Disconnect the coil from the wiring harness.
- Set your multimeter to Ohms (Ω).
- Touch one probe to each terminal (for 2-pin) or specific pins (for 4-pin).
- Compare the reading to specs in your manual or online.
I once tested a COP coil and got zero reading on the secondary side. No spark = no go. Replaced it, and boom—problem solved.
Testing 2-Pin and 4-Pin Coils
2-pin and 4-pin coils are like different puzzle pieces—both spark your engine but need slightly different testing approaches. For 2-pin coils, common in ATVs, test across the two terminals; 4-pin coils, often in cars, require checking specific pin pairs (consult a wiring diagram). I learned this swapping coils on my old sedan—4-pin setups can be trickier!
Testing Coil-on-Plug Systems
Coil-on-plug systems are like solo artists, each powering one spark plug directly. Disconnect the coil, measure resistance between its terminals (same Ohm ranges apply), and ensure it’s free from engine heat damage. My neighbor’s modern SUV misfired until we tested each COP unit this way—problem solved!
Method 2: Testing with a Test Light
How a Test Light Works
A test light is your quick-and-dirty way to see if power’s flowing to the ignition coil, like a flashlight spotting a weak circuit. It lights up when connected to a live wire, confirming the coil’s getting juice from the battery. I’ve used this trick on my lawn mower to avoid chasing ghosts in the wiring.
If you don’t have a multimeter handy, a test light works great for checking if power is getting to the coil. It’s like using a flashlight to see if a wire is live.
To test:
- Hook the alligator clip to a solid ground.
- Probe the positive side of the coil while someone cranks the engine.
- If the light flashes, power is reaching the coil.
I helped a buddy check his ATV with just a $10 test light. Saved him from buying a new coil he didn’t need. The light blinked like it was supposed to—that meant the issue was elsewhere.
Method 3: Spark Test
Sometimes, nothing beats seeing a spark with your own eyes. That’s where a spark plug tester comes in handy. It lets you see if the coil is actually firing without pulling a plug.
How I do it:
- Remove the coil from the engine.
- Attach the tester to the spark plug boot.
- Ground the tester and crank the engine.
- Look for a strong blue spark.
A weak or missing spark usually means a dead coil. I did this on my old dirt bike once and saw nothing but a faint orange flicker—bad coil confirmed.
Method 4: Visual Inspection
Before diving into electronics, always take a close look. Sometimes the answer is right in front of you. Cracks, oil leaks, burn marks, or corroded connectors are red flags.
Check the wiring too—loose or broken wires mimic a failing coil. I once found a cracked COP boot after chasing a misfire for days. One visual glance later, I knew what was wrong.
Method 5: Using an OBD2 Scanner
You don’t always need wires, probes, or spark testers to find a bad ignition coil—sometimes your car will tell you straight up. That’s where an OBD2 scanner comes in handy. Think of it like asking your car what’s wrong instead of guessing.
I used to ignore the check engine light until one day it blinked at me like it was trying to send Morse code. Hooked up my OBD2 scanner and boom—it said “Cylinder 3 misfire.” That narrowed things down fast. Without that code (P0303), I might’ve wasted time testing all four coils when only one was acting up.
Most modern cars speak a standard code language. The P0300 series tells you which cylinder is misfiring:
- P0300 = Random/multiple misfires
- P0301–P0308 = Misfire in cylinder 1 through 8 respectively
If you see one of those codes, there’s a solid chance the issue lies in that cylinder’s ignition coil—or at least somewhere in its system.
Now, not all scanners are created equal. I used to have a super cheap one that froze more than it worked. Then I picked up a basic BlueDriver Bluetooth scan tool —and wow, what a difference. It reads codes clearly, gives live data, and even explains what each code means in plain English. And it pairs with my phone, so no more squinting at tiny screens.
Using an OBD2 scanner won’t prove the coil is dead, but it’ll point you in the right direction. From there, you can combine it with a multimeter or spark test to confirm. Saves time, cuts frustration, and helps you fix what actually needs fixing—no guesswork required.
Advanced Diagnostics – What the Pros Use
If you’ve ever taken your car to a shop and watched a tech hook up some high-tech gadget that looks like it came from NASA, you’re not alone. I used to wonder why they needed all that gear when I could test an ignition coil at home with just a multimeter. But then I got curious—what are they really seeing that I’m not?
Turns out, pros use tools like non-intrusive current probes and oscilloscopes to get a deeper look into how the ignition coil is performing in real time. These tools don’t just tell you if it’s working—they show how well it’s working. Think of it like listening to your car’s heartbeat instead of just checking if it’s breathing.
A current probe clips right over the wiring without breaking the circuit. It measures how much electricity flows through the coil during operation. If the current spikes too fast or takes too long to drop off, that can mean the coil is on its last legs—even if it still sparks when you test it manually.
Then there’s the oscilloscope , which maps electrical signals as waveforms. I remember watching a mechanic pull up this wild graph on his screen and point out a glitch in the pattern. “That,” he said, “is a failing ignition coil trying to hide.” And sure enough, after replacing it, the engine ran smoother than before.
Some shops also use diagnostic software that ties into the car’s computer and gives live data readings. It’s like having a translator between you and your car’s brain. While these tools aren’t for every DIYer, knowing they exist helps you understand what mechanics are doing—and when it might be worth taking your ride in for a deep check.
Troubleshooting Common Ignition Coil Problems
Even after testing an ignition coil and getting clear results, things don’t always add up. I’ve had coils that tested fine but still caused problems—and trust me, it’s frustrating when your car keeps acting up despite “good” numbers on the meter. That’s where troubleshooting comes in. Let’s walk through the most common issues and how to fix them without losing your mind.
Misfires or Rough Idling? Check the Whole System
A misfire is one of the clearest signs of a bad ignition coil—but it’s not always the coil’s fault. I once chased a rough idle for days only to find out it was a cracked spark plug. So if you’re dealing with hesitation, shaking, or poor performance, test both the coil and the spark plug before swapping parts.
Sometimes, even if the coil sparks and tests within range, it might not be firing under real-world conditions. That’s why I always suggest doing a full system check—especially if the engine light flashes while driving.
No Start or Intermittent Failure? Could Be More Than Just the Coil
There’s nothing worse than turning the key and… nothing. Or worse—it starts sometimes and not others. I had this happen with my old truck, and at first I blamed the coil. But after testing it multiple ways, I realized the problem was deeper: a faulty ignition module hiding behind it.
Intermittent failure can also come from sensors like the crankshaft position sensor or wiring issues. If your coil checks out but the car still won’t start, don’t stop there—dig deeper into related components before buying new parts.
Faulty Wiring or Connections? Don’t Overlook the Basics
You could have the healthiest ignition coil in the world, but if the wiring’s fried or the connector’s corroded, it still won’t work. I once found a melted harness on a friend’s motorcycle that looked fine from the outside—until we wiggled the wire and saw sparks flying.
Always inspect connectors, wiring, and grounds closely. Use a wiring diagram (you can usually find these online or in a repair manual) to make sure power is getting where it needs to go. Sometimes the issue isn’t the part itself—it’s what connects to it.
When to Replace an Ignition Coil
So how do you know when it’s time to just replace it? Here are my red flags:
- Resistance readings way outside the normal range (primary: 0.4–2 ohms, secondary: 6,000–15,000 ohms)
- No spark during testing
- Physical damage like cracks, oil saturation, or burn marks
If any of those apply, it’s time for a new coil. And when choosing a replacement, I stick to reputable brands like Bosch, Denso, or Motorcraft. Cheap coils might save money now, but they often fail faster and cause more headaches later.
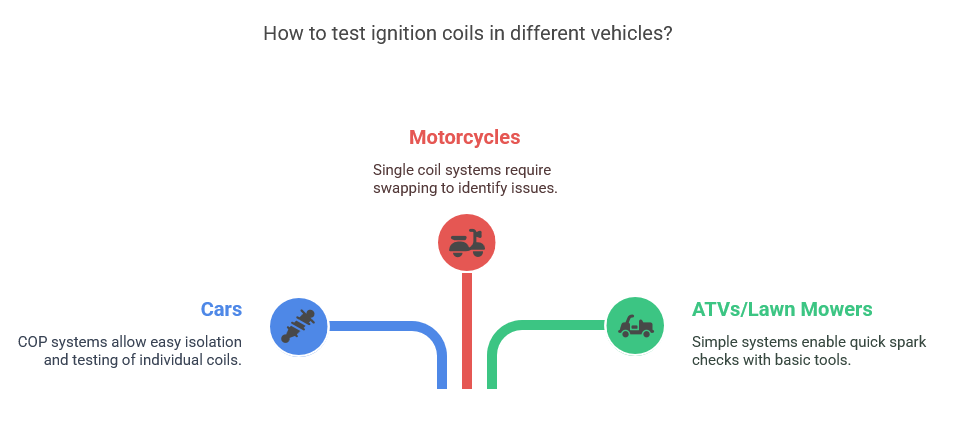
Testing Ignition Coils in Different Vehicles
Believe it or not, the basic way to test an ignition coil stays pretty much the same whether you’re working on a car, motorcycle, ATV, or lawnmower. The tools are similar—multimeter, spark plug tester, maybe a test light—and the goal is always the same: find out if the coil is sparking strong or quietly calling it quits.
But here’s the catch: different vehicles have different setups, and that affects how you approach testing. For example, most cars today use coil-on-plug (COP) systems, where each cylinder has its own coil. That makes testing easier—you can isolate one at a time without pulling a ton of parts. I remember helping my cousin check his 2005 Honda Accord—just pulled one COP, tested it, and found the bad one in under ten minutes.
On the flip side, motorcycles often use a single coil for two or more cylinders, especially older models. So when I was tuning up my old Yamaha XS650, I had to be careful—I couldn’t just blame one coil for both cylinders. I ended up swapping coils between sides to see if the misfire followed, which helped me narrow things down before even touching the multimeter.
Then there’s ATVs and lawn mowers , which usually have simpler systems—sometimes just one cylinder and a basic ignition coil. These are great for beginners because they don’t involve complex wiring diagrams or multiple modules. I once tested a riding mower coil using nothing but a screwdriver and a battery. No fancy tools, just a quick spark check. If it sparks, it lives. If not? Time for a new one.
Real-Life Scenarios – From My Garage to Yours
I’ve learned more about how to test an ignition coil from messing up than I ever did from reading a manual. Sometimes you just have to get your hands dirty—and maybe shock yourself once or twice—to really understand what works and what doesn’t. Here are two real-world stories from my own garage that might sound familiar.
Case Study: Testing a Motorcycle Ignition Coil
A few summers back, my buddy brought over his old dirt bike. It was running rough—sputtering at idle and dying under load. He’d already replaced the carb and checked the fuel tank, but nothing helped. I figured it was either the spark plug or the coil.
We started with a visual check—nothing obvious. Then we hooked up a multimeter. The primary resistance looked fine, but the secondary side was way off the chart. That told us the internal windings were shot. We swapped the coil, fired it up, and boom—it ran like new.
The big takeaway? Don’t skip the Ohm test. Just because it sparks doesn’t mean it’s working right. And on bikes, where space is tight and parts wear fast, testing an ignition coil at home can save hours of guesswork.
Case Study: Lawn Mower Ignition Issues
Now, not all fixes are high-tech. One spring, my push mower wouldn’t start no matter how many times I yanked the cord. I pulled the spark plug—looked good. Hooked up a test light—getting power. So next step? Test the ignition coil.
On small engines, it’s usually a simple setup. I used a screwdriver to check for spark by grounding it to the engine block while cranking. Nothing. Not even a flicker. Replaced the coil, and it fired right up.
What I learned here? Even basic machines need proper diagnostics. Don’t assume it’s just “old age” or a fuel issue. If you know how to test an ignition coil, you can avoid unnecessary part swaps or trips to the shop.
Lessons Learned from Trial and Error
Over the years, I’ve zapped myself, fried a meter or two, and replaced coils that didn’t need replacing—all because I rushed or skipped steps. But each mistake taught me something.
My advice? Take your time. Use the right tools. And don’t be afraid to double-check. Whether it’s a car, bike, or mower, the process stays mostly the same—you just adapt to the machine.
Because at the end of the day, testing an ignition coil isn’t about being a pro mechanic. It’s about knowing enough to fix what’s broken—and not throwing money at what isn’t.
❓ FAQs – Answering the Most Searched Questions
How do you know if your ignition coil is bad?
If your engine misfires, idles roughly, stalls, or won’t start, it could be a bad ignition coil. You might also see a check engine light or poor fuel economy. These signs often point to weak or no spark from the coil.
Can you test an ignition coil without a multimeter?
Yes. You can use a test light or perform a basic spark test with a spark plug tester. These methods help you see if the coil is producing power or spark without checking resistance directly.
What should the resistance be on an ignition coil?
Primary winding resistance should be between 0.4 and 2 ohms. Secondary winding should read between 6,000 and 15,000 ohms. If readings are way off, the coil may be faulty.
Can a bad ignition coil cause a misfire?
Yes. A failing ignition coil can cause one or more cylinders to misfire. This happens when the coil doesn’t send enough voltage to the spark plug to ignite the fuel-air mix.
Can you drive with a bad ignition coil?
Not safely. Driving with a bad ignition coil can damage other parts like the catalytic converter or cause the engine to stall. It’s best to test the ignition coil and fix the issue as soon as possible.
How much does it cost to replace an ignition coil?
Replacement costs vary by vehicle. DIY replacement can cost $50–$150 per coil. Labor at a shop adds $50–$100. Some COP coils cost more, especially for imports or high-end cars.
Conclusion – Stay Proactive, Save Time & Money
If you’re someone who likes to stay in control of your vehicle’s health and avoid costly repairs, learning how to test an ignition coil is one of the best things you can do. It’s not just about fixing what’s broken—it’s about knowing what’s not broken so you don’t waste time or money chasing ghosts.
I’ve saved myself countless headaches (and dollars) by taking a few minutes to check a coil before replacing it—or worse, ignoring it until it left me stranded. Whether it’s your daily driver, weekend motorcycle, or that old lawn mower that never starts when you want it to, a little knowledge goes a long way.
So next time your engine stumbles or stalls, don’t panic—grab your multimeter, spark plug tester, or test light, and see what’s really going on. And if you’ve got a story or a question, drop it in the comments below. I’d love to hear how you tackled your own ignition coil issue!