
This article was updated in July 12, 2026 with new products and information by Mark S. Taylor
Forget the generic service sticker pasted onto your radiator shroud. It is lying to you, or at least it isn’t telling you the whole mechanical story. The honest answer to “how often to flush coolant” splits into two completely different intervals depending entirely on the specific color and chemical formulation sitting in your cooling block right now.
Old-school green IAT coolant requires a complete flush every 30,000 miles or 2 years, full stop. Modern OAT and HOAT long-life coolants—such as Dex-Cool, Toyota Super Long Life, and Honda Type 2—are rated for 100,000 to 150,000 miles or 5 years by the chemical engineers who formulate them. Treating every coolant type the same means you will either waste money flushing a system that had another 70,000 miles of protection left, or leave a tired IAT fluid cooking your cylinder head gasket for three extra years.
Contents
- 1 What Happens When You Skip a Coolant Flush
- 2 Safety Notes Before Handling Coolant
- 3 Coolant Types & Their Actual Service Life
- 4 The Diagnostics: Testing Reserve Alkalinity and Voltage
- 5 Flush vs. Top-Off: Why They’re Not the Same Job
- 6 US Professional Shop Cost Metrics
- 7 The DIY Gravity Flush Pipeline: Step-by-Step
- 8 DIY Flush — Can You Do It Yourself?
- 9 Prevention & Ongoing Maintenance
- 10 FAQs About How Often to Flush Coolant
- 11 The Bottom Line
What Happens When You Skip a Coolant Flush
Electrolytic corrosion does not announce itself with a dashboard warning light. It works quietly on water pump seals until they weep, on radiator tubes until they pinhole, and on aluminum cylinder heads until you are looking at a $2,000+ repair bill instead of a preventative maintenance flush.
The Acidic Gasket Breakdown
I recently had a 2005 GM Impala roll into the shop bay with a rough idle and a faint, sweet chemical smell under the hood. The customer swore he had never experienced a cooling issue. Once I pulled the upper intake manifold, I found exactly what I expected: the composite intake gasket had been completely eaten through by acidic, degraded coolant, allowing the fluid to migrate straight into the combustion cylinders. That repair ran the owner north of $650 in labor alone. A standard $150 professional flush eighteen months earlier would have prevented the entire failure.
The Electrolysis Pin Hole
In another instance, a 2012 Chevy Silverado came in with a slow coolant loss that no other shop could locate—there was no puddle in the driveway and no obvious hose weep. When we pressure-tested the system, the needle dropped steadily. After pulling the water pump, we found the internal shaft bearing had completely seized due to aggressive electrolysis pitting on the impeller. Coolant was working past the internal seal and burning off invisibly against the hot exhaust manifold. That turned into a $420 water pump job caused entirely by stale chemistry.
Safety Notes Before Handling Coolant
- Thermal Pressure Danger: Never open a radiator cap or expansion tank petcock on a hot or warm engine. A pressurized cooling system at operating temperature operates at well over 200°F. It will release instant, scalding steam and boiling fluid upon opening. Let the engine sit cool for at least 45 minutes before servicing.
- Toxicity Protocols: Used engine coolant is highly toxic to pets and local wildlife. Ethylene glycol possesses a distinct sweet taste that attracts animals, and even a microscopic ingested amount is fatal. Always drain fluid into a sealed catch pan and recycle it at an auto parts store.
Coolant Types & Their Actual Service Life
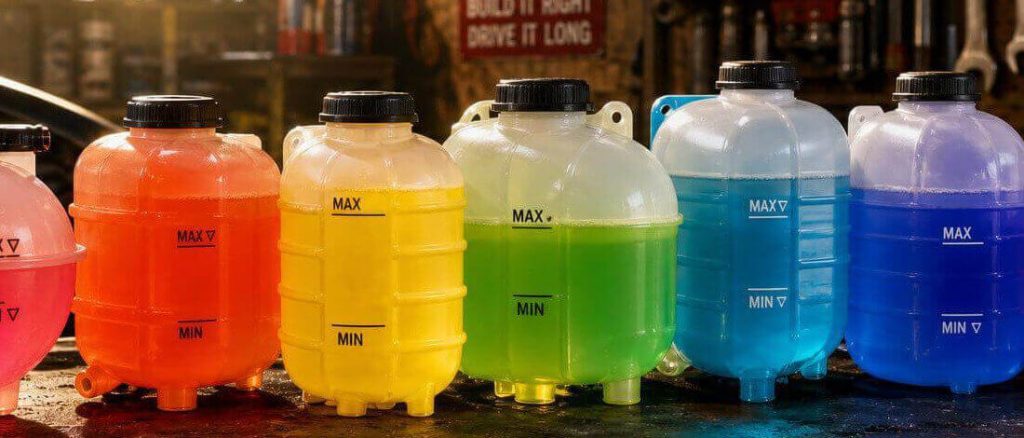
Color is merely a dye hint, not definitive mechanical proof. Systems frequently get mixed or topped off with whatever was cheap on the retail shelf by previous owners.
| Coolant Formulation Type | Common Dye Color | Primary Internal Chemistry | Real-World Service Interval |
| IAT (Inorganic Additive Technology) | Green | Silicate and phosphate-based inhibitors | 30,000 Miles / 2 Years |
| OAT (Organic Acid Technology) | Orange (Dex-Cool) | Organic acid corrosion inhibitors | 100,000–150,000 Miles / 5 Years |
| HOAT (Hybrid Organic Acid) | Yellow / Pink / Turquoise | Silicate and organic acid hybrid blend | 60,000–100,000 Miles / 5 Years |
| P-HOAT / Si-OAT (Asian Market Fill) | Pink / Blue | Phosphate or silicate hybrid matrix | 60,000–100,000 Miles / 5 Years |
The Diagnostics: Testing Reserve Alkalinity and Voltage
Mileage and years are simply baseline approximations. What actually kills engine coolant is additive depletion. The silicate and phosphate packages designed to fight corrosion get chemically consumed over time. Once they are spent, the coolant shifts from an engine protector into an acidic asset destroyer.
To check your fluid accurately without guessing, use these two technician tests:
1. The pH Chemical Test Strip
Dip a dedicated cooling system pH test strip directly into the radiator filler neck. A healthy, protected system should read firmly between 8.3 and 10.5. If the test strip drops below 7.0, the fluid has turned acidic and must be flushed out immediately.
2. The Digital Multimeter Stray Current Test
Touch your digital multimeter’s black ground lead to the negative (-) battery terminal, and submerge the red positive lead directly into the liquid coolant at the radiator neck while the engine is running at operating temperature.
- A healthy system will read under 0.3 Volts.
- If your meter displays 0.5 Volts or higher, you have dangerous stray current—electrolysis—actively eating your aluminum engine block, water pump impeller, and radiator core from the inside out.

Flush vs. Top-Off: Why They’re Not the Same Job
Topping off a low coolant reservoir with a fresh jug does absolutely nothing to revive the depleted, acidic chemistry already circulating deep inside your engine block. You are simply diluting bad fluid with good fluid. A proper flush displaces the spent volume entirely.
The Two Service Tiers:
- The Machine Fluid Exchange: A professional machine flush hooks directly into your vehicle’s primary radiator lines, utilizing a pressurized exchange pump to displace 90% to 95% of the old fluid across the engine block, radiator, and heater core simultaneously.
- The Gravity Drain-and-Fill: This traditional driveway method simply opens the bottom radiator petcock valve. While easy, gravity alone cannot drain the fluid trapped behind the engine block thermostat or inside the low heater core lines, leaving 20% to 30% of the old, contaminated coolant trapped inside the vehicle.
US Professional Shop Cost Metrics
| Service Tier / Vehicle Scope | Average Parts & Fluid Cost | Professional Shop Labor Hours | Total Real-World Shop Bill |
| DIY Driveway Gravity Drain | $25 – $45 (Coolant & Distilled Water) | N/A (Driveway Time) | $25 – $45 |
| Independent Shop Gravity Drain | $25 – $45 | 0.5 – 0.8 Hours | $90 – $150 |
| Independent Shop Machine Flush | $30 – $55 | 0.7 – 1.0 Hours | $140 – $210 |
| Dealership OEM Machine Flush | $35 – $65 (OEM Fluid) | 0.8 – 1.2 Hours | $180 – $280 |
The DIY Gravity Flush Pipeline: Step-by-Step
Necessary Tools & Supplies:
- Fresh, vehicle-specific 50/50 pre-diluted coolant
- Several gallons of distilled water (Never use tap water, as the minerals induce rapid scale buildup)
- A 2-gallon minimum capacity fluid drain pan
- A cooling system spill-free funnel kit
1. Verify Cold Engine Status: Under 5 min.
Ensure the car has been shut off for at least an hour. Check that the upper radiator rubber hose feels completely soft and cold before removing the primary radiator pressure cap.
2. Open the Lower Petcock Valve: 10 min.
Position your drain pan directly underneath the bottom corner of the radiator. Locate the plastic petcock thumb screw, rotate it open slowly, and allow the old coolant to drain completely out of the radiator frame.
3. Execute a Distilled Water Cycle: 15 min.
Close the petcock valve tightly. Fill the radiator neck completely with pure distilled water. Start the engine, turn the cabin heater to maximum blast, and let the car idle for 10 minutes until the thermostat opens. Shut the engine off, let it cool, and drain the water out. Repeat this step until the drained fluid runs crystal clear.
4. Refill and Purge Trapped Air Blocks: 15 min.
Close the petcock one final time. Attach a spill-free funnel to the radiator neck and pour in your fresh 50/50 pre-diluted coolant slowly. Start the engine with the radiator cap off. As the engine reaches operating temperature, squeeze the upper radiator hose periodically to force trapped air bubbles up through the funnel. Once the bubbling stops completely and the fluid level stabilizes, lock the radiator pressure cap back into place.

DIY Flush — Can You Do It Yourself?
A basic gravity drain-and-fill is highly safe for most driveway DIYers with basic hand tools. However, the exact phase most people botch is bleeding the trapped air out of the engine block afterward. An air pocket sitting stagnant against the cylinder head will read as overheating on your dashboard gauge even though the main block itself is flooded with fluid.
When to Skip DIY: If your vehicle is a European platform (such as a BMW inline-six or Audi setup) that utilizes a pressurized electric water pump or multiple block-mounted bleed screws, skip the driveway layout. Getting the complex bleeding sequence wrong traps localized air blocks that mimic a blown head gasket for months. Leave these specific platforms to a dedicated shop with an air-evacuation vacuum tool.
Prevention & Ongoing Maintenance
Reserve alkalinity depletes up to twice as fast in cooling networks that consistently operate under severe heat cycles. Trucks that regularly tow heavy loads, commuter cars trapped in stop-and-go gridlock, or older vehicles with marginal cooling fans will burn through their additives far quicker than the factory mileage chart suggests.
Build a simple annual maintenance protocol around these steps:
Pressure Cap Inspections: Inspect the radiator cap’s integrated rubber seal yearly for hardening, rot, or micro-cracking. A cap that cannot seal down to its exact pressure rating lowers the entire boiling point of the engine.
Annual Conductivity Checks: Test your pH or voltage levels once a year regardless of mileage. It costs nothing but five minutes and catches corrosive depletion early.
Monthly Cold Level Checks: Track your expansion tank levels monthly. Chronically low fluid confirms an active internal engine consumption or a pinhole pressure weep.
FAQs About How Often to Flush Coolant
Can I mix different coolant colors or types?
No. Mixing OAT and IAT coolants can cause the additive packages to react and form a gel that clogs radiator passages and heater cores. If you don’t know what’s in your system, a full flush before adding anything different is the safe move.
Does coolant that still looks clean mean it’s still good?
No. Additive depletion happens chemically before it shows up visually. Color and clarity are not reliable indicators of remaining protection — test pH or conductivity instead.
Can I just use water instead of coolant in an emergency?
Only as a short-term measure to get home. Straight water has no corrosion inhibitors and a much higher freeze point, and running it long-term accelerates the exact corrosion this whole article is about.
Is it safe to flush coolant myself, or does it need a shop?
A basic gravity drain-and-fill is safe for most DIYers with the engine cold and the right catch pan for disposal. Systems with a dedicated bleed valve, common on European makes and BMW inline-sixes, are better left to a shop since an incorrect bleed sequence traps air that mimics an overheating problem.
What happens if I keep driving on old, depleted coolant?
The corrosion inhibitors run out first, silently, while the coolant still looks and functions normally in terms of temperature control. Once that happens, electrolytic corrosion starts working on your water pump seal, radiator core, and eventually the aluminum head, turning a $150 flush you skipped into a $650–$2,000+ repair down the line.
The Bottom Line
Run your service intervals based on your vehicle’s actual factory coolant chemistry, not a generic mileage sticker. Green IAT fluids require prompt attention every two years, while modern HOAT formulations can safely run much longer. Skip this cheap preventative maintenance task, and you are simply financing a future cylinder head gasket tear-down.
Cooling Diagnostics & Calibration: If your cooling system service has triggered unexpected dashboard indicators or left your vehicle’s engine computers displaying fault codes during air pocket purges, check our master workshop guide onHow to Read Check Engine Light Codes Without a Scannerto clear historical codes. For alternative fueling imbalances or tracking down complex mechanical problems under the hood, read our in-depth diagnostic analysis onWhy an Engine Runs Rich.