
This article was updated in November 1, 2025 with new products and information by Mark S. Taylor
I’ll never forget my first try. I used a metal screwdriver to pry my dash. I left a big, ugly scratch. It can feel like a hard job. You might worry you will mess it up. But trust me, you can do this. I learned how to install a car stereo the hard way, so you don’t have to. This guide will walk you through each step. My goal is to give you the faith to do it yourself. Let’s get started!
Contents
- 1 Before You Cut a Single Wire: The Prep Work That Saves Time
- 2 Choosing the Right Stereo: Single DIN vs. Double DIN
- 3 The Golden Rule: Disconnect Your Battery!
- 4 The Main Event: Your Step-by-Step Installation Guide
- 5 Testing the New Stereo
- 6 Hooking Up a Backup Camera
- 7 But What About My Steering Wheel Controls?
- 8 Help! My Car Has a Factory Amp (Factory Amp)
- 9 Troubleshooting: “My Stereo Has No Sound!”
- 10 DIY vs Hiring a Pro
- 11 Car Stereo Installation Cost
- 12 Common Mistakes to Avoid
- 13 FAQs About Car Stereo Installation
- 14 My Final Thoughts on How to Install a Car Stereo
Before You Cut a Single Wire: The Prep Work That Saves Time
Installing a car stereo can be easy, but only if you prep right. Trust me, I’ve learned this the hard way. I’ve made mistakes—like using a butter knife to remove trim pieces (don’t do it!). The right tools and preparation save time and frustration. Here’s what you need before you start.
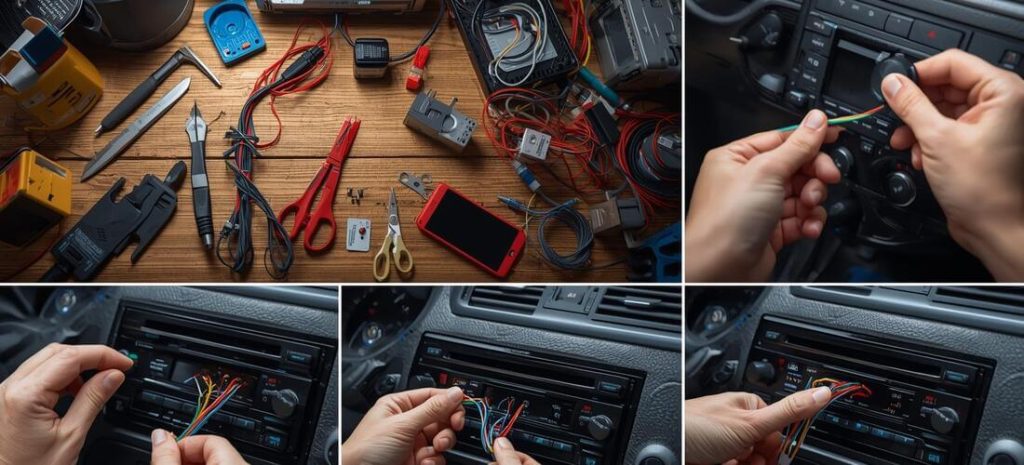
Gather Your Tools: My Go-To Kit
Let’s talk about tools. This step is key. It can make your job fun or make you want to quit. I learned this the hard way. I tried to use a knife to pop off my dash. It was a bad move. It left a bad scratch. It cost me cash to fix. Do not be like me. Get the right gear first. It will save you time and stress.
Essential Tools:
Panel Removal Tools
What are these tools? They are safe plastic pry bars. They help you take your car’s trim off. They will not scratch or break your plastic parts. I use mine all the time. They are a must-have.
Socket Set
Why do I need a socket set? Your old radio is held in with bolts. A simple set will take them out fast. You will likely need a 10mm socket. It is the most common size for this job.
Wire Strippers
What do wire strippers do? They strip the plastic off wires. This lets you join them to your new radio. A good set also has a crimper. This makes a strong, safe link for your power and sound.
Multimeter
What is a multimeter for? It checks for power in a wire. It is a safe way to test things. It tells you if a wire is “hot” or “live.” This tool helps you avoid big mistakes.
Highly Recommended:
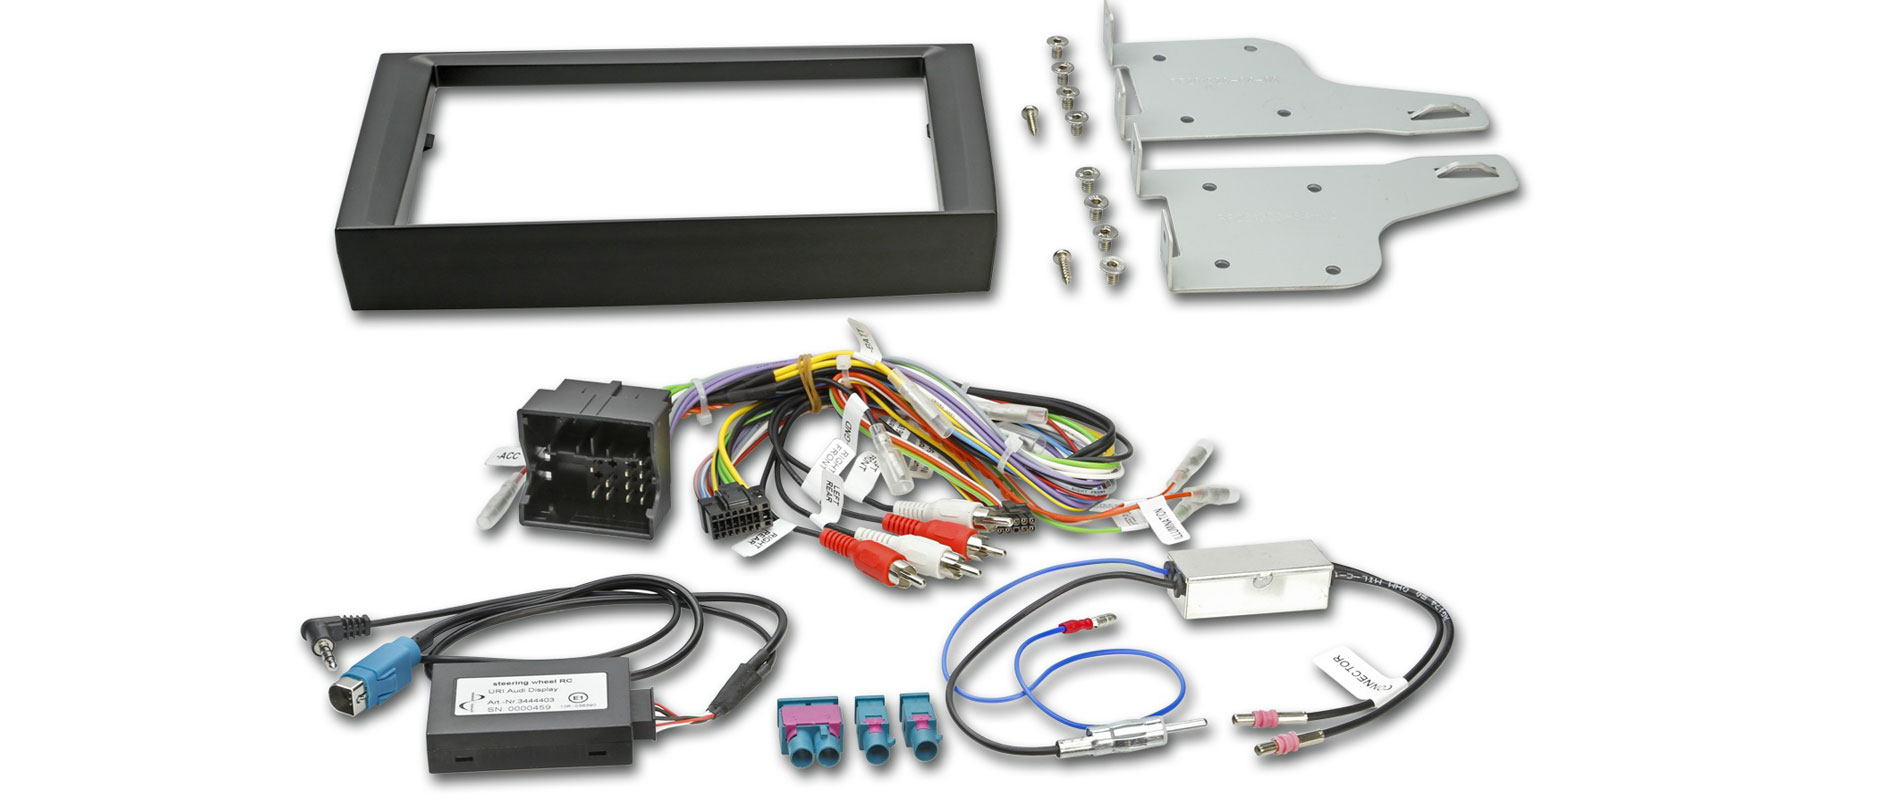
Wiring Harness
What is a wiring harness? It is a plug that links your new radio to your car. It is a huge time saver. You do not cut any of your car’s real wires. This makes the job safe and easy to undo later.
Dash Kit
Why get a dash kit? It helps your new radio fit in the hole. It fills in the gaps around it. This makes your new radio look clean and factory-fitted. It is a small part that makes a big difference.
Steering Wheel Control Box
What if I have buttons on my wheel? You need this small box. It lets your new radio talk to your car. It makes the volume and seek buttons work again. Without it, your wheel buttons will not do a thing.
Choosing the Right Stereo: Single DIN vs. Double DIN
Picking a new stereo is fun. But what size do you need? I bought the wrong one once. It was a real pain. So let’s get it right for you. Think of DIN sizes like shoe sizes. Your car has a size. The stereo must fit. There are two main sizes. They are Single DIN and Double DIN.
Single DIN: The Small One
This is the small, standard size. It is about 2 inches tall. It is about 7 inches wide. What is a Single DIN radio? It’s the classic, slim radio you see in many cars. It is great for a simple, clean look. Some even have a screen that pops out.
Double DIN: The Big One
This is the larger, modern size. It is about 4 inches tall. It is about 7 inches wide. What is a Double DIN radio? It’s the big screen made for touchscreens and GPS. It gives your car a cool, updated feel. Most new cars use this size.
How to Check Your Car’s Size
This is the easy part. You just need a tape measure. How do I know what stereo fits my car? Measure the hole in your dash. First, measure the height. Then, measure the width. If the hole is about 2 inches tall, you need a Single DIN. If it is about 4 inches tall, you need a Double DIN. It is that simple.
The Golden Rule: Disconnect Your Battery!
This is my golden rule. It is the most important step. I never skip it. Ever. I once saw a friend make a big spark. He blew a fuse. It scared us both. Why should you disconnect your car battery? To keep yourself and your car’s parts safe from harm.
Why This Step is So Important
Think of it like this. Your car’s battery is a big power source. When you touch a wire to metal, it can make a spark. That spark is called a short. A short can hurt you. It can fry your new radio. It can even hurt your car’s main brain. What does disconnecting the battery prevent? It stops bad power flows before they can happen.
How to Disconnect Your Battery in 3 Easy Steps
This is so simple. It takes less than a minute. It gives you peace of mind.
- Find the Battery: Pop the hood of your car. The battery is a big box with two posts on top. One post is red with a plus (+) sign. The other is black with a minus (-) sign.
- Loosen the Nut: Get your 10mm wrench. Put it on the black post’s nut. This is the negative side. Turn it to the left until it is loose.
- Move the Cable: Slide the black cable off the post. Tuck it to the side so it can’t touch metal again. You are all set! How do you disconnect a car battery? Use a 10mm wrench to loosen the nut on the black, negative side and move the cable.
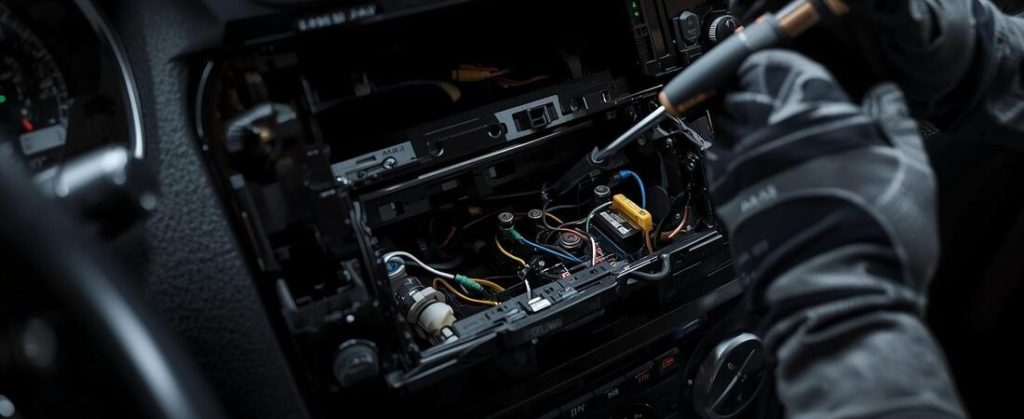
The Main Event: Your Step-by-Step Installation Guide
Okay, it is time for the fun part. Let’s put that new radio in your car. I will walk you through it. Just take your time. You can do this. How do you install a car stereo? You do it in five simple steps.
Remove the Factory Trim Panels
First, we need to take off the plastic trim. This is the part around your old radio. My big tip is to work slow. Be gentle. Start at the bottom. Pry the trim outwards. You will hear a little pop. That is just a clip letting go. It is a good sound. How do you remove car dash trim? Use a plastic tool to gently pry it off, starting from the bottom.
Unbolt and Remove the Old Stereo
Now you can see the old radio. It is held in by bolts or screws. Find them and take them out. Your radio will slide right out. Some cars use special keys. They are called DIN keys. They are little metal T-shaped tools. You slide them into the small holes on the side of the radio. This unlocks it so you can pull it out. What are DIN keys for a car stereo? They are special tools used to pull a radio out of the dash.
The Wiring – Don’t Fear the Rainbow!
This part sounds scary. It is not. I promise. We will make it easy.
Remember that wiring harness I told you about? This is its time to shine. It plugs right into your car’s factory plug. This means you do not cut any of your car’s wires. It is a safe and clean way to connect things. What is a wiring harness for? It lets you connect your new radio without cutting your car’s original wires.
Connecting Wires: Color by Color
Your new radio has its own harness with wires. You will connect these to the adapter harness. Just match the colors. It is that easy. Yellow to yellow. Red to red. Green to green. What do the main car stereo wires do?
- Yellow Wire: This is the memory wire. It gives the radio a little bit of power all the time. This is so your radio can save your settings.
- Red Wire: This is the power wire. It only gets power when your car key is on. This is how you turn the radio on and off.
- Black Wire: This is the ground wire. It connects to a metal part of your car’s frame. It makes the whole system work safely.
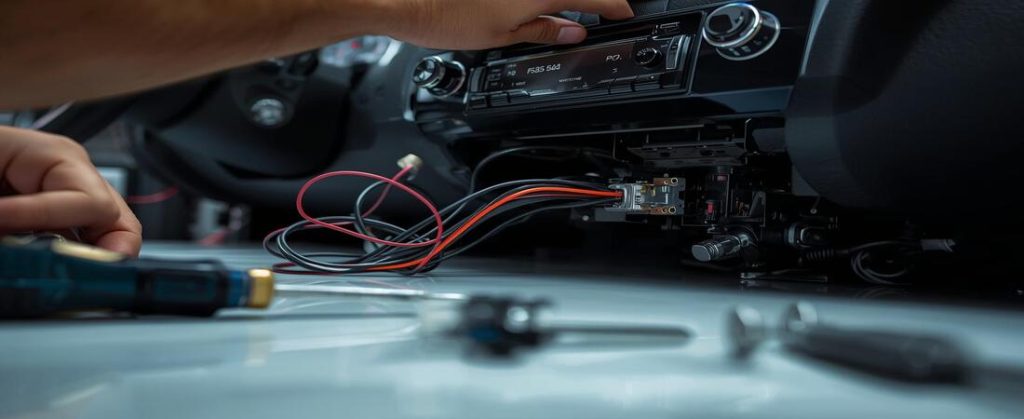
Mount the New Stereo and Dash Kit
Now, put your new radio into its new home. Slide it into the metal sleeve or the dash kit. It should click into place. My pro-tip is super important. Before you push it all the way in, hook the battery back up for a second. Test the radio. Make sure it has power and the sound works. It is much easier to fix a wire now than after it is all bolted in. Should I test my new stereo before I install it? Yes, always test it before you bolt it in place.
Final Assembly and Reconnection
You are so close! If the test worked, unplug the battery again. Now, bolt the new radio into the dash. Make sure it is snug. Next, carefully snap the trim panels back on. They should pop right into place. Last, go back to the battery. Reconnect the black negative cable and tighten it. You did it! What is the last step of a car stereo install? Reconnecting the car’s battery.
Testing the New Stereo
This is the best part. It is time to test your new radio. This step shows if your hard work paid off. How do you test a new car stereo? You check a few key things.
First, turn your car key to the “on” spot. The screen on the radio should light up. This is a great sign! Next, play some music. Do you hear sound from all the speakers? If you have Bluetooth, link your phone now. Make a quick test call. See if you can be heard. Last, press the buttons on your steering wheel. Make sure they still work.
I will never forget my first time. I put the radio in. I turned the key. And nothing. The screen was dark. It was dead. My heart sank. I thought I broke it all. I took it back out, feeling so sad. The problem was a dumb mistake. I forgot to hook up one wire. It was the black ground wire. I clipped it to some metal. I put it back in. And it worked! This is a big reason a new car stereo will not work.
If you have a problem, do not worry. It is often an easy fix. This is stereo installation troubleshooting. If the radio will not turn on, check your car’s fuses. Also, check that the black ground wire is on clean metal. If the radio has power but no sound, check the speaker plugs. Make sure the blue and white wire is hooked up. A small fix can solve the problem.
Hooking Up a Backup Camera
How do you do backup camera integration? You mount a small camera on the back of your car. Then, you run a long wire from it to the front. This wire plugs into the back of your new radio. Now, when you put your car in reverse, the radio screen will show you what is behind you. It is a great safety feature.
For me, these features are a must. I love my Bluetooth for music. I use my backup camera every single day. My biggest struggle was the steering wheel control box. It took me a minute to get it set up right. But once I did, it felt like magic. It made the new radio feel like it truly belonged in my car.
But What About My Steering Wheel Controls?
This is a big question. Your new radio is in. But the buttons on your wheel are dead. I felt the same way. It is a letdown. How do you fix steering wheel controls? You need a special part. It is an interface module. Think of it like a translator. Your car speaks one language. The new radio speaks another. This box helps them talk to each other.
I use a brand called Axxess. PAC is also great. You must find the one made for your car. A good car audio store can help you pick the right one. Or you can look it up online. What is the best steering wheel control interface? The best one is the one made for your car’s model and year.
Help! My Car Has a Factory Amp (Factory Amp)
What is a factory amp? It is a second power box. Its only job is to make your speakers loud. This makes the job a bit harder. Your new radio needs to work with this extra box. How do you install a car stereo with a factory amp? You need to connect it the right way.
You have two ways to fix this. One is hard. One is easy. The hard way is to bypass the amp. This means running new wires to every speaker. I do not suggest this for your first time. The easy way is to use another module. This module plugs in and makes it all work. I think this is the best way for most people.
Troubleshooting: “My Stereo Has No Sound!”
The radio turns on. The lights are on. But you hear nothing. It is so quiet. Do not worry. We can fix this. Let’s check a few things. This is my quick list for stereo installation troubleshooting.
- Is the ground wire on tight? It must touch clean metal. Paint or rust can stop it from working. A bad ground is a very common problem.
- Did you hook up the blue and white wire? This is the amp turn-on wire. It tells your car’s amp to wake up. If this wire is not connected, you will get no sound.
- Check your fuses. Your car has many small fuses. One might be blown. Look for the fuse box in the car and under the hood. A blown fuse is an easy fix.
DIY vs Hiring a Pro
Doing your own car stereo install can feel great. I did mine and saved money. It took time and patience, but I learned a lot. Hiring a pro is faster and easier. They get the job done cleanly and quickly.
If your system has tricky wiring or smart features, a pro is best. They have the tools and skills for it. Also, pros often offer a warranty. It helps if something goes wrong later. In the end, choose what fits your skills, time, and budget.
Car Stereo Installation Cost
When I installed my first car stereo, I was curious about the cost. Doing it yourself can save money—you mostly pay for parts like the stereo and wiring kit. A basic install might cost between $50 and $150 for parts. If you want a Bluetooth upgrade, expect to spend a bit more, usually around $100 to $300. Touch screen systems can run $300 and up, especially with extra features.
Hiring a professional adds labor fees, which vary by location. If you search car stereo installation cost near me, prices often range from $100 to $300 just for the install. In my experience, DIY works well for simple setups, but pro help is worth it for complex systems or tight timelines.
Common Mistakes to Avoid
The biggest mistake is forgetting to disconnect the battery first. I did that once and blew a fuse. It was a costly lesson. Also, mismatched wires cause problems. Match wire colors carefully to avoid trouble.
Skipping the wiring harness is another error. It helps keep wires neat and safe. Poor mounting can make your stereo rattle or fall out. I made sure to secure mine tight. This saved me from noise and extra work.
FAQs About Car Stereo Installation
Q1: Can I install a car stereo myself?
Yes, you can. It is a great DIY job. You just need the right tools and a guide. If you take your time, you can do it. It is a fun way to upgrade your car’s sound.
Q2: What is the average cost to install a car stereo?
The cost can change a lot. It depends on the stereo you pick. If you do it yourself, you just pay for parts. A pro will charge for parts and work. The work can cost from $100 to $250.
Q3: How much does it cost for Best Buy to install a car stereo?
Best Buy can install a stereo for you. Their team is called the Geek Squad. The cost is about $100 for a basic job. A hard job will cost more. You should check their web site for the final price.
Q4: Is it cheaper to install a car radio yourself?
Yes, it is much cheaper to do it yourself. You save all the money on labor. You only pay for the new radio and parts. A pro can charge over $100 just for the work.
Q5: How long does it take to install a car stereo?
For your first time, it can take two to three hours. If you have done it before, it can be as fast as one hour. The time it takes can change. It depends on your car and the new stereo.
[su_youtube url=”https://www.youtube.com/watch?v=Z94N-_nZDpI” width=”200″ height=”90″]
My Final Thoughts on How to Install a Car Stereo
If you’re someone who enjoys DIY projects and wants to save money, installing your own car stereo is a great choice. But, if you’re short on time or don’t want the hassle, getting it professionally installed might be the way to go. Based on my own experience, taking it slow and following each step carefully really pays off.
It’s like putting together a puzzle—everything clicks into place, and the reward is huge. When you power up your new stereo, you’ll feel a great sense of pride. Plus, you can show it off to your friends and family!