
This article was updated in August 24, 2025 with new products and information by Mark S. Taylor
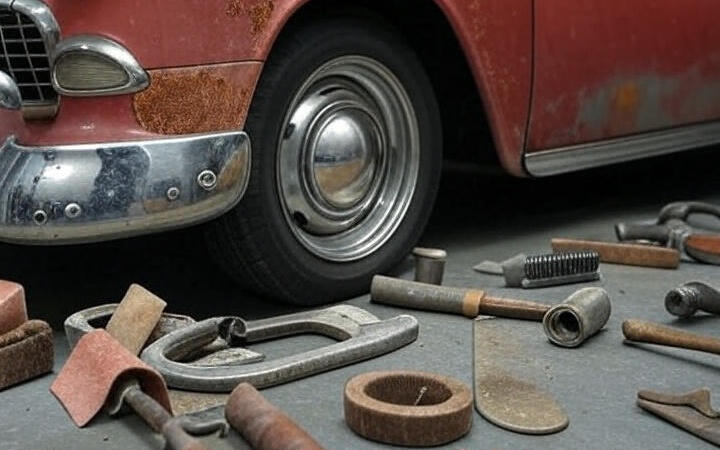
I’ll never forget the sinking feeling I had while cleaning out the garage and discovering rust eating away at the quarter panel of my ’65 Mustang. A local body shop quoted me nearly $3,000—a figure that felt like a death sentence for my project. But that major setback ended up being a $300 fix I tackled myself. Rust is the biggest threat to our classic cars, but it doesn’t have to drain your wallet. This guide is dedicated to affordable vintage car body rust repair, a crucial skill in the world of Auto Repair for Classic Cars. I’ll show you the exact budget-friendly methods and tools you can use to fix everything from minor surface rust to gaping rust holes, restoring your car’s integrity and value. Let’s get your hands dirty and bring that timeless classic back to its former glory.
Contents
Understanding the Enemy: The Three Stages of Rust
If you’re a classic car owner, rust is the enemy you know all too well. But not all rust is created equal. Knowing how to identify the different types makes a huge difference in how you approach repairs and can save you from costly mistakes. I once ignored what I thought was minor rust on a fender, and that small oversight snowballed into a $500 professional repair that I could have easily avoided.
Let’s break down the three main types of rust you’ll find, so you don’t make the same mistake I did.
Stage 1: Surface Rust (The Easy Fix)
This is the most common and least threatening type of rust. It’s that light, orange, flaky layer that appears on the top layer of paint or bare metal, often on lower body panels, wheel wells, or stone chips.
The Good News: It hasn’t penetrated the metal’s structure yet.
The Plan: Fixing surface rust is a perfect DIY job. All you need is some sandpaper or a wire brush to remove the flaky bits, a quality rust converter to neutralize what’s left, and a fresh coat of primer and paint to seal the metal from moisture.
Quick Tip: Tackle surface rust the moment you see it. A 30-minute fix today prevents a weekend-long repair job six months from now.
Stage 2: Scale Rust (The Warning Sign)
This is what happens when surface rust is left to fester. You’ll see pitting in the metal, and the texture will be rough and crusty. Moisture has started to settle in, and the rust is beginning to compromise the metal’s strength.
The Bad News: The metal is starting to be eaten away.
The Plan: Sandpaper won’t be enough here. You’ll need a wire wheel on a drill or grinder to get down to clean metal. After cleaning, treat it with a more aggressive rust remover or converter before considering a thin layer of body filler to smooth out the pitting.
Quick Tip: If you see bubbling under your paint, it’s a classic sign of scale rust hiding underneath. Don’t ignore it—the problem is always worse than it looks.
Stage 3: Penetrating Rust (The Serious Threat)
Penetrating rust is the final stage—the enemy is through the gates. This is when the rust has eaten completely through the metal, creating actual holes and weak, brittle spots. You’ll find this on neglected panels or in areas that trap water, like the lower fenders, rocker panels, or car frame.
The Ugly News: This is now a structural and safety issue.
The Plan: This is no longer a simple sanding job. The only proper fix is to cut out the rotted metal completely. You will need to either weld in a new patch panel or, for severe damage, go for a full body panel replacement.
Quick Tip: If you discover penetrating rust on your car’s frame, stop and get a professional assessment immediately. Frame rust can make a vehicle unsafe to drive.
Your Best Defense: How to Spot Rust Early
The key to winning the war on rust is early detection. Once a month, give your car a thorough inspection. A flathead screwdriver can be your best friend—gently probe any suspicious spots. If it feels soft or flakes away easily, you’ve found rust.
Focus on these five hotspots:
Underbody & Frame – Check the rails and floor pans, especially in corners where dirt and moisture collect.
Wheel Wells – They are constantly blasted with water, salt, and mud.
Quarter Panels & Rocker Panels – Look behind the wheels and along the bottom of the car.
Door Seams & Drip Rails – These channels are designed to direct water, but they can easily clog and trap it.
Around Windshields & Windows – Old rubber seals can crack, allowing water to seep in and sit on the metal.
Why Rust Repair is Crucial for Classic Cars
Rust isn’t just a cosmetic issue—it’s a threat to your car’s performance and safety. If left untreated, even small rust spots can weaken the metal and cause major problems down the road. As a classic car owner, I’ve learned the hard way that rust can slowly eat away at your car’s structure, and fixing it early can save you a lot of money in the long run.
The most common areas for rust on vintage cars are body panels, quarter panels, and the car frame. These areas are exposed to the elements and are prone to trapping moisture. The frame is especially important since rust here can affect the car’s strength and make it unsafe to drive. If rust spreads to body panels or quarter panels, the repair costs can go up quickly, and in some cases, you may need to replace entire panels.
Neglecting rust is like ignoring a small crack in a wall—it can start off small, but if you don’t address it, the damage can grow. Fixing rust early on is much cheaper than dealing with larger problems later. Left unchecked, rust can damage your car to the point where you’ll need major repairs like welding or car frame rust repair, which can easily run into the thousands.
Common Rust Issues in Classic Cars
Rust is one of the most common issues classic car owners face. It can range from a minor inconvenience to a serious problem that impacts the car’s safety and performance. Let’s look at the different types of rust and how they affect your car.
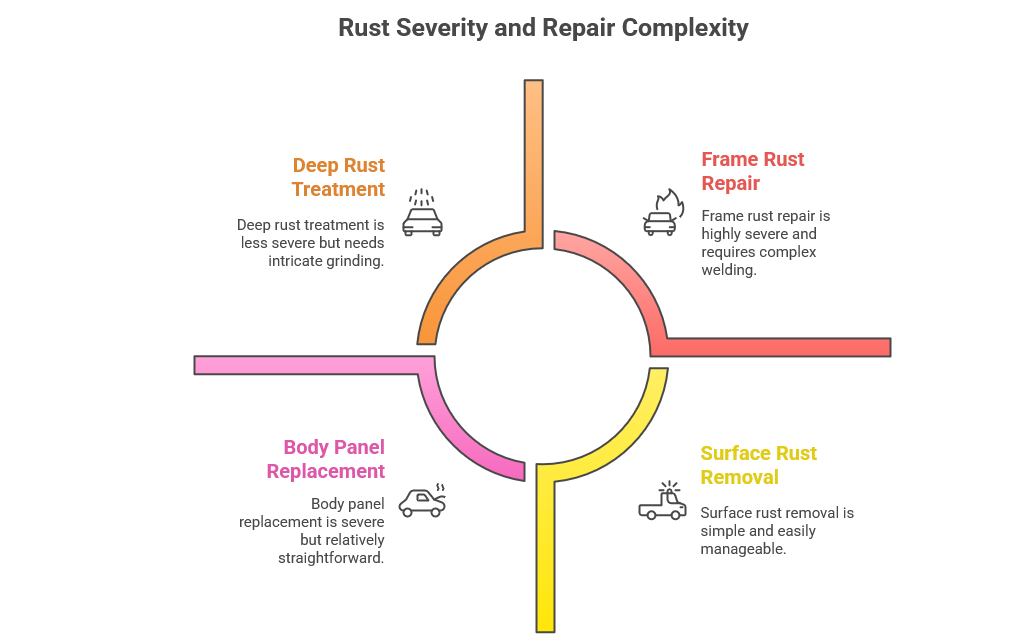
Surface Rust vs. Deep Rust: Understanding the Severity
Surface rust is the easiest to deal with. It looks like a light, flaky layer of rust on the surface of the metal. It’s usually caused by exposure to moisture or salt. Thankfully, surface rust is simple to fix. A little sandpaper, a wire brush, and a good rust converter can handle it. You can usually tackle this yourself.
Deep rust is more serious. It happens when surface rust is left untreated for too long. It eats deeper into the metal and creates pitting. This type of rust requires more work to fix. You’ll need to grind down the area, treat it with rust remover, and sometimes use filler to smooth it out. The longer you wait, the harder and more expensive it gets to fix.
Rust on Body Panels: Why Early Repair is Critical
Rust on body panels is a common problem, especially on lower parts like fenders and quarter panels. These areas are more exposed to water, road salt, and debris, which makes them more prone to rust. If you don’t fix it early, the rust can spread and weaken the metal, leading to bigger repairs or even needing a full panel replacement. It’s much cheaper and easier to handle small rust spots before they become a bigger problem.
Rust on Car Frame: The Serious Issue
Rust on the car frame is a big deal. The frame supports the entire car, so rust here can affect the car’s safety. If the frame is rusted through, it can make the car unsafe to drive. Fixing frame rust usually means cutting out the damaged sections and welding in new metal. This is not a simple job and should be done by a professional. If you find rust on the frame, get it checked out right away.
Rust Holes and Filler Solutions: Patching Up the Damage
Rust can sometimes create holes in the metal, especially if it’s been left untreated for a while. For smaller holes, body fillers are a good solution. They can be applied to fill the holes, shaped, and sanded smooth. For larger holes, you might need to use sheet metal to replace the damaged area. Addressing rust holes quickly will prevent further damage and keep your car safe and looking good.
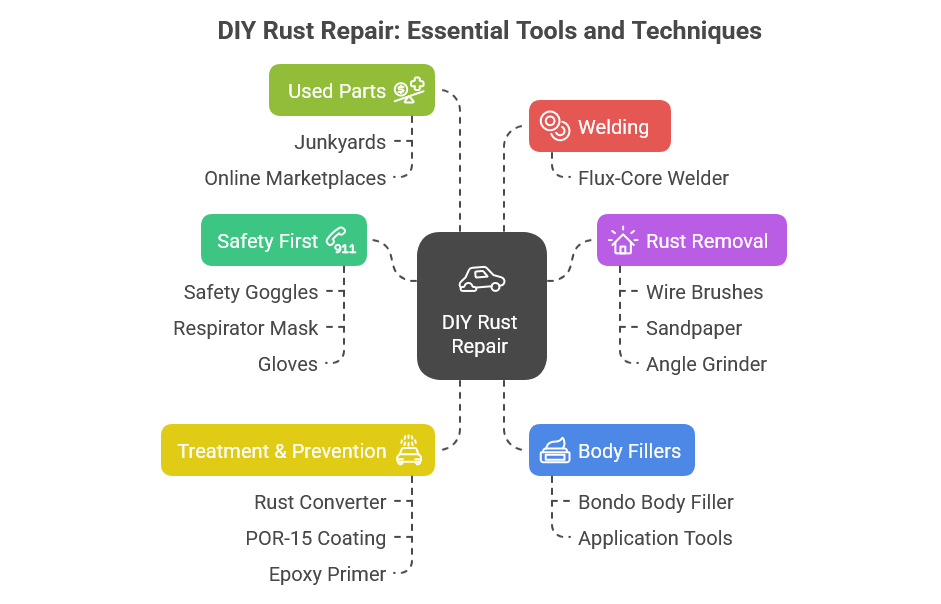
Your DIY Arsenal: Essential Tools for Budget-Friendly Rust Repair
You don’t need a professional workshop to win the war on rust. For less than the cost of one shop visit, you can build a capable arsenal for most DIY vintage car rust repair projects. Let’s walk through the essential gear, organized by each step of the job.
1. Safety First: The Non-Negotiables
Before you even touch the car, gear up. Rust dust, metal particles, and chemical fumes are no joke.
- Safety Goggles (~$10)
Protect your eyes from flying debris. - Respirator Mask (~$25)
A quality N95 or P100 respirator is crucial to avoid inhaling harmful dust and particles. - Gloves (~$10)
Protect your hands from sharp metal and chemicals.
2. The Attack Phase: Rust Removal Tools
This is where the work begins. Your choice of tool depends on the severity of the rust.
- Wire Brushes (~$10)
A must-have for scrubbing away light surface rust and cleaning tight seams. - Sandpaper (~$15 for an assortment)
Start with a coarse 80-grit to remove rust, and finish with 180-220 grit to smooth the metal before priming. - Angle Grinder (~$50)
For scale or penetrating rust, this is your best friend. A decent model paired with a wire wheel or flap disc attachment will strip rust and old paint down to bare metal in seconds.
3. Treatment & Prevention: Converters and Primers
Once the rust is gone, you need to make sure it never comes back.
- Eastwood Rust Converter (~$25/bottle)
Instead of removing every last speck, this chemical product converts remaining rust into a stable, black, paintable surface. It’s a huge time-saver for antique car restoration. - POR-15 Rust Preventative Coating (~$50/quart)
This is a legendary product in the classic car world. It’s a bit pricier, but for crucial areas like the frame or floor pans, POR-15 provides an almost bulletproof seal against future corrosion. - Epoxy Primer (~$30/can)
After treating the rust, a high-quality epoxy primer acts as a final, waterproof barrier, creating the perfect base for paint.
4. The Finish: Body Fillers
For pits and holes left by rust, body filler is your go-to for a smooth finish.
- Bondo Body Filler (~$20/quart)
There’s a reason Bondo is famous. According to thousands of user reviews from 2025, it remains the top choice for DIYers due to its low cost, ease of use, and quick sanding time. It’s perfect for smoothing out surface imperfections. - Application Tools (~$10)
You’ll need a set of plastic putty knives and a sanding block to apply and shape the filler correctly.
5. Advanced Repairs: Welding on a Budget
For penetrating rust holes, welding is the only permanent solution.
- Flux-Core Welder (~$120 for a starter kit)
Don’t be intimidated. A budget-friendly flux-core welder is a fantastic choice for beginners because it doesn’t require a separate bottle of shielding gas. It’s perfect for patching holes in body panels and is an affordable way to learn a valuable skill.
6. The Ultimate Budget Hack: Sourcing Used Parts
Sometimes, a panel is too far gone to save. Before you buy new, go hunting.
- Junkyards & Online Marketplaces
Sites like eBay or local salvage yards are treasure troves. I once found a rust-free fender for my Mustang for $150; a new one would have cost over $1,000. It’s the single best way to save money on a large repair. Always inspect used parts carefully for hidden rust or damage before buying.
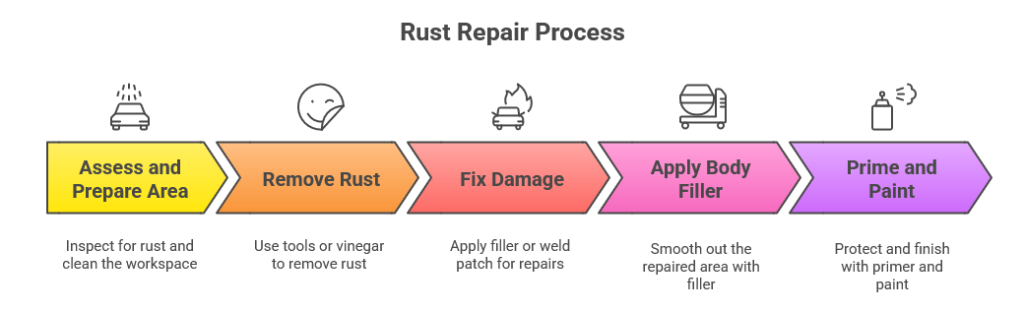
The Battle Plan: A 5-Step Guide to Flawless Rust Repair
Tackling rust yourself is one of the most rewarding parts of classic car ownership. Forget the high shop quotes; this is a battle you can win in your own garage. I’ve broken down the entire process into five manageable steps. Follow this plan, and you’ll turn that rusty panel into a seamless, professional-looking repair.
Step 1: Assess and Prepare the Area
Before you pick up a tool, you need to know what you’re up against.
- Inspect Thoroughly: Grab a flashlight and a flathead screwdriver. Examine common rust hotspots: wheel wells, rocker panels, floor pans, and the frame. Gently probe any suspicious-looking bubbles or flakes. If the metal feels soft or crumbles, you’ve found your project.
- Create a Clean Workspace: Clean the area around the rust with a degreaser ($5) to remove any dirt or oil. A clean surface is essential for a lasting repair.
Step 2: Remove the Rust Down to Bare Metal
Now, it’s time to get rid of the enemy.
- For Surface Rust: A simple wire brush ($10) or coarse sandpaper will work for light rust. For a faster and more effective job, an angle grinder with a wire wheel attachment will strip rust and paint in seconds.
- Zero-Cost Hack for Small Parts: If you’re working on a removable part like a bracket or trim piece, you don’t need expensive chemicals. Soaking the part in household white vinegar for 24 hours will dissolve the rust completely.
Step 3: Fix the Damage (Holes and Pitting)
This is where you choose your method based on the severity of the damage.
- Option A: The No-Weld Fix (For Small Holes & Pitting): Perfect for beginners! If you have pinholes or deep pitting but don’t want to weld, you can use a fiberglass-reinforced body filler. It’s stronger than regular filler and is designed to bridge small gaps, creating a durable, waterproof seal. I used this method on a muscle car panel and saved myself a $500 welding bill.
- Option B: The Welded Patch Panel (For Large Holes): If the rust has eaten a large hole, the only permanent fix is to cut it out and weld in new metal. Use an angle grinder to cut out the rotted section completely. You can then weld in a new patch panel using a budget-friendly flux-core welder. Remember to source your panel from a junkyard or eBay to save hundreds.
Step 4: Apply Body Filler for a Smooth Finish
This is the artistry stage, where you restore the panel’s original shape.
- Mix and Apply: Mix a small batch of body filler (like Bondo, ~$20) according to the directions. Apply a thin, tight coat over the repaired area with a putty knife. It’s better to build up in thin layers than to apply one thick coat.
- Sand and Shape: Once it’s fully hardened, start sanding. Use 80-grit sandpaper on a sanding block to shape the filler, then switch to finer 180 or 220-grit paper to create a perfectly smooth, feathered edge that blends into the surrounding metal.
Quick Tip: Don’t rush the sanding. A perfectly smooth filler stage is the secret to an invisible repair.
Step 5: Prime and Paint Like a Pro on a Budget
This final step locks in your hard work and protects the metal for years to come.
- Prime the Area: Apply 2-3 coats of a high-quality epoxy primer ($30/can). This creates a durable, waterproof barrier between the metal and the elements.
- Affordable Paint Solution: You don’t need a professional spray booth. For a tough, durable, and shockingly cheap finish, use tractor paint. It’s designed to withstand harsh weather, it’s very forgiving to apply with a brush or sprayer, and it gives a great period-correct look to many classic cars.
- Apply a Clear Coat: For extra gloss and protection, finish with a few coats of a spray-can clear coat. This will give your repair that final, professional shine.
Cost Breakdown: Average Expenses for Rust Repair on Classic Cars
Rust repair on classic cars doesn’t have to be as expensive as you might think. With the right approach, you can save a lot of money. Let’s break down the average costs for different types of rust repairs and explore budget-friendly options for doing the work yourself.
Economical Rust Repair Options for Old Vehicles
Here’s a comparison of the costs involved, whether you decide to handle the repair yourself or take it to a shop:
| Repair Type | DIY Cost | Pro Cost |
|---|---|---|
| Surface Rust | $50-$100 | $200-$500 |
| Quarter Panel | $200-$800 | $1,500-$3,000 |
| Full Panel Replacement | $500-$2,000 | $2,000-$6,000 |
Sources: J.D. Power, Vintage Mustang Forums (2024-2025 data)
As you can see, doing it yourself can save you a significant amount. For smaller rust problems like surface rust, you might spend just $50-$100 compared to $200-$500 at a shop. For bigger jobs like replacing quarter panels or full panels, DIY repairs can save you thousands. Of course, your skill level and time commitment are factors to think about.
Hidden Costs and Savings Tips
When repairing rust, some costs are easy to overlook. Here are a few hidden expenses to keep in mind, along with ways to save:
- Paint Matching ($100): If you need to match your car’s original color, this can add about $100. You can save by using tractor paint—it’s durable and cheaper than car paint, though you might need to mix it to match the color.
- Time (20-40 hours DIY): DIY repairs take time. You could spend anywhere from 20 to 40 hours, depending on the job. It might seem like a lot, but remember, you’re saving money on labor costs by doing it yourself.
- Save by Batch-Buying Supplies: If you’re working on multiple projects or anticipate doing more rust repairs, buying supplies like body filler, primer, and paint in bulk can save you money in the long run.
By factoring in these hidden costs and looking for savings, you can manage your rust repair budget without sacrificing quality.
When to Hire a Professional for Vintage Car Rust Repair
While fixing rust on your own can be rewarding, there are times when it’s best to bring in the professionals. Some rust problems go beyond what DIY tools and techniques can handle. Let’s take a look at when it’s time to call in an expert.
Severe Rust Damage Needs Expert Care
If the rust has gone deep or affects critical parts of your car, it may be too much for a DIY fix. Here are some situations when professional help is necessary:
- Welding Techniques
If rust has created deep holes, especially in the frame or body, welding might be required. It’s tricky to weld thin metal correctly without causing more damage. Professionals can handle this with the right tools and experience. - Body Panel Replacement
For rust that’s eaten through large body panels, you might need to replace the entire part. This is not a simple fix and requires precise cutting and welding. It’s best left to professionals to ensure the new panel fits properly and is securely attached.
Cost Considerations
When you hire a professional, the costs can add up. For example, the average cost to repair rust on a classic car quarter panel ranges from $1,500 to $3,000. If you need a full panel replacement, the price can rise to $2,000 to $6,000. While that may sound expensive, these costs cover the labor and skill required to ensure the job is done right.
When It’s Worth the Investment
If the damage is significant, especially on parts that affect the car’s safety, like the frame, it’s worth paying for professional repairs. They’ll get the job done properly, which helps preserve your car’s value and safety.
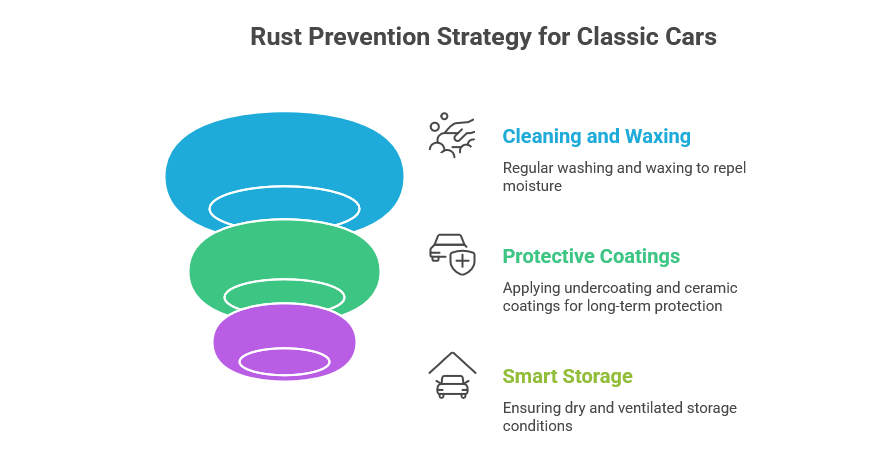
The Long Game: Low-Cost Rust Prevention for Your Classic Car
Repairing rust is rewarding, but preventing it is smarter and always cheaper. A little proactive maintenance is the best investment you can make in your vintage car’s future. Here are three critical areas to focus on to keep your classic rust-free for years to come.
1. The First Line of Defense: Cleaning and Waxing
This is the simplest and most effective habit you can adopt.
- Wash Regularly: Dirt and mud trap moisture against your car’s metal. Make it a habit to wash your car frequently, especially the undercarriage, frame, and inside the wheel wells. These areas collect grime, which can cause rust over time.
- Apply a Protective Wax: After washing, apply a good coat of wax. A quality wax kit (~$20) does more than just make the paint shine. It creates a hydrophobic barrier that repels water, keeping moisture from touching the metal.
2. Your Car’s Armor: Protective Coatings
For long-term protection, especially if you drive your car daily or live in a damp climate, you need a layer of armor.
- DIY Undercoating: Products like Fluid Film (~$15/can) are great for protecting your car’s underbelly. This lanolin-based spray creates a moisture-proof barrier on the frame, floor pans, and inside body panels.
- Modern Paint Protection: Consider a DIY Ceramic Coating Kit (~$50). While a professional job can cost $500+, these kits provide long-lasting protection. They create a hard, slick surface that prevents dirt and water from sticking to your paint.
Personal Tip: If you ever strip parts down to bare metal, coat them in epoxy primer. When I restored my classic car, I coated the entire frame with epoxy. It was the best investment I made—five years later, that frame is still rust-free.
3. Smart Storage: The Easiest Tactic of All
How you store your car can make or break your rust prevention efforts.
- Keep it Dry and Ventilated: Humidity is the enemy. A dry garage is ideal, but if you live in a humid area, a carport that allows air circulation is better than parking on wet ground.
- Use the Right Cover: If you have to store your car outside, invest in a breathable car cover. Avoid using a plastic tarp, as it traps moisture and can cause rust.
- Never Store it Dirty: Always wash and dry your car completely before putting it into long-term storage. Storing a car with dirt or moisture on it is an open invitation for rust to form.
Best Rust Repair Products for Classic Cars
When it comes to fixing rust on your classic car, using the right products can make all the difference. Whether you’re dealing with surface rust or deep damage, choosing the right materials can lead to a smooth, long-lasting repair. Let’s dive into some of the best products for classic car rust repair and how to use them effectively.
Rust Converters: What Are They and How to Use Them Effectively
Rust converters are special products that turn rust into a stable surface. They don’t remove rust entirely, but they make it safe to paint over. They are perfect for light rust spots and save time in the repair process.
- How to Use: Start by cleaning the area. Then, apply the rust converter directly to the rust with a brush or spray. Let it dry and you’ll have a stable surface for further repairs.
- Top Picks:
- Eastwood Rust Converter (~$25/bottle)
- Permatex Rust Treatment (~$17)
These converters are easy to use and can help prevent rust from spreading further, especially in hard-to-reach areas.
Body Fillers: The Best Cheap Rust Repair Fillers for Classic Cars
For holes and pitting left by rust, body fillers are a great solution. They create a smooth surface and help restore the car’s shape. Here are two popular and affordable options:
- Bondo Body Filler (~$15-$20/qt): Bondo is well-known for its ease of use and affordability. It’s great for small holes and surface imperfections.
- Evercoat Rage Gold (~$40/qt): If you’re looking for a premium filler, this one provides a smooth, durable finish.
Quick Tip: Always apply filler in thin layers, letting each layer dry before sanding. This will help you get a perfectly smooth finish.

Epoxy Primers: How Vintage Car Epoxy Primer Helps with Rust Prevention and Restoration
Epoxy primers are essential for long-term rust prevention. They form a strong bond with the metal and create a waterproof layer, sealing the metal from moisture and air.
- Why Use Epoxy Primer: After applying body filler or repairing rust, an epoxy primer ensures that the metal is sealed, protecting it from future rust. It also provides a solid base for paint.
- Top Epoxy Primers:
- PPG DP90 Epoxy Primer (~$50/qt)
- KBS Coatings Epoxy Primer (~$35/qt)
Personal Tip: When I restored my car, I used epoxy primer on the frame. That layer of protection kept the frame rust-free for over five years.

Welding Techniques: Affordable Welding Options for Rust Repair on Body Panels
For severe rust damage, welding is often the only permanent fix. If rust has caused holes or structural damage, welding can restore the integrity of the body.
- Affordable Welding Options:
- Flux-Core MIG Welders (~$100): These are the most budget-friendly welders and work great for thin metal, like body panels. They don’t require a separate gas tank, making them ideal for DIY projects.
- MIG Welders (~$200-$400): For more control and professional results, MIG welders are a step up.
Welding Tip: Practice on scrap metal before working on your car. This will help you get the hang of welding without risking damage to your car’s body.
Personal Experience: How I Restored My Vintage Car’s Rust
Restoring my 1967 Mustang was one of the most rewarding projects I’ve ever taken on. The car had been sitting in a barn for years, covered in rust. When I decided to restore it, I knew rust would be my first challenge. What I didn’t expect was how much rust had crept into places I didn’t see at first.
The First Step: Tackling Surface Rust
At first, I thought I could quickly fix the surface rust. But once I started cleaning the car, I found rust in areas I hadn’t imagined. The wheel wells, frame, and even the rocker panels had rust. Some spots had deep pitting. I knew I had to act fast to stop it from spreading.
I started by using a wire brush to remove the light rust. Then, I moved to an angle grinder to tackle the tougher spots. For small parts, I used vinegar—a cheap and effective way to remove rust from small pieces like brackets. Once all the rust was gone, I was left with bare metal. I knew I had to seal it quickly to stop rust from coming back.
Epoxy Primer and Body Filler
Next, I had to fix the damage. I used Bondo body filler to fill in the pitting and holes. It was easy to apply and worked well for small holes. The tricky part was the sanding. I spent a lot of time sanding the filler smooth, making sure it blended well with the surrounding metal.
After the filler work, I coated everything with epoxy primer. I used PPG DP90 because it’s affordable and provides great protection. This primer was crucial for keeping rust from returning.
Welding the Quarter Panel
The biggest challenge came when I found rust holes in the quarter panel. The rust was too deep to fix with just body filler, so I had to replace the panel. I decided to try a flux-core MIG welder to handle this. It was a beginner-friendly option and saved me money compared to hiring a pro.
Welding was harder than I expected. I had to be careful not to warp the thin metal. I practiced on scrap metal first to get comfortable with the welder. After tacking the panel in place, I welded it in securely. It wasn’t perfect, but it was strong, and I was proud of the result.
The Final Touch: Priming and Painting
After welding, I primed and painted the car myself. I used a ceramic coating for the paint, which is affordable and provides long-lasting protection. The final result was amazing. My Mustang was rust-free and looked like new.
The Reward
The process took time, but the reward was worth it. I restored the 1967 Mustang without spending a fortune at a shop. It felt great to fix the rust myself, and it taught me the importance of tackling rust early. The car is now ready for many more years on the road, and I’m proud to have done it all myself.
FAQs: About Affordable Vintage Car Rust Repair
Is it worth fixing rust on an older car?
Yes, fixing rust on a vintage car is often worth it. Small rust spots are cheap to repair and stop bigger damage. If the frame is solid, affordable rust repair can add years of life and protect the value of your classic car.
How much does full body rust repair cost?
Full body rust repair on a vintage car can cost $1,000 to $5,000 or more. The price depends on panel damage, labor, and paint. DIY rust repair techniques with sheet metal, filler, and primer are cheaper. They can bring costs down a lot compared to shop work.
How to fix rust on a vintage car?
To fix rust on an old car, sand or grind off the rust, use a rust converter, patch with sheet metal, and apply filler. Then add primer, paint, and clear coat. DIY rust repair saves money and keeps classic cars safe while stopping rust from spreading further.
Can a rusted car body be repaired?
Yes, most rusted car bodies can be repaired. Surface rust can be sanded and treated. Rust holes need patch panels or welding. With affordable body filler, welding, or epoxy primer, even old vehicles can be restored. Repairing is cheaper than replacing a whole car.
What is the best rust treatment for vintage cars?
The best rust treatment for vintage cars is a rust converter plus epoxy primer. These seal bare metal and stop new rust. For extra protection, add a clear coat and apply wax. Affordable rust proofing like sprays and sealants helps prevent rust before it starts.
My Final Thoughts on Affordable Vintage Car Body Rust Repair
If you’re someone who loves hands-on work and saving money, affordable vintage car body rust repair is perfect for you. You can restore your car without spending a lot, especially using the budget-friendly tips I’ve shared. However, if you prefer to avoid DIY projects or simply don’t have the time, consulting a professional might be a better choice.
From my experience, taking on the repair myself was rewarding. It saved me money, and now my classic car is looking great. But no matter what route you take, know that maintaining your vintage car doesn’t have to be expensive. Start your project today, and enjoy the process!