
This article was updated in September 14, 2023 with new products and information by Mark S. Taylor
To clean a uv care air purifier, first unplug the unit and remove the filter. Wash the filter with mild soap and warm water, being careful not to damage it.
Wipe the interior and exterior of the unit with a soft cloth dampened with a mixture of water and mild detergent. Rinse the filter thoroughly and allow it to dry completely before reinstalling it. Finally, plug the air purifier back in and run it on its highest setting for a few minutes to ensure any remaining dirt or debris is removed.
Introduction: maintaining a clean and efficient air purifier is crucial for ensuring the quality of the air we breathe indoors. Among the wide range of air purifiers available in the market, uv care air purifiers have gained popularity due to their ability to eliminate harmful airborne particles effectively. However, like any other device, uv care air purifiers require regular cleaning to continue functioning optimally. Cleaning your uv care air purifier not only ensures its performance but also extends its lifespan. When it comes to cleaning your uv care air purifier, it is essential to follow the manufacturer’s instructions to avoid causing any damage. An improper cleaning process can lead to reduced efficiency or even render the purifier useless. Luckily, the cleaning process for uv care air purifiers is relatively simple. We will guide you through the steps to properly clean a uv care air purifier, ensuring you maintain clean and pure air in your indoor environment. Remember, by following the cleaning instructions, you can enjoy the full benefits of your uv care air purifier and promote a healthier living space for you and your loved ones.
Contents
Understanding The Importance Of Regular Cleaning
Your uv care air purifier is an essential tool for keeping the air in your home clean and healthy. However, just like any other appliance, it requires regular maintenance to ensure optimal performance. Cleaning your air purifier not only helps it work more effectively but also extends its lifespan, saving you money in the long run.
Let’s explore why cleaning your uv care air purifier is so crucial:
Why Cleaning Your UV Care Air Purifier Is Essential
- Removing accumulated dust and debris: Over time, your air purifier’s filters can become clogged with dust, pet hair, pollen, and other airborne particles. By cleaning the filters regularly, you prevent the accumulation of these contaminants, allowing the air purifier to continue capturing particles efficiently. Clean filters ensure that the air you breathe is as pure as possible.
- Maintaining optimal airflow: A clean air purifier promotes better airflow, allowing the device to operate at maximum efficiency. When the filters are dirty, they restrict the airflow, causing the purifier to work harder and consume more energy. By cleaning the filters, you ensure that the air can circulate freely, minimizing strain on the device and optimizing its performance.
- Preventing unpleasant odors: Over time, trapped particles on the filters can start to emit unpleasant odors. These odors can then circulate back into the house, reducing air quality. By regularly cleaning the filters, you eliminate the sources of these odors, keeping your home smelling fresh and clean.
- Extending the lifespan of your air purifier: A well-maintained air purifier lasts longer than one that is neglected. By cleaning your uv care air purifier regularly, you remove contaminants that can cause wear and tear on the device’s internal components. This maintenance routine helps ensure that your purifier continues to function optimally for years to come.
- Ensuring effective allergen removal: If you or your family members suffer from allergies, regular cleaning of your air purifier is essential. When the filters are clogged with allergens, they become less effective at trapping these particles, compromising the purifier’s ability to provide relief. By keeping your air purifier clean, you can depend on it to remove allergens effectively and improve the overall air quality in your home.
Remember, proper maintenance is key to the longevity and effectiveness of your uv care air purifier. Regularly cleaning the filters ensures that your purifier can continue to provide you with clean, fresh air. Now that we understand why cleaning is essential, let’s move on to learning the step-by-step process of cleaning your uv care air purifier.
Gathering The Necessary Tools And Materials
What You’Ll Need To Clean Your UV Care Air Purifier
Keeping your uv care air purifier clean is essential for maintaining optimal air quality in your home. To effectively clean your air purifier, you’ll need to gather a few tools and materials beforehand. Here’s a list of items you’ll need:
- Soft microfiber cloth: This gentle cloth is perfect for wiping down the exterior surfaces of your air purifier without leaving any scratches or marks.
- Mild detergent: Opt for a mild detergent or dish soap that is free from harsh chemicals. This will ensure a thorough cleaning without damaging the internal components of your air purifier.
- Water: You’ll need clean, lukewarm water to mix with the mild detergent for cleaning.
- Soft-bristle brush: A soft-bristle brush is useful for removing dust and debris from the air purifier’s filters, ensuring optimal filtration performance.
- Compressed air canister: This handy tool can help blow out loose particles and dust from hard-to-reach areas of your air purifier.
- Replacement filters (if necessary): Depending on the model of your uv care air purifier, you may need to replace the filters periodically. Check your user manual to determine if it’s time for a filter replacement.
- Rubber gloves: While not essential, wearing rubber gloves can protect your hands from any residual dirt or cleaning solutions during the cleaning process.
- Clean, dry towel: Use a clean, dry towel to wipe down any excess moisture after cleaning your air purifier.
Recommended cleaning solutions for optimal results:
- Mix a small amount of mild detergent with lukewarm water in a container. This gentle solution will effectively remove dirt and grime from the exterior surfaces of your air purifier.
- Avoid using harsh chemicals or abrasive cleaners, as they can damage the finish of your air purifier.
- Follow the manufacturer’s instructions for cleaning the filters. In most cases, gently vacuuming or washing the filters with water will suffice. Avoid using detergents or cleaning solutions on the filters unless specified by the manufacturer.
- Regularly cleaning the filters will help maintain the efficiency of your air purifier and prolong its lifespan.
Remember, proper cleaning and maintenance are key to ensuring that your uv care air purifier functions optimally, providing you with clean and fresh indoor air. By gathering the necessary tools and materials and following the recommended cleaning solutions, you can enjoy the benefits of a clean and efficient air purifier in your home.
Step 1: Unplugging And Disassembling The Air Purifier
The Importance Of Turning Off And Unplugging The Purifier Before Cleaning
Cleaning your uv care air purifier regularly is essential to maintain its effectiveness and ensure the longevity of the appliance. Before diving into the step-by-step process, it is crucial to emphasize the importance of turning off and unplugging the purifier before cleaning.
Here’s why:
- Safety first: Unplugging the purifier guarantees that you won’t accidentally start the appliance while disassembling or cleaning it. It eliminates the risk of electric shock or other potential hazards.
Steps To Safely Disassemble The Different Parts Of The Purifier
Now that you understand why it is important to unplug the air purifier before cleaning, let’s move on to the safe disassembly process. Follow these steps to take apart the different parts of your UV care air purifier:
- Remove the front cover: Start by gently pulling the front cover away from the purifier. Use both hands and apply an even force to avoid any damage to the cover or the purifier itself.
- Take out the pre-filter: Locate the pre-filter inside the purifier, usually situated right behind the front cover. Carefully remove the pre-filter by pulling it towards you. Take note of any accumulated dirt or debris on the filter.
- Detach the main filter: Depending on the model of your UV care air purifier, the main filter might be placed beneath the pre-filter or in a separate compartment. Refer to the user manual to locate the main filter and remove it accordingly. Again, be cautious while handling the filter to avoid any harm.
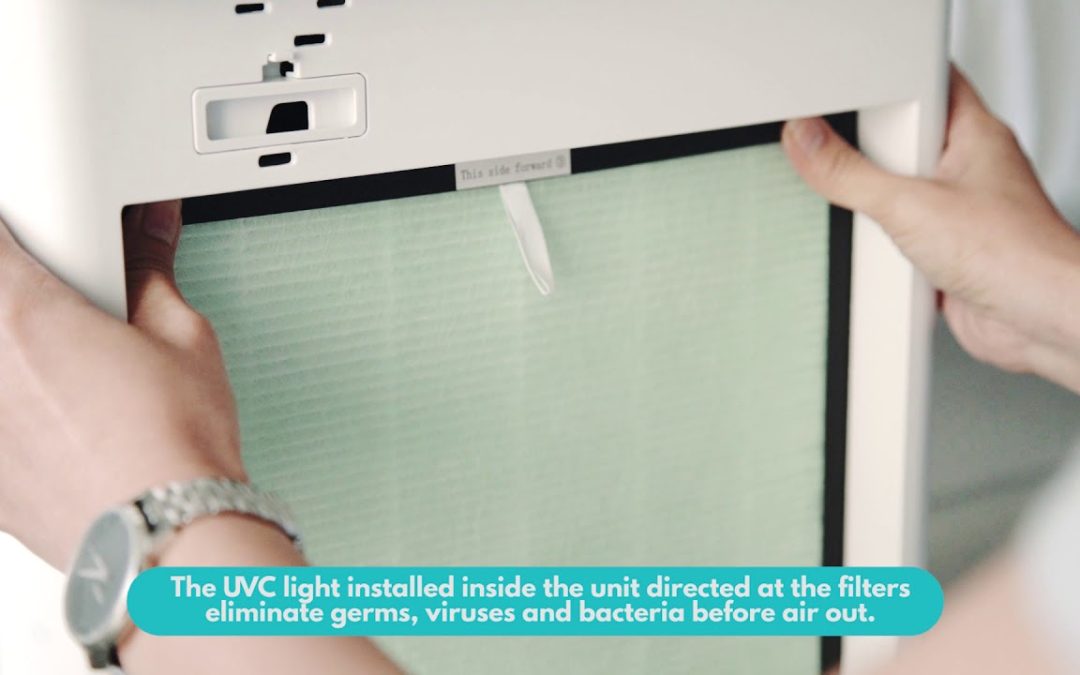
- Separate the UV lamp (if applicable): If your air purifier has a UV lamp component, check if it is detachable. In most cases, there will be an accessible compartment or panel where you can remove the UV lamp. Follow the instructions provided in the user manual to safely detach the lamp.
- Clean the disassembled parts: Once you have successfully disassembled the necessary components, you can begin cleaning them individually. Depending on the specific instructions for each part, use a soft cloth, mild detergent, or a vacuum cleaner to remove any dust, dirt, or debris accumulated over time. Be gentle and thorough in your cleaning process.
Remember, maintaining the cleanliness of your UV care air purifier ensures optimal performance and helps keep the air in your environment fresh and pollutant-free. Regular cleaning of the purifier’s components improves its overall efficiency and extends its lifespan.
By adhering to these simple steps and prioritizing safety, you can easily disassemble the air purifier and clean its different parts. Good luck with your cleaning routine, and enjoy crisp and healthy air throughout your home or office space!
Step 2: Cleaning The Filters
An Overview Of The Different Types Of Filters In Your UV Care Air Purifier
When it comes to maintaining the performance and efficiency of your UV care air purifier, cleaning the filters is a crucial step. Your air purifier is equipped with different types of filters that work harmoniously to capture and remove indoor air pollutants.
Understanding these filters is essential to ensure effective cleaning. Here’s an overview of the different types of filters in your UV care air purifier:
- Pre-filter:
- The pre-filter is the first line of defense in your air purifier.
- It captures large particles like dust, pet hair, and lint.
- Cleaning the pre-filter regularly prevents clogging and enhances the longevity of other filters.
- Activated carbon filter:
- The activated carbon filter effectively adsorbs odors, chemicals, and harmful gases.
- It enhances the air quality by neutralizing unpleasant smells, smoke, and volatile organic compounds (VOCs).
- Cleaning the activated carbon filter ensures continuous absorption capacity.
- True HEPA filter:
- The true HEPA filter is the heart of your air purifier.
- It traps microscopic particles as small as 0.3 microns, such as allergens, pollen, mold spores, and bacteria.
- Cleaning the true HEPA filter maintains its filtration efficiency and keeps the air in your home fresh and clean.
How To Remove And Clean Each Filter Properly
Now that you have a basic understanding of the different filters in your UV care air purifier, let’s dive into the step-by-step process of removing and cleaning each filter properly:
Pre-filter:
- Turn off and unplug the air purifier before starting the cleaning process.
- Locate the pre-filter compartment, usually at the front or back of the unit.
- Remove the pre-filter from the compartment by unlatching or sliding it out.
- Gently shake the pre-filter outdoors to remove loose debris.
- If the pre-filter is washable, gently rinse it under running water.
- Allow the pre-filter to air dry completely before reinserting it into the compartment.
Activated carbon filter:
- Just like the pre-filter, make sure the air purifier is turned off and unplugged.
- Identify the activated carbon filter, usually located alongside the pre-filter.
- Depending on the model, you can replace the filter or reactivate it by placing it in direct sunlight for a few hours.
- If the activated carbon filter is washable, follow the manufacturer’s instructions for proper cleaning.
- After cleaning or reactivating the filter, ensure it is completely dry before reinstalling it.
True HEPA filter:
- Turn off and unplug the air purifier to avoid any accidents or damage.
- Locate the true HEPA filter compartment, typically at the top or side of the unit.
- Depending on the model, the true HEPA filter may be replaceable or washable.
- If it’s a replaceable filter, follow the manufacturer’s instructions to safely remove and replace it.
- If the filter is washable, rinse it gently under lukewarm water to remove dirt and debris.
- Allow the true HEPA filter to completely air dry before reinstalling it.
Regularly cleaning the filters in your UV care air purifier is vital for optimal performance. Follow these simple steps to keep your air purifier running efficiently and ensure a healthier indoor environment for you and your family.
Step 3: Wiping Down The Exterior Surfaces
The Best Practices For Cleaning The Outer Surfaces Of Your Air Purifier
Keeping the exterior surfaces of your uv care air purifier clean is just as important as maintaining its filters. Over time, dirt, dust, and grime can accumulate on the device, affecting its overall performance and efficiency. To ensure your air purifier continues to work effectively and looks its best, follow these best practices for cleaning the outer surfaces.
- Regular cleaning: It is essential to clean the exterior surfaces of your UV care air purifier regularly. Aim to clean it at least once a week or more frequently if you notice excessive dirt or smudges. By maintaining a clean exterior, you not only enhance the aesthetic appeal of your device but also promote its longevity.
- Use a soft cloth: When wiping down the exterior surfaces, always use a soft, lint-free cloth. This helps to prevent scratching or damaging the device. Microfiber cloths are highly recommended for their gentle yet effective cleaning abilities.
- Avoid abrasive cleaners: Harsh chemicals or abrasive cleaners can damage the surface of your air purifier. Therefore, it is best to avoid using products such as bleach, ammonia, or any other cleaning solutions that contain strong chemicals. Opt for mild, non-abrasive cleaning solutions instead.
- Dilute mild cleaners: If you choose to use a mild cleaning solution, remember to dilute it properly. Mix the cleaner with water according to the instructions provided to ensure the right concentration. Using a solution that is too potent can potentially harm the device’s surface.
- Gently wipe away dirt: Start by lightly dampening the cloth with the cleaning solution, making sure it is not dripping wet. Then, gently wipe down the entire exterior surface of the air purifier. Pay special attention to areas where dust and dirt are more likely to accumulate, such as the control panel and air intake vents.
- Dry thoroughly: After wiping down all the surfaces, use a separate dry cloth to thoroughly dry the air purifier. This step is crucial to prevent any remaining moisture from causing damage to the device. Ensure that the air purifier is completely dry before plugging it back in.
- Don’t forget the cord: While cleaning the exterior, remember to wipe down the power cord with a damp cloth as well. Ensure that the cloth is only slightly damp and not soaked. This helps to remove any dirt or dust that may have accumulated on the cord.
- Clean smart displays with caution: If your UV care air purifier has a smart display, exercise caution when cleaning it. Smart displays often require gentle cleaning with a soft, dry cloth. Refer to the user manual for specific instructions on how to clean and maintain the display.
- Perform safety checks: Before plugging the air purifier back in, ensure that all the surfaces are completely dry and there are no signs of damage. It is always advisable to double-check the device’s safety features and ensure everything is in working order to maintain your safety and the longevity of the air purifier.
- Follow manufacturer’s instructions: While these best practices provide general guidance for cleaning the outer surfaces of an air purifier, it is crucial to consult the manufacturer’s instructions specific to your UV care model. The manufacturer may provide additional advice or precautions that you should follow to avoid any potential damage while cleaning.
By following these best practices, you can keep your UV care air purifier looking clean, sleek, and functioning at its best. Remember to clean the exterior surfaces regularly, use mild cleaning solutions, and perform safety checks to ensure optimal performance and a longer lifespan for your air purifier.
Step 4: Cleaning The Fan And Vents
Understanding The Importance Of Keeping The Fan And Vents Clean
The fan and vents of your UV care air purifier play a crucial role in keeping the air in your home clean and free from pollutants. Regularly cleaning these components is important to ensure that your air purifier functions optimally and continues to provide you with clean and fresh air.
Here are some key points to keep in mind:
- Dust and debris can accumulate on the fan and vents over time, reducing the efficiency of your air purifier.
- When the fan and vents are dirty, the airflow may become restricted, affecting the air purification process.
- Cleaning these components not only enhances the performance of your air purifier but also helps to prolong its lifespan.
Step-by-step instructions For Cleaning The Fan And Vents
Cleaning the fan and vents of your UV care air purifier is a straightforward process that can be done without causing any damage. Follow these step-by-step instructions to ensure a thorough cleaning:
- Before starting, turn off and unplug your air purifier for safety.
- Locate the fan and vents on your air purifier. Consult your user manual if you are unsure.
- Use a soft, dry cloth or a brush attachment on your vacuum cleaner to gently remove any loose dust or debris from the vents.
- If there is stubborn dirt or grime on the vents, dampen a cloth with water or a mild, non-abrasive cleaner and wipe them clean. Ensure the cloth is not dripping wet to avoid damage to the electrical components.
- For the fan, use a can of compressed air or a small brush to remove any dust or debris that may have accumulated. Be careful not to apply excessive force or damage the fan blades.
- Once you have cleaned the fan and vents, allow them to dry completely before reassembling and powering up your air purifier.
- It is recommended to clean the fan and vents at least once a month, or more frequently if you notice a decrease in the performance of your air purifier.
Remember, keeping the fan and vents of your UV care air purifier clean is essential for maintaining its effectiveness in purifying the air in your home. By following these simple cleaning steps, you can ensure that your air purifier continues to provide you with clean and fresh air, promoting a healthier living environment for you and your family.
Step 5: Reassembling And Testing The Air Purifier
How To Properly Reassemble The Purifier After Cleaning
After thoroughly cleaning your UV care air purifier, it’s important to properly reassemble it to ensure optimal functionality. Here are the key points to keep in mind:
- Begin by referring to the user manual for specific instructions on how to reassemble your particular model of uv care air purifier. Each model may have slight variations in the reassembly process.
- Start by locating the main components of the air purifier, including the filters, pre-filters, and the housing unit. Make sure each component is clean and free from any residual dirt or debris from the cleaning process.
- Carefully align the filters and pre-filters according to the instructions provided in the user manual. Ensure that they are securely in place and properly seated within their respective compartments.
- Once the filters and pre-filters are in place, gently close and secure the housing unit. Make sure that it is tightly sealed to prevent any air leakage or contaminants from entering the purifier.
- Double-check that all the components are properly fitted, and there are no loose or misaligned pieces.
- Finally, plug in the air purifier and turn it on to verify that it is functioning correctly. Listen for any unusual noises or vibrations, as this could indicate an error in reassembly.
- Observe the air purifier over the next few hours to ensure that it is effectively purifying the air and producing clean, fresh air.
Tips For Testing The Airflow And Overall Functionality Of The Purifier
To ensure that your UV care air purifier is working at its best, it’s essential to test the airflow and overall functionality. Here are some tips to help you evaluate its performance:
- Position the air purifier in an open area, away from obstructions, walls, or furniture to allow proper airflow.
- Turn on the air purifier and select the desired speed or mode. Some models may have different fan speeds or purification modes to choose from.
- Place your hand near the air purifier’s vent and feel the airflow. It should be noticeable and strong, indicating that the purifier is effectively circulating and filtering the air.
- Pay attention to any unusual odors emitted by the air purifier. If there are any strange smells, check the filters and pre-filters to ensure they are clean and properly installed.
- Monitor the air purifier’s noise levels. While some noise is expected, excessive or unusual sounds may indicate a problem. Contact customer support if you notice any concerning noises.
- Consider using an air quality monitor to assess the effectiveness of the air purifier. These devices measure the air quality and provide real-time data on the air purity levels.
- Regularly clean and maintain your UV care air purifier to ensure optimal performance. Follow the manufacturer’s recommendations for filter replacement and cleaning intervals.
By following these steps and regularly testing the airflow and overall functionality of your UV care air purifier, you can ensure that it continues to provide clean, purified air for you and your family.
Maintaining A Regular Cleaning Schedule
Keeping your UV care air purifier clean is essential for optimal performance and ensuring that it continues to provide you with clean and fresh air. By establishing a regular cleaning routine, you can maintain the efficiency of your air purifier and extend its lifespan.
Here are some key points to consider when it comes to cleaning your UV care air purifier:
The Recommended Frequency For Cleaning Your UV Care Air Purifier
- It is recommended to clean your UV care air purifier every two to four weeks, depending on the level of usage and the air quality in your home.
- Regular cleaning will help remove any dust, dirt, and other particles that may accumulate on the filters and hinder the air purifier’s performance.
- By adhering to a regular cleaning schedule, you can ensure that your UV care air purifier continues to effectively capture and remove indoor pollutants, providing you with clean and fresh air.
Tips On Establishing A Routine To Ensure Optimal Performance
- Set a reminder: Mark your calendar or set a reminder on your phone to clean your UV care air purifier at regular intervals. This will help you stay on track and not forget about this important task.
- Prepare a cleaning kit: Keep all the necessary cleaning tools and supplies together in a designated kit. This may include a microfiber cloth, a vacuum cleaner with a brush attachment, mild soap or cleaning solution, and clean water.
- Turn off and unplug the unit: Before you start cleaning, make sure to turn off and unplug your UV care air purifier. This will ensure your safety and prevent any damage to the unit.
- Start with the filters: Remove the filters from your air purifier and gently clean them using a vacuum cleaner with a brush attachment. If your filters are washable, follow the manufacturer’s instructions to clean them with mild soap and water. Allow the filters to dry completely before reinstalling them.
- Wipe down the unit: Use a soft, damp cloth or microfiber cloth to wipe down the exterior surfaces of your uv care air purifier. Be gentle and avoid using abrasive cleaners or excessive moisture.
- Pay attention to the vent openings: Dust and debris can accumulate on the vent openings of the air purifier. Use a vacuum cleaner or a brush to remove any buildup and ensure optimal airflow.
- Check the pre-filter: Some UV care air purifiers have a pre-filter that helps trap larger particles. Check this filter regularly and clean or replace it as needed.
- Keep a maintenance log: Consider keeping a log of your cleaning activities. This will help you track when you last cleaned your air purifier and remind you of any maintenance tasks that need to be performed.
By following these tips and establishing a regular cleaning schedule, you can ensure that your uv care air purifier operates at its best, providing you with clean and healthy indoor air. Take the time to care for your air purifier, and it will continue to serve you well in creating a comfortable living environment.
Final Thoughts: Clean Air For A Healthier Home
Cleaning your air purifier regularly is essential to maintaining clean indoor air quality and promoting overall well-being. By eliminating dust, allergens, and pollutants from the air, you can create a healthier living environment for you and your family. Regular maintenance ensures that your air purifier works efficiently and effectively, providing you with the best possible results.
Summarizing The Importance Of Cleaning Your Air Purifier Regularly
- Enhancing air quality: Cleaning your air purifier removes accumulated dust, pollen, pet dander, and other airborne particles, allowing it to effectively filter the air and improve indoor air quality.
- Reducing allergens: Regular cleaning reduces allergens, helping to alleviate symptoms for those with allergies or asthma.
- Eliminating odors: Cleaning the filters and components of your air purifier helps eliminate unpleasant smells, leaving your home smelling fresh and clean.
- Increasing longevity: Proper maintenance and cleaning prolong the lifespan of your air purifier, saving you money in the long run.
- Preventing mold growth: Regular cleaning prevents the buildup of moisture and mold inside the unit, ensuring that the air being circulated remains free from harmful microorganisms.
How Regular Cleaning Can Contribute To Better Indoor Air Quality And Overall Well-Being
Cleaning your air purifier on a regular basis can have a significant impact on your indoor air quality and overall well-being. Here are some key points to consider:
- Efficiency: A clean air purifier operates more efficiently, reducing energy consumption and ensuring optimal performance.
- Dust and allergen removal: Regular maintenance prevents the accumulation of dust and allergens on the filters, allowing the air purifier to effectively capture and remove these particles from the air.
- Health benefits: By removing harmful pollutants from the air, a clean air purifier can reduce the risk of respiratory issues and help alleviate allergy or asthma symptoms.
- Improved sleep: Clean indoor air promotes better sleep by reducing pollutants that can interfere with sleep quality.
- Peace of mind: Knowing that your air purifier is clean and functioning properly provides peace of mind, allowing you to relax and enjoy a healthier home environment.
Regular cleaning of your air purifier is a simple yet crucial step in maintaining clean indoor air quality. By incorporating this regular maintenance into your routine, you can ensure that your air purifier continues to provide clean, fresh air for you and your family to breathe, ultimately contributing to your overall well-being.
So, don’t neglect the cleanliness of your air purifier – take steps today to create a healthier home environment.
Frequently Asked Questions For How To Clean UV Care Air Purifier
How do I clean my air purifier?
Cleaning your air purifier involves a few steps:
- Ensure the purifier is unplugged.
- Remove and clean the filters as per the manufacturer’s instructions.
- Use a soft, damp cloth to clean the exterior, avoiding any contact with water inside the unit.
- Let all components dry thoroughly before reassembling and plugging in the purifier.
Can I wash my air purifier filter?
It depends on the type of filter:
- Pre-filters: These can usually be vacuumed or rinsed with water and mild detergent. Ensure they’re completely dry before reinstallation.
- HEPA filters: Most HEPA filters are not washable; they should be replaced as recommended in the user manual.
How do I clean my HEPA air purifier filter?
As mentioned earlier, HEPA filters are typically not washable. You should replace them according to the manufacturer’s guidelines, usually every 6-12 months, depending on usage and air quality.
Is UV Care Air Purifier safe?
Yes, UV Care Air Purifiers are generally safe when used as directed. They utilize UV-C technology to kill germs, including viruses and bacteria, making indoor air cleaner and safer. However, it’s essential to follow the manufacturer’s safety instructions and keep the purifier out of the reach of children and pets.
What are the side effects of air purifiers?
Air purifiers are designed to improve indoor air quality and typically do not have harmful side effects. However, in rare cases, individuals with allergies may experience temporary symptoms such as sneezing or congestion when a purifier is first used, as it initially circulates particles in the air before trapping them. To minimize this, use a purifier with a HEPA filter and ensure proper maintenance to prevent any issues.
Conclusion
Keeping your uv-care air purifier clean is essential for maintaining its optimal performance and ensuring the air in your home remains pure and fresh. Regularly cleaning your air purifier not only prevents the buildup of dust and debris but also extends its lifespan.
Start by unplugging the device and carefully removing the filters. Wash the filters with warm soapy water and allow them to dry completely before reinstalling them. Using a soft, clean cloth, wipe down the exterior of the air purifier, removing any dirt or grime.
Pay attention to the vents and other hard-to-reach areas. Don’t forget to clean the uv-c light inside the air purifier. Follow the manufacturer’s instructions on how to safely clean this component. Once everything is clean and dry, reassemble the air purifier and plug it back in.
By following these simple steps and cleaning your uv-care air purifier regularly, you can ensure it continues to purify the air effectively and efficiently for your family’s health and comfort. Breathe easy knowing that the air in your home is clean and allergen-free.