
This article was updated in August 25, 2026 with new products and information by Mark S. Taylor
Replacing your rear brake pads restores stopping power, prevents rotor damage, and saves hundreds of dollars in shop labor. Modern rear brake systems require specific procedures—especially if your vehicle uses an Electronic Parking Brake (EPB) or integrated screw-in caliper pistons.
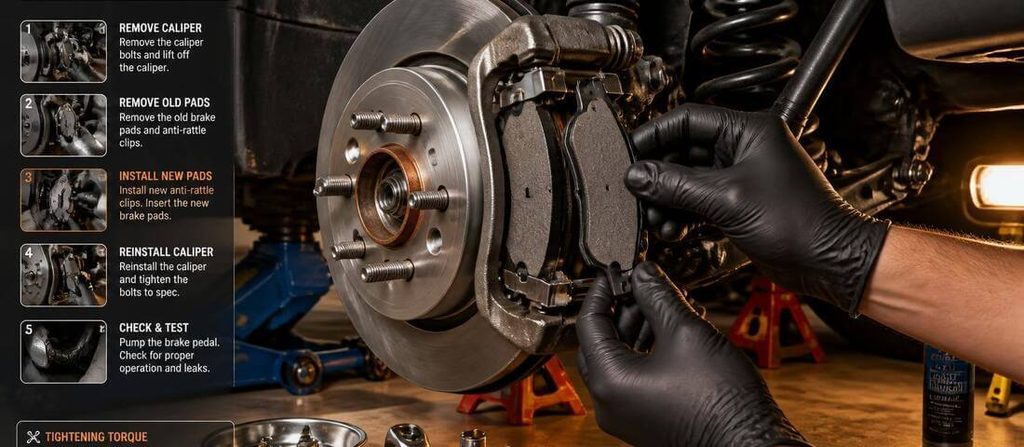
How to install rear brake pads, secure the vehicle on jack stands, remove the wheel, and unbolt the caliper. Put electronic parking brakes into service mode or use a piston wind-back tool to retract the piston. Clean hardware slots, lubricate slide pins, install new pads, reassemble, pump the pedal, and torque lug nuts.
Contents
- 1 Can I Still Drive with Worn Rear Brake Pads?
- 2 Symptoms Grouped by Driving Condition
- 3 Root Causes of Rear Brake Wear (Ranked by Likelihood)
- 4 Stepwise Diagnostic Workflow Before Disassembly
- 5 Step-by-Step: How to Install Rear Brake Pads
- 5.1 Required Tools and Supplies
- 5.2 Step 1: Secure Vehicle and Loosen Lug Nuts
- 5.3 Step 2: Retract the Parking Brake System
- 5.4 Step 3: Remove Caliper and Old Brake Pads
- 5.5 Step 4: Clean Brackets and Service Slide Pins
- 5.6 Step 5: Install New Pads and Reassemble Caliper
- 5.7 Step 6: Prime Hydraulic Pressure and Test Drive
- 6 Rear Brake Repair Cost Comparison
- 7 DIY vs. Shop Decision Matrix
- 8 FAQs About How to Install Rear Brake Pads
- 8.1 Q1: Do I need special tools to compress rear brake caliper pistons?
- 8.2 Q2: Why do I need to pump the brake pedal before driving after a pad change?
- 8.3 Q3: Can I replace rear brake pads without replacing the rotors?
- 8.4 Q4: Should I use anti-seize or brake grease on slide pins?
- 8.5 Q5: Do I need to bleed my brakes after simply changing rear pads?
- 9 Technician Verdict
Can I Still Drive with Worn Rear Brake Pads?
Your driving safety depends on the remaining friction material on the inner and outer pads.
| Brake Condition | Driving Status | Recommended Action |
| Friction Material > 4 mm | Safe to Drive | Pads have sufficient life. Inspect again at your next regular tire rotation. |
| Friction Material 2–3 mm | Drive to Service Only | Wear indicators are active or near contact. Replace pads within 500 miles (Art’s Automotive). |
| Friction Material < 2 mm or Metal Grinding | Stop Driving Immediately | Steel backing plates are contacting the rotor. Driving risks severe rotor gouging and sudden brake fade. |
Immediate Escalation Signs
Pull over and arrange service if you observe any of the following:
- A high-pitched screech that transitions into a harsh metal-on-metal scraping sound during stops.
- The brake pedal sinks toward the floorboard or feels spongy underfoot.
- The red brake warning light remains illuminated on the instrument cluster.
- Visible brake fluid leaking around the rear wheels or caliper fittings.
Symptoms Grouped by Driving Condition
- During Light Braking: High-pitched squeal caused by acoustic wear indicators contacting the rotor surface.
- During Hard Braking or Highway Deceleration: Grinding vibration, pedal pulsation, or vehicle pulling to one side due to uneven rear pad wear or a seized slide pin.
- At Low Speed / Rolling Off: Continuous dragging chirp or burning odor caused by a sticking caliper piston or unreleased parking brake cable.
- Over Bumps (Brakes Disengaged): Metallic rattling from the rear wheels caused by missing or fatigued anti-rattle spring clips.
Root Causes of Rear Brake Wear (Ranked by Likelihood)
- Normal Friction Wear Accelerated by Electronic Systems (High Likelihood / Low Repair Risk):Modern Electronic Brake Force Distribution (EBD) and Electronic Stability Control (ESC) apply subtle rear brake pressure during light stops and cornering to reduce front-end nose dive (MotorBiscuit). This frequently causes rear pads to wear faster than front pads.
- Corroded or Seized Caliper Slide Pins (Moderate Likelihood / Medium Risk):Road salt and moisture degrade slide pin grease, causing the floating caliper to bind. This forces the inner pad to remain in constant contact with the rotor face.
- Seized Internal Parking Brake Mechanism or EPB Actuator (Low–Moderate Likelihood / High Cost):Mechanical wind-back screw shafts or electric parking brake motors can seize internally, preventing the piston from retracting fully off the rotor.
Stepwise Diagnostic Workflow Before Disassembly
Follow this diagnostic sequence to evaluate your rear brake assembly before purchasing parts:
Visual Pad Check: Measure pad thickness through the wheel spokes using a brake gauge. If either the inner or outer pad measures 3 mm or less, plan immediate replacement.
Slide Pin & Caliper Inspection: Check the rubber slide pin boots for tears or road grime. Ensure the caliper moves smoothly on its bracket pins.
Parking Brake Mechanism Identification: Inspect the rear caliper body. If you see an electric motor with an electrical connector, the vehicle has an Electronic Parking Brake (EPB). If you see an external cable and spring lever, it uses an integrated mechanical wind-back caliper.

Step-by-Step: How to Install Rear Brake Pads
Required Tools and Supplies
- Hydraulic floor jack and two rated jack stands
- Wheel chocks and lug wrench
- Metric socket set and combination wrenches
- Rear caliper piston wind-back tool set (or OBD-II scanner with EPB service mode capability)
- Wire brush and brake cleaner spray
- High-temperature silicone or ceramic brake lubricant (DO NOT use petroleum grease on rubber boots)
- Caliper hanger hooks or bungee cords
- Safety glasses and nitrile gloves
Step 1: Secure Vehicle and Loosen Lug Nuts
- Park the vehicle on a level, solid concrete surface. Place wheel chocks firmly in front of and behind both front wheels.
- Break the rear wheel lug nuts loose by a half-turn using your breaker bar and socket while the tires are still on the ground (Wilmar LLC).
- Raise the rear axle using the approved factory jack points. Set the vehicle down securely on jack stands and remove the rear wheels.
Step 2: Retract the Parking Brake System
Choose the method that matches your vehicle’s rear brake system:
- For Electronic Parking Brake (EPB) Systems:Activate EPB Service/Maintenance Mode using a bi-directional scan tool, smartphone diagnostic app, or the vehicle’s onboard dashboard sequence (AutoZone DIY). You will hear the electric motors wind back into the caliper body.
- For Mechanical Integrated Parking Brake Calipers:Do not use a standard C-clamp. Fit the corresponding 2-pin adapter from a caliper wind-back tool into the divots on the face of the piston. Rotate the piston clockwise while applying firm forward pressure until it seats flush against the caliper bore (The Drive).
Step 3: Remove Caliper and Old Brake Pads
- Remove the upper and lower caliper slide pin guide bolts using the appropriate socket or hex key.
- Lift the caliper off the mounting bracket. Support the caliper on the rear suspension spring using a wire hook. Never let the caliper hang by the rubber hydraulic brake hose.
- Slide the worn inner and outer brake pads out of the caliper bracket abutment channels.
Step 4: Clean Brackets and Service Slide Pins
- Pry out the old stainless steel abutment clips. Clean the exposed bracket channels with a wire brush and brake cleaner to remove rust scale.
- Snap new stainless steel abutment clips firmly into the bracket.
- Pull the caliper slide pins from their rubber boots. Wipe away old hardened grease, inspect the rubber boots for tears, and apply a fresh coat of high-temperature silicone brake lubricant.
Step 5: Install New Pads and Reassemble Caliper
- Apply a thin film of brake lubricant to the contact ears of the new brake pads. Keep friction material and rotor surfaces completely grease-free (Sangsin USA).
- Insert the new inner and outer pads into the bracket clips. Ensure any mechanical wear sensor clips are oriented in the factory position (typically on the trailing edge of the inner pad).
- Align the divots on the caliper piston so they clear the raised alignment nubs on the back of the inner brake pad.
- Position the caliper over the new pads and torque the slide pin bolts to factory specification (typically 25–35 ft-lbs for most passenger vehicles).
Step 6: Prime Hydraulic Pressure and Test Drive
- Reinstall the wheels, snug the lug nuts, lower the vehicle, and torque lug nuts in a criss-cross star pattern to manufacturer spec (typically 80–100 ft-lbs for cars, 130–150 ft-lbs for trucks).
- If equipped with EPB, exit Service Mode using your scanner or dashboard procedure.
- CRITICAL STEP: Pump the brake pedal 4 to 5 times from inside the cabin until the pedal becomes firm. This extends the caliper pistons against the new pads.
- Check master cylinder fluid level and top off with fresh, sealed DOT 3/DOT 4 fluid if necessary.
- Perform a gentle pad bedding procedure: make 5 to 6 moderate decelerations from 45 mph down to 15 mph with 30 seconds of cooling time between stops.

Rear Brake Repair Cost Comparison
| Repair Scenario | DIY Cost | Independent Shop | Dealership | Assumptions |
| Rear Brake Pads Only | $35 – $75 | $175 – $260 | $260 – $380 | Premium ceramic pad set + hardware clips; 1.0–1.5 hrs labor. |
| Rear Pads + Rotors | $90 – $180 | $320 – $480 | $480 – $750 | Ceramic pads + two coated replacement rotors; 1.5–2.0 hrs labor. |
| Pads, Rotors + 1 Caliper | $160 – $290 | $480 – $720 | $750 – $1,100 | Seized slide pin or piston requiring remanufactured caliper assembly. |
DIY vs. Shop Decision Matrix
| Task / Scenario | Required Skill & Tools | Estimated Time | Risk Level | Recommendation |
| Standard Rear Pad Replacement | Intermediate; Hand tools, wind-back kit | 1.5 – 2.5 hours | Low–Moderate | DIY (Significant labor savings) |
| EPB Equipped Vehicle | Intermediate; Scan tool or OBD app | 1.5 – 2.0 hours | Moderate | DIY if proper scan tool is owned |
| Seized Caliper / Frozen Bleeder Screw | Advanced; Torch, flare wrenches, pressure bleeder | 3.0 – 5.0 hours | High | Professional Shop |
| Brake Fluid Flushing / ABS Module Bleed | Advanced; Bi-directional scanner, pressure bleeder | 1.5 – 2.5 hours | High | Professional Shop |
FAQs About How to Install Rear Brake Pads
Q1: Do I need special tools to compress rear brake caliper pistons?
Yes, most rear calipers require a wind-back tool that rotates the piston while pressing it inward to clear internal parking brake threads. For vehicles equipped with electronic parking brakes (EPB), you must use an OBD-II scan tool or dashboard service sequence to retract the electric actuator motor.
Q2: Why do I need to pump the brake pedal before driving after a pad change?
Retracting the caliper pistons pushes hydraulic fluid back into the reservoir, leaving a large air gap between the piston face and the new pad backing plate. Pumping the pedal seats the piston firmly against the pad so you have full braking power on your first stop.
Q3: Can I replace rear brake pads without replacing the rotors?
You can reuse your existing rotors if their surface is smooth, free of deep heat cracks or heavy scoring, and the thickness exceeds the stamped minimum discarding limit. However, installing new pads on heavily grooved rotors causes premature pad wear, noise, and uneven bedding.
Q4: Should I use anti-seize or brake grease on slide pins?
Always use dedicated high-temperature silicone or polyglycol-based ceramic brake lubricant on caliper slide pins. Never use petroleum-based anti-seize or general-purpose grease on slide pins because petroleum swells and destroys the rubber guide pin boots, causing the pins to seize.
Q5: Do I need to bleed my brakes after simply changing rear pads?
No, bleeding the hydraulic system is not required during a standard pad replacement as long as you did not open the bleeder screw or disconnect any hydraulic brake lines. You only need to monitor and adjust the master cylinder fluid level under the hood.
Technician Verdict
- Do First: Identify whether your vehicle uses an Electronic Parking Brake (EPB) or mechanical wind-back caliper before lifting the vehicle.
- Can Wait: Replacing rear rotors can wait if micrometer measurements confirm the thickness is well above the discard minimum and runout is within 0.002 inches.
- Immediate Attention: If a caliper slide pin is frozen solid or a rubber piston boot is torn and leaking fluid, replace the entire caliper assembly immediately rather than forcing pads into a damaged housing.