

This article was updated in October 5, 2023 with new products and information by Mark S. Taylor
To change brake calipers, start by parking the vehicle on a level surface and engaging the parking brake. Then, remove the wheel, disconnect the brake line, and unbolt the caliper from the mounting bracket.
Finally, install the new caliper, reconnect the brake line, and reattach the wheel. Remember to bleed the brake system to remove any air bubbles after the caliper replacement. Nowadays, regular brake maintenance is crucial for ensuring safe and efficient driving.
Brake calipers play a vital role in the braking system, as they apply the necessary pressure to the brake pads, allowing the vehicle to slow down or stop. Over time, the brake calipers can wear out, leading to decreased braking performance or even brake failure. To ensure your brakes are functioning at their best, it is important to know how to change the brake calipers. In this guide, we will walk you through the step-by-step process of replacing your brake calipers, so you can drive confidently knowing your brakes are in optimal condition.
Contents
- 1 Tools And Materials Needed
- 2 Step 1: Safety Precautions
- 3 Step 2: Removing The Old Brake Caliper
- 4 Step 3: Inspecting And Cleaning
- 5 Step 4: Installing The New Brake Caliper
- 6 Step 5: Brake Fluid And Bleeding
- 7 Step 6: Testing And Final Check
- 8 Frequently Asked Questions On How To Change Brake Calipers
- 9 Conclusion
Tools And Materials Needed
Changing brake calipers may seem like a daunting task, but with the right tools and materials, you can do it yourself and save some money. Here is a list of the essential tools and materials you’ll need for the job:
List Of Tools Required For The Job:
- Socket set with metric sizes (ranging from 8mm to 19mm): You’ll need sockets of various sizes to remove and install brake caliper bolts and brackets.
- Combination wrench set: This set will come in handy for removing brake line fittings and brake hose bolts.
- Torque wrench: It’s important to torque the caliper bolts and other fasteners to the manufacturer’s specifications for safety and proper function.
- C-clamp or piston retraction tool: When changing calipers, you’ll need to compress the brake piston back into the caliper to accommodate the new brake pads.
- Brake bleed kit: You’ll need this to remove any air trapped in the brake lines after replacing the calipers.
- Brake fluid: You’ll need to bleed the brake system, so having some fresh brake fluid on hand is essential.
List Of Materials Needed For The Job:
- New brake calipers: Make sure to purchase the correct calipers for your vehicle’s make, model, and year.
- Brake pads: It’s recommended to replace the brake pads along with the calipers to ensure proper braking performance.
- Brake hardware kit: This kit usually includes new caliper bolts, rubber bushings, and other necessary hardware.
- Brake cleaner: You’ll need this to clean any dirt, grease, or brake fluid residue from the caliper and other brake components.
- Anti-seize compound: Applying a small amount of this compound to the caliper bolts will prevent them from seizing over time.
- Shop towels or rags: Keep some handy for wiping off excess brake fluid, cleaning the caliper, and general cleanup.
By having these tools and materials ready, you’ll be well-prepared to tackle the task of changing brake calipers. Remember to consult your vehicle’s service manual for specific instructions and safety precautions. Let’s get started!
Step 1: Safety Precautions
Importance Of Wearing Protective Gear
When it comes to changing brake calipers, safety should be the number one priority. Before you dive into the task at hand, it is crucial to take proper precautions to ensure your well-being. Wearing the right protective gear will not only safeguard you from potential injuries but also make the process much smoother.
Here are the key points to keep in mind:
- Safety goggles: Protect your eyes from debris and any potential damage caused by the brake system.
- Gloves: Choose thick, durable gloves to shield your hands from sharp edges, chemicals, and grease.
- Protective clothing: Wear long sleeves and pants to avoid direct contact with any chemicals or hot parts of the vehicle.
- Closed-toe shoes: Opt for sturdy footwear to protect your feet from falling tools or heavy parts.
- Face mask: Use a mask to prevent inhaling harmful fumes and dust while working.
By wearing the appropriate protective gear, you minimize the risk of accidents, cuts, burns, and exposure to harmful substances. Ensuring your safety not only ensures a successful brake caliper change but also allows you to enjoy peace of mind throughout the process.
Ensuring The Vehicle Is In A Safe And Secure Position
Before you commence changing brake calipers, it is of utmost importance to ensure that your vehicle is in a safe and secure position. Neglecting this step can lead to accidents, injuries, or further damage to your vehicle. Take note of the following points:
- Find a level surface: Park your vehicle on a flat surface to provide stability and prevent it from rolling.
- Engage the parking brake: This step reinforces the vehicle’s stability and keeps it from moving while you work.
- Use wheel chocks: Place wheel chocks on the wheels opposite of the ones you are working on to ensure they stay in place.
These precautions will prevent any unintended movement of the vehicle while you are changing the brake calipers. Taking the time to double-check and secure the vehicle enhances your safety and makes the task much more manageable.
Remember, your safety and the safety of others are paramount. By wearing protective gear and ensuring the vehicle’s position, you lay a solid foundation for a successful brake caliper change. Stay tuned for the next steps in the process!
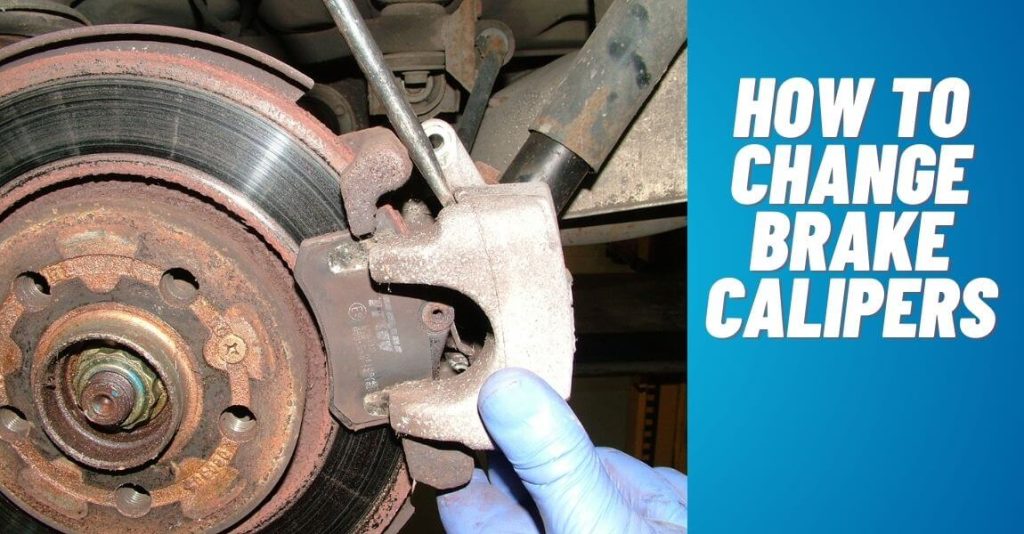
Step 2: Removing The Old Brake Caliper
Now that we’ve loosened the lug nuts on the wheel in step 1, it’s time to move on to removing the old brake caliper. This step is crucial in the brake caliper replacement process, so let’s dive right in.
Loosening The Lug Nuts On The Wheel
To ensure easy removal of the old brake caliper, the first step is to loosen the lug nuts on the wheel. Here’s how you can do it:
- Use a lug wrench or a socket wrench to turn the lug nuts counterclockwise.
- Loosen each lug nut gradually in a star pattern to prevent the wheel from tilting unevenly.
- Once all the lug nuts are loosened, you can move on to the next step.
Removing The Brake Caliper Bolts
With the lug nuts loosened, it’s time to remove the brake caliper bolts. These bolts secure the caliper to the caliper bracket. Follow these steps to remove them:
- Locate the brake caliper bolts on the back of the caliper.
- Use a socket wrench or a suitable allen wrench to turn the bolts counterclockwise.
- Carefully remove the bolts, ensuring not to strip them in the process.
- Place the bolts in a safe spot where they won’t get misplaced.
Detaching The Brake Caliper From The Rotor
Once the brake caliper bolts are removed, it’s time to detach the brake caliper from the rotor. Follow these steps to complete this crucial task:
- Gently pull the brake caliper away from the rotor while ensuring not to damage any surrounding components.
- If the caliper feels stuck, you can use a rubber mallet or a suitable hammer to tap it gently until it loosens.
- Make sure to hang the caliper using a wire or bungee cord to prevent any strain on the brake line.
- Remember, the goal is to detach the brake caliper without causing damage or unnecessary strain.
Congratulations! You’ve successfully completed step 2 of changing brake calipers. Now, you’re one step closer to installing the new brake caliper. In the next step, we’ll cover how to install the new brake caliper. Stay tuned!
Note: it’s essential to consult your vehicle’s manual or seek professional guidance if you’re unsure about any step in this process. Safety should always be the top priority when working on your vehicle’s braking system.
Step 3: Inspecting And Cleaning
Thoroughly Inspecting The Brake Caliper For Any Damage Or Wear
When it comes to changing brake calipers, thorough inspection and cleaning are crucial steps to ensure their optimal performance. Inspecting the brake caliper allows you to identify any potential damage or wear that may hinder its functionality. Here are the key points to keep in mind during the inspection process:
- Start by visually examining the caliper for any signs of damage, such as cracks or leaks. Check for any loose or missing bolts as well.
- Inspect the brake pads for wear. Look for thinning or uneven wear patterns, as these can indicate underlying issues that need to be addressed.
- Ensure that the pistons are functioning properly and moving smoothly. They should extend and retract without any hesitation or resistance.
- Examine the brake lines for any signs of leakage or corrosion. Damaged brake lines can compromise the brake system’s integrity and should be replaced if necessary.
- Pay attention to the caliper slide pins. They should move freely and without any binding. Lubricate them as needed to prevent friction and ensure smooth operation.
By thoroughly inspecting the brake caliper, you can catch any potential problems early on and address them promptly, ensuring your safety on the road.
Cleaning The Brake Caliper Components
In addition to inspecting the brake caliper, cleaning the components is essential to maintain their efficiency and prolong their lifespan. Here are the key points to consider when cleaning the brake caliper:
- Start by removing any buildup of dirt, debris, or corrosion on the caliper’s exterior using a soft brush or cloth. Be careful not to scratch or damage the surface.
- Clean the brake pad slides and pins using brake cleaner or a suitable solvent. This will remove any grease or grime that may hinder their movement and cause braking issues.
- Inspect the brake pads for any glazing or contamination. If necessary, sand them lightly to remove the glazed surface and restore their grip.
- Thoroughly clean the piston using brake cleaner and a lint-free cloth. Ensure that it moves smoothly without any resistance or sticking.
- Regularly check and clean the brake caliper mounting bracket, ensuring it is free from rust or debris. This will ensure proper alignment and functionality.
Cleaning the brake caliper components not only improves their performance but also helps prevent premature wear and ensures a safer braking experience. Take time to inspect and clean your brake calipers properly to keep them functioning optimally.
Step 4: Installing The New Brake Caliper
Attaching The New Brake Caliper To The Rotor
After successfully removing the old brake caliper, it’s time to install the new one. This step is crucial in ensuring your brakes function optimally. Follow these steps to correctly attach the new brake caliper to the rotor:
- Start by aligning the caliper with the rotor, ensuring that the brake pads are in the correct position.
- Gently slide the caliper onto the rotor, taking care not to damage the brake pads.
- Check that the guide pins align properly with the caliper bracket. These pins are essential for the caliper’s movement.
- Gently press the caliper against the rotor to ensure a snug fit.
- Make sure that the brake hose is not twisted or kinked. Proper alignment of the hose is vital for the efficient functioning of the brake system.
- Double-check all connections and ensure everything is in the correct position before moving on to the next step.
Tightening The Brake Caliper Bolts Securely
To guarantee the proper functioning and safety of your brakes, it is crucial to tighten the brake caliper bolts securely. Improperly tightened bolts can lead to brake failure, so follow these steps to ensure a secure fit:
- Start by using a torque wrench to tighten the bolts. Matching the manufacturer’s specifications is essential, as overtightening or undertightening can have adverse effects.
- Begin with the top bolt, tightening it just enough to hold the caliper in place. Then move on to the bottom bolt.
- Now, fully tighten both bolts according to the torque specifications provided by the manufacturer.
- Do not rush this step; take your time to ensure each bolt is tightened securely.
- Double-check the torque on both bolts to prevent any potential issues down the line. A loose brake caliper can lead to brake instability and compromised safety.
Remember, attaching the new brake caliper and tightening the bolts securely are vital steps in the brake replacement process. Following these steps correctly will ensure your brakes operate smoothly and safely.
Step 5: Brake Fluid And Bleeding
When it comes to changing brake calipers, one crucial step that cannot be overlooked is dealing with the brake fluid. Properly maintaining your brake fluid ensures the effective functioning of your braking system and guarantees your safety on the road.
In this step, we will guide you through checking and topping up the brake fluid level, as well as bleeding the brake system to remove any air bubbles.
Checking And Topping Up The Brake Fluid Level:
• begin by locating the brake fluid reservoir under the hood of your vehicle. It is usually positioned on top of the master cylinder, near the firewall.
• check the fluid level in the reservoir by removing the cap. The level should be between the minimum and maximum marks indicated on the side of the reservoir. If it is below the minimum mark, it is essential to top it up.
• to top up the brake fluid, use a clean funnel to avoid contamination. Slowly pour the fluid into the reservoir, being careful not to spill any onto the engine or painted surfaces.
• make sure to use the recommended brake fluid type specified by the vehicle manufacturer. Refer to your owner’s manual or consult with a professional if you are unsure.
Bleeding The Brake System:
• bleeding the brake system is necessary to remove any trapped air bubbles, which can impair the performance of your brakes. This process ensures that the brake pedal feels firm and responsive, providing maximum stopping power.
• start by attaching a clear plastic hose to the bleeder screw on the caliper furthest from the master cylinder. Place the other end of the hose into a container partially filled with brake fluid.
• with the help of a partner, have them slowly press the brake pedal multiple times and hold it down. While the pedal is depressed, loosen the bleeder screw to release the air and fluid mixture. Close the screw before your partner releases the pedal.
• repeat this process, working your way from the caliper furthest from the master cylinder to the one closest. Remember to check and top up the brake fluid reservoir periodically during the bleeding process.
• once all the air bubbles have been expelled and only clean fluid is flowing through the clear plastic hose, you can proceed to the next caliper.
By following these simple steps, you can effectively check and top up the brake fluid level, as well as bleed the brake system to ensure your brakes are in optimal condition. Remember, if you are unsure or uncomfortable performing these tasks yourself, it is always best to seek assistance from a professional mechanic to guarantee your safety on the road.
Step 6: Testing And Final Check
After successfully installing the new brake calipers, it is crucial to ensure that they are operating correctly before hitting the road. Here are the key points to remember during the testing and final check of your brake calipers:
- Spinning the wheel to ensure proper brake caliper functionality: Before finishing up the installation process, take a moment to spin the wheel by hand. This step will allow you to verify that the brake caliper is working smoothly and not causing any unnecessary friction or drag.
- Double-checking all connections and tightening if necessary: Carefully inspect all the connections related to the brake caliper, such as the brake line, banjo bolt, and caliper mounting bolts. Verify that they are securely fastened and tightened. If you notice any loose connections, use the appropriate tools to tighten them properly.
- Checking brake fluid level and its condition: Take a moment to check the brake fluid level in the master cylinder. Also, inspect the color and consistency of the fluid. If there are any signs of contamination or if the fluid level is lower than recommended, it may be necessary to bleed the brakes or replenish the brake fluid.
- Verifying brake pedal firmness: With the vehicle parked, carefully press the brake pedal several times to ensure that it feels firm and responsive. A spongy or excessively soft brake pedal could indicate air in the brake lines, requiring a bleeding procedure.
- Testing the brakes in a controlled environment: Once you have completed all the necessary steps, it is vital to test the brakes in a safe and controlled environment. Find a clear stretch of road or an empty parking lot to carefully apply the brakes at different speeds. Observe how the vehicle responds and listen for any unusual noises or vibrations. If you notice any issues during the test, it is imperative to address them promptly.
By following these testing and final check procedures, you can ensure that your brake calipers are installed correctly and functioning optimally. Remember, the safety of you and your passengers depends on properly operating brakes, so take the time to carry out these steps with diligence and care.
Frequently Asked Questions On How To Change Brake Calipers
How Often Should Brake Calipers Be Replaced?
Brake calipers typically do not need to be replaced as often as other brake components. However, it is recommended to inspect them regularly for signs of wear and tear. If you notice any leaks, corrosion, or uneven braking, it is likely time to replace the calipers.
Can I Change Brake Calipers Myself?
Yes, changing brake calipers is a task that can be done by skilled diy enthusiasts. However, it is important to have the proper tools and knowledge to ensure a safe and effective replacement. If you are unsure or uncomfortable performing this task, it is best to consult a professional mechanic.
Is it easy to fix a brake caliper?
The ease of fixing a brake caliper depends on your level of experience and familiarity with automotive repairs. For someone with mechanical know-how, changing a brake caliper can be manageable. However, if you’re not confident in your abilities, it’s recommended to seek professional assistance to ensure the job is done correctly and safely.
Can you change a brake caliper without bleeding?
It is not advisable to change a brake caliper without bleeding the brake system. Bleeding the brakes is essential to remove any air bubbles from the brake lines, ensuring proper brake fluid circulation and optimal braking performance. Skipping this step could lead to braking issues and safety concerns.
How do you compress a caliper when changing brakes?
To compress a caliper piston when changing brakes, you can follow these steps:
a. First, locate the caliper piston, which is usually visible on the backside of the caliper.
b. Place a C-clamp or a specialized caliper compression tool over the piston.
c. Slowly tighten the clamp or tool to apply pressure to the piston.
d. As you compress the piston, you’ll notice it retracting into the caliper housing.
e. Continue compressing until the piston is fully retracted, which allows space for the new, thicker brake pads.
Remember to be cautious while compressing the piston and ensure that the brake fluid reservoir cap is open to prevent pressure buildup in the brake system.
Conclusion
Changing brake calipers is a task that requires skill and precision, but with the right knowledge and tools, it can be done successfully. By following the step-by-step instructions outlined in this blog post, you can confidently take on the challenge of replacing your brake calipers.
It’s important to remember that safety should always be the top priority when working on any vehicle maintenance task, so make sure to take all necessary precautions. Regularly inspecting and, if needed, changing your brake calipers is essential for maintaining the braking performance of your vehicle and ensuring your safety on the road.
Whether you’re a seasoned diyer or a beginner, with this guide, you can tackle the task with confidence, saving both time and money by doing it yourself. So go ahead, get your hands dirty, and enjoy the satisfaction of completing a job well done.
Safe driving!