
This article was updated in June 5, 2023 with new products and information by Mark S. Taylor
Driving enthusiasts understand the importance of stability and control while maneuvering their vehicles. Sway bars, also known as anti-roll bars, play a crucial role in reducing body roll and enhancing overall stability. Whether you’re an experienced mechanic or a passionate DIYer, this guide will walk you through the process of installing sway bars in your vehicle. From necessary tools to step-by-step instructions, we’ve got you covered!
Contents
What Are Sway Bars?
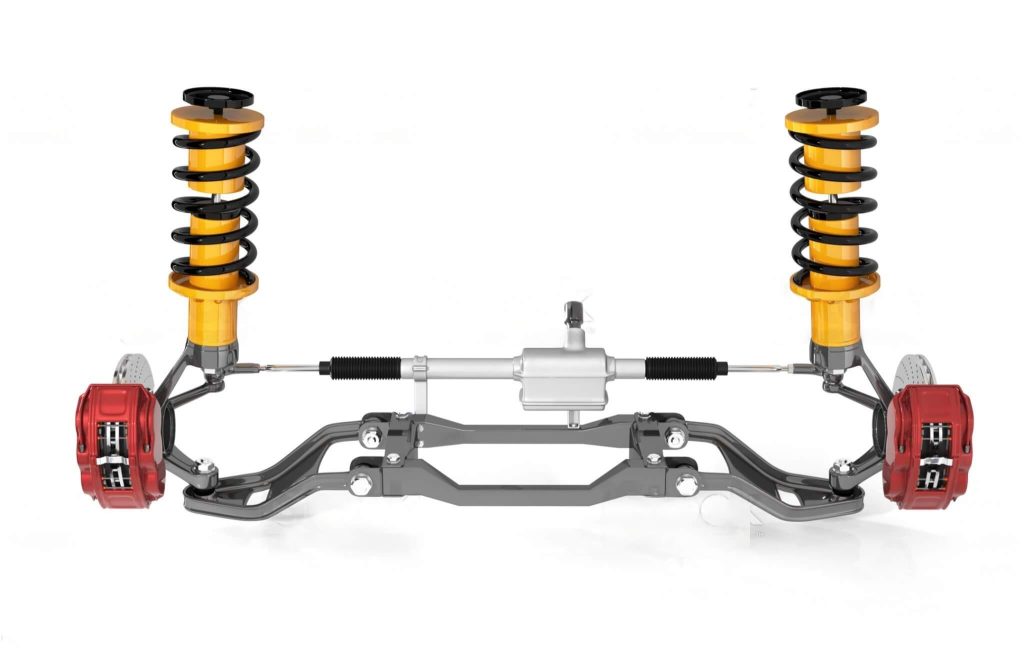
Before diving into the installation process, let’s understand the purpose of sway bars. Sway bars are suspension components designed to minimize body roll when cornering or maneuvering at high speeds. They connect the left and right sides of a vehicle’s suspension system, effectively transferring load and balancing the chassis. By reducing body roll, sway bars enhance stability, control, and responsiveness.
Tools Required for Installation
To install sway bars, you’ll need a few tools to ensure a smooth process. Here’s a list of the essential tools:
- Jack and jack stands
- Wrench set
- Socket set
- Torque wrench
- Pry bar
- Anti-seize lubricant
- Thread-locking compound
- Rubber mallet
- Safety glasses
Having these tools readily available will save you time and frustration during the installation.
Preparing Your Vehicle
Before beginning the installation, it’s crucial to prepare your vehicle. Here’s a step-by-step guide:
- Park your vehicle on a flat surface and engage the parking brake.
- Place wheel chocks behind the rear tires to prevent the vehicle from rolling.
- Lift the vehicle using a jack and secure it with jack stands for added safety.
- Locate the sway bar brackets and end links, typically found near the suspension components.
Removing the Old Sway Bar
To install a new sway bar, you’ll need to remove the existing one. Follow these steps:
- Begin by removing the sway bar brackets using a wrench or socket set.
- Carefully detach the end links from the sway bar using the appropriate tools.
- Once the end links and brackets are removed, gently lower the old sway bar from the vehicle.
Installing the New Sway Bar
Now that the old sway bar is out of the way, let’s proceed with installing the new one. Here’s how:
- Align the new sway bar with the mounting locations and lift it into place.
- Attach the sway bar brackets and tighten them securely using a torque wrench.
- Apply an appropriate amount of anti-seize lubricant to the sway bar bushings to prevent squeaking and ensure smooth operation.
Torqueing the Bolts
Properly torquing the bolts is crucial to ensure the sway bar functions optimally. Follow these steps:
- Refer to your vehicle’s manufacturer specifications for the recommended torque values.
- Use a torque wrench to tighten the sway bar bolts to the specified torque.
- Tighten the bolts gradually and evenly to ensure consistent torque distribution.
Connecting the End Links
To complete the installation, it’s time to connect the end links. Here’s what you need to do:
- Attach the end links to the sway bar using appropriate tools.
- Make sure the end links are properly aligned and secure them tightly.
- Apply thread-locking compound to the end link nuts to prevent them from loosening over time.
Adjusting Sway Bar Stiffness
Some sway bars offer adjustable stiffness settings, allowing you to fine-tune your vehicle’s handling characteristics. Here’s how you can adjust sway bar stiffness:
- Consult the manufacturer’s instructions or product documentation for specific adjustment procedures.
- Typically, adjustable sway bars have multiple mounting holes or adjustable links.
- By changing the mounting position or link adjustment, you can modify the sway bar’s stiffness to suit your preferences.
How to Install Sway Bars
Introduction Sway bars, also known as stabilizer bars or anti-roll bars, are an important component of a vehicle’s suspension system. They help reduce body roll during cornering and improve overall stability. If you’re looking to enhance your vehicle’s handling and performance, installing sway bars can be a worthwhile upgrade. In this article, we will guide you through the process of installing sway bars on your vehicle.
Understanding Sway Bars Sway bars are typically metal bars that connect the left and right sides of a vehicle’s suspension. They work by transferring the energy from one side of the suspension to the other, minimizing body roll and improving traction. Sway bars come in various sizes and thicknesses, and their installation can vary depending on the vehicle’s make and model.
Benefits of Installing Sway Bars There are several benefits to installing sway bars on your vehicle. Firstly, they improve handling and stability, especially during turns and maneuvers. This can result in better control and a more enjoyable driving experience. Additionally, sway bars can help reduce body roll, which can enhance safety by keeping the vehicle more stable on the road.
Gathering the Necessary Tools Before you begin the installation process, make sure you have all the necessary tools and equipment. This may include a socket wrench set, torque wrench, pry bar, jack stands, and the new sway bars specific to your vehicle. Refer to the manufacturer’s instructions or consult a professional for guidance on the appropriate sway bars for your vehicle.
Preparing the Vehicle To install sway bars, start by preparing your vehicle. Park it on a level surface and engage the parking brake. Ensure the wheels are secure and use jack stands to lift the vehicle off the ground, providing enough clearance to work underneath. Always prioritize safety during this process.
Removing the Old Sway Bars (if applicable) If your vehicle already has sway bars installed, you may need to remove them before installing the new ones. Begin by locating the sway bar links and disconnecting them using appropriate tools. Loosen and remove the bolts that secure the sway bar to the suspension components. Carefully remove the old sway bar from the vehicle.
Installing the New Sway Bars Now it’s time to install the new sway bars. Begin by positioning the new sway bar in place, aligning it with the mounting points on the suspension components. Secure the sway bar using the provided hardware, ensuring a tight fit. Follow the manufacturer’s instructions for torque specifications and tightening sequences.
Torqueing the Bolts Once the sway bars are properly installed, use a torque wrench to tighten the bolts to the recommended specifications. This step is crucial to ensure the sway bars are securely fastened and will function effectively. Improper torqueing can lead to loose sway bars and potential safety hazards.
Reassembling and Testing After torquing the bolts, reassemble any components that were removed, such as sway bar links. Double-check all connections and make sure everything is properly tightened. Once reassembled, lower the vehicle from the jack stands. Take the vehicle for a test drive to ensure the sway bars are functioning correctly and to evaluate any improvements in handling and stability.
Read More: How To Install A Boost Gauge On Any Car
FAQs
Q1: Can I install sway bars myself, or should I seek professional help?
The installation of sway bars can be done by DIY enthusiasts with the necessary tools and knowledge. However, if you are not confident in your abilities or lack experience working on vehicles, it is recommended to seek professional help to ensure a proper installation.
Q2: Will installing sway bars affect the ride quality of my vehicle?
Installing sway bars may result in a slightly firmer ride due to the reduced body roll and increased stability. However, the impact on ride quality is generally minimal, and many drivers find the improved handling to be worth it.
Q3: Are sway bars vehicle-specific, or can I install any size on my vehicle?
Sway bars are vehicle-specific, and it’s important to choose the correct size and type for your vehicle. Refer to the manufacturer’s recommendations or consult with a professional to ensure you select sway bars that are compatible with your vehicle’s make and model.
Q4: Can sway bars be installed on any type of vehicle?
Sway bars can be installed on most vehicles, including cars, trucks, and SUVs. However, the installation process may vary depending on the vehicle’s suspension design and specifications. Consult the manufacturer’s instructions or seek professional guidance for specific vehicle compatibility.
Q5: Can I reuse my old sway bars if they are still in good condition?
If your old sway bars are still in good condition, you may be able to reuse them. However, it’s important to assess their condition and ensure they meet the necessary specifications for your vehicle. Always prioritize safety and consult with a professional if you have any doubts.
Conclusion: Installing sway bars can significantly enhance your vehicle’s handling and stability. By following the steps outlined in this article and considering safety precautions, you can successfully install sway bars on your vehicle. Always refer to the manufacturer’s instructions and seek professional assistance if needed to ensure proper installation.