
This article was updated in June 27, 2025 with new products and information by Mark S. Taylor
I’ll never forget the first time I had to replace drum brakes. I had no idea what I was doing, but after a few wrong turns and some trial and error, I finally figured it out. It felt like a major win when I successfully completed the job. Now, I can replace drum brakes on any vehicle with confidence. If you’re wondering how to replace drum brakes, you’re in the right place! This guide will walk you through the process, highlighting key steps and safety tips along the way. Whether you’re a beginner or someone looking to refresh your skills, I’ll show you how to do it right the first time.
Contents
- 1 Why and When You Need to Replace Drum Brakes
- 2 Tools and Materials You’ll Need for the Job
- 3 Step-by-Step Drum Brake Removal Process
- 4 Inspecting Components – When to Replace vs Reuse
- 5 Replacing Brake Shoes – The Heart of the Job
- 6 Reassembling the Drum Brake System
- 7 Adjusting Drum Brakes – Getting It Just Right
- 8 Bleeding the Brakes – After Drum Replacement
- 9 Final Checks and Test Drive
- 10 Upgrading to Disc Brakes – Is It Worth It?
- 11 Common Issues & Troubleshooting Tips
- 12 FAQs – Everything You’ve Asked About Drum Brakes
- 13 My Final Thoughts on DIY Drum Brake Replacement
Why and When You Need to Replace Drum Brakes
So, when do you actually need to swap out those drum brakes? This is a question I get a lot, and honestly, the answer is simpler than you might think. Unlike brake shoes, which wear down over time and need regular replacing, drums only need replacing if they’re deeply cracked, severely oversized, or show excessive wear. Think of it like a good cast iron pan – it gets better with age, and if you treat it right, it’ll last you ages. My personal rule of thumb is, if they look structurally sound and aren’t warped, they’re probably good to go for another round.
Now, don’t get me wrong, while drums are tough, the brake shoes inside them are designed to be sacrificial. It’s a bit like how a printer needs new ink cartridges but the printer itself keeps going. In fact, if they’re properly adjusted, your existing brake drums can easily last for several sets of brake shoes. I’ve seen drums that have been through three or four sets of shoes and are still perfectly within spec, saving my friends (and me!) a good chunk of change.
But how do you know when it’s truly time? Well, your car usually gives you some pretty clear hints. If you’re hearing unusual noises like a grinding or scraping sound when you brake, or if your braking just feels less effective than it used to, those are definite red flags. Visible damage, like deep grooves or even cracks on the drum’s surface, is another clear sign. I remember once ignoring a faint scraping noise on my old sedan, only to find the drum severely scored when I finally pulled it off – a lesson learned about listening to my car’s subtle warnings! These signs indicate your drum brake service is overdue.
Tools and Materials You’ll Need for the Job
Before you dive into your drum brake replacement, let’s talk about what you’ll need to get the job done right. I’ve learned from experience: starting without the right tools is like trying to bake a cake without flour. It might work, but it won’t be pretty.
First up: a good jack and jack stands or ramps . These help lift your car so you can safely take the wheel off. Don’t skip this step—safety always comes first. A lug wrench will also come in handy when it’s time to loosen and tighten those wheel nuts.
Now, here’s a tip many beginners miss: penetrating oil (like WD-40 or PB Blaster). That old brake drum might be stuck on there tight, thanks to years of rust and grime. Give it a good spray and let it sit while you prep the rest of your gear.
When you’re inside the drum, a brake spring tool becomes your best friend. Those little springs are under pressure and can be a real pain to remove by hand. Trust me, using pliers instead will only leave you frustrated and sore. Also keep a flathead screwdriver and needle-nose pliers nearby—you’ll use them more than you think.
And don’t forget brake cleaner and a rag . Wipe everything down before installing new parts. Clean brakes not only look better but work better too.
Materials: What to Buy Before You Begin
Once you have your tools ready, gather your materials. The main part you’ll replace is the drum brake shoes . These press against the drum when you hit the brakes. Over time, they wear down and need to be swapped out. Always go for quality brands—even if they cost a bit more, they last longer and stop better.
A brake hardware kit should also be on your list. This often includes new springs, clips, pins, and adjusters. Think of it like changing the batteries in your remote—it makes sense to do it while you’re already in there.
Here’s a smart move: consider buying a drum brake replacement kit . These kits bundle the shoes, hardware, and sometimes even the wheel cylinder into one package. It saves time and makes sure you have all the parts you need before you start.
If your wheel cylinder looks leaky or sticky, now’s the time to swap it out. It’s not always needed, but a faulty one can cause big problems later.
Safety First – Gear Up!
Last but not least: protect yourself. Wear gloves to guard your hands from sharp edges and brake dust. And don’t skip safety glasses —tiny bits of metal or brake cleaner can easily fly into your eyes.
Wear clothes you don’t mind getting dirty. Brake jobs are messy, and no matter how careful you are, you’ll end up with grease somewhere by the end of it.
Think of this list as your pre-flight checklist. If you’ve got everything lined up before you start, you’ll work faster, stay safer, and finish the job feeling proud—not stressed.
Step-by-Step Drum Brake Removal Process
- Spray the Hub with Penetrating Oil: If the drum is stuck, start by spraying the hub with penetrating oil. This will help loosen any rust or buildup that might be making the drum hard to remove.
- Ease Pressure off the Adjusting Bolt: Next, relieve the pressure on the adjusting bolt. This will make it easier to remove the drum and prevent damaging any components when pulling the drum off.
- Back Off the Brake Adjuster: Adjust the brake shoes by turning the brake adjuster mechanism. This will create enough space between the shoes and the drum, helping the drum come off more easily.
- Tap Drum Edges Gently: If the drum is still stuck, gently tap the edges with a hammer or screwdriver to break loose any rust or debris around the drum.
- Pull the Drum Off: With the drum loosened, carefully pull it off. If it’s still difficult to remove, a little extra effort might be needed, especially if rust has built up. Be patient and avoid using excessive force that could damage the drum or other components.
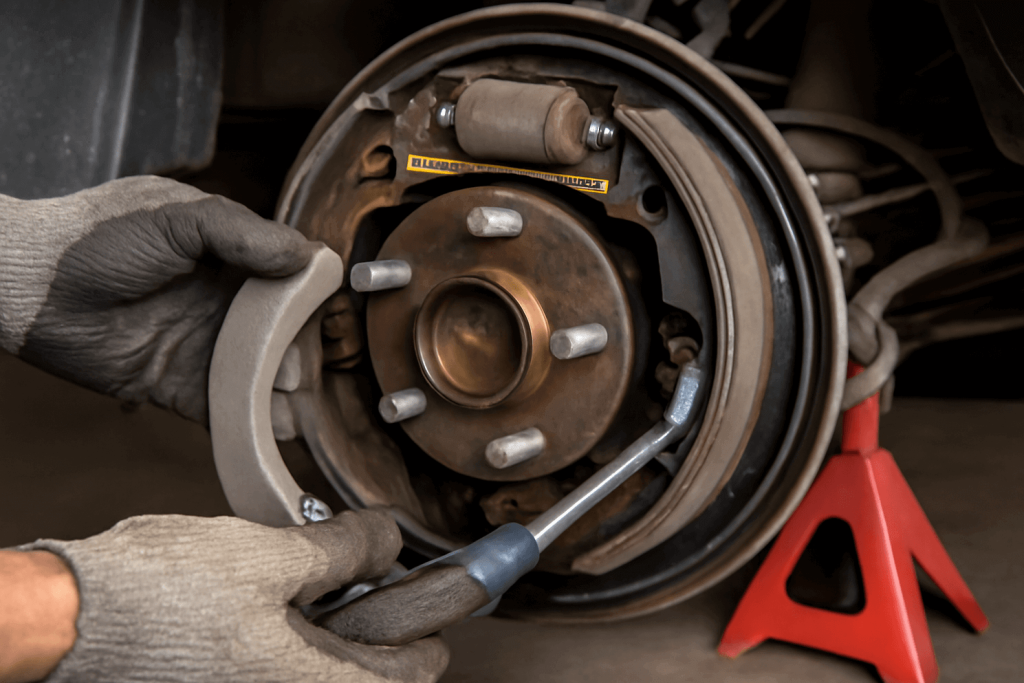
- Inspect What’s Behind the Drum: Once the drum is off, take a moment to inspect the components behind it—look for signs of wear, rust, or damage. This is a good time to check the brake shoes, wheel cylinder, and any other parts that may need attention.
By following these steps, you’ll have the drum removed and be ready to replace any worn parts inside.
Inspecting Components – When to Replace vs Reuse
Once you’ve removed the drum, it’s time to check the condition of the components inside. This step is crucial for ensuring your brakes work effectively and safely.
Brake Shoes: First, check the brake shoes for wear. If the lining is too thin, it’s time to replace them. If you’re unsure, remember, it’s always better to replace worn shoes than risk poor braking performance.
Wheel Cylinder: Look at the wheel cylinder for any signs of leakage. If it’s leaking, the fluid can cause your braking system to fail. If you spot leaks, don’t hesitate to replace it.
Springs: Inspect the springs for any signs of wear or breakage. Broken or worn springs can lead to poor performance or even a malfunction in the braking system. Replace them if necessary.
Bearings: Check the bearings for any play or roughness. If there’s any movement or a grinding feel, they need to be replaced. Bearings should spin smoothly without any rough spots.
Drum Surface: Finally, inspect the drum surface. Look for cracks, scoring, or excessive wear. If the drum has deep grooves or is cracked, it should be replaced. Also, measure the drum’s diameter. If it’s beyond the manufacturer’s specifications, it’s time for a new one.
Going through these checks ensures that your drum brake system is in top shape. If any components don’t meet the standards, replacing them will give you safer and more reliable braking. It’s always better to spend a little extra on new parts now than face bigger issues down the road!
Replacing Brake Shoes – The Heart of the Job
Replacing the brake shoes is the most important part of the job. Start by using a brake spring tool to carefully remove the old shoes. This tool helps you remove the springs without damaging any components. Once the shoes are off, compare the new shoes to the old ones to ensure they match in size and shape. This step is important because the new shoes need to fit properly in the drum to function correctly.
Next, install the new shoes and hardware. Take your time to carefully position the shoes in place, making sure everything lines up. If you have a brake hardware kit, replace all the clips and springs with fresh parts. This will help ensure your brakes work smoothly and last longer.
It’s a good idea to use diagrams or photos from your service manual to match the original setup. This will guide you in placing the shoes, springs, and clips exactly how they were before.
If you notice any signs of a leaking wheel cylinder, now’s the time to replace it. Leaks can cause poor braking performance, so if the cylinder is damaged or leaking, replacing it will ensure everything works as it should.
By carefully following these steps, you’ll ensure your drum brakes are replaced properly and safely, with fresh parts that’ll keep you driving smoothly.
Reassembling the Drum Brake System
Once you’ve replaced the brake shoes, it’s time to put everything back together. Start by putting the pushrod, shoes, and top spring back as a unit. This makes it easier to install everything without losing track of parts. Make sure the adjuster is in place—if it’s not, your brakes won’t adjust correctly, and that can cause issues later.
Next, double-check all the springs. Make sure they are all connected properly. Missing or misplaced springs can cause poor braking, so don’t rush this part.
Finally, clean off any excess grease or dirt. Wipe down everything to make sure nothing is in the way of smooth operation. Keeping things clean helps prevent wear and tear over time.
Taking your time to reassemble the drum brake system carefully will make sure everything works just right when you’re done.
Adjusting Drum Brakes – Getting It Just Right
Once everything is in place, it’s time to adjust the brakes. You can make a manual adjustment either through the backing plate or the drum hole. This is where patience is key—slowly tighten the adjuster while spinning the drum. You want to tighten it until you feel a slight drag. This ensures that the brake shoes are close enough to the drum to provide proper braking power.
Once you feel the drag, back off the adjuster slightly, following the manufacturer specs. It’s a small adjustment, but it makes a big difference in brake performance. You don’t want the shoes too tight, or they’ll cause unnecessary wear and poor performance.
Finally, be sure to check the parking brake after adjusting the drum brakes. Pull the parking brake and make sure it works smoothly and holds the car firmly in place. A well-adjusted parking brake will ensure your car is safe and ready to go.
Bleeding the Brakes – After Drum Replacement
After replacing the wheel cylinder or opening the brake lines, bleeding the brakes is essential. This step ensures that no air is trapped in the brake lines, which could cause the brakes to feel soft or unresponsive. Trust me, I’ve learned the hard way—skipping this step can lead to poor braking performance, and we definitely don’t want that.
If you’re working solo, you can use the single-person method. Grab a clear container, attach a tube to the bleeder valve on the brake caliper, and submerge it in the container. As you pump the brake pedal, air bubbles will escape through the tube. Keep an eye on the fluid level and top it up to prevent introducing more air. If you have a helper, have them press the pedal while you tighten and loosen the valve to release air.
Always make sure to use the correct brake fluid for your car—this is a small detail that can make a big difference in performance. Once the air is out, double-check the pedal feel. If it’s firm and responsive, you’re good to go! Bleeding the brakes may seem like a small step, but it’s key to making sure your new drum brakes work properly and safely.
Final Checks and Test Drive
Before you wrap up, make sure everything is reassembled properly. Reinstall the tire and torque the lug nuts to the manufacturer’s specifications. It’s easy to forget this step, but it’s crucial for your safety.
Next, pump the brake pedal a few times before starting the car. This helps build pressure in the system and ensures that the brakes are fully engaged.
Now for the most important part: take a short test drive at low speed. Start slow and listen carefully for any unusual noises, like grinding or squealing. Pay attention to how the brakes feel—does the car pull to one side? Is the pedal soft or firm? If you notice any issues, head back and recheck everything. Sometimes, a small adjustment is needed to get it just right.
Upgrading to Disc Brakes – Is It Worth It?
Thinking about upgrading from drum brakes to disc brakes? I’ve been there, weighing the pros and cons. Let’s break it down simply.
Pros of Converting:
Disc brakes give you better stopping power. They handle heat better, too, so they don’t fade as easily. They also dry faster in wet weather, which can make a big difference in performance. Plus, disc brakes are easier to inspect and maintain.
Cons of Converting:
The downside is the cost. Conversion kits aren’t cheap. You’ll also need to check if your car can handle the change, and that might involve other upgrades. Disc brakes are also bulkier, so they may not fit in smaller or older cars.
Cost Considerations:
A conversion kit can cost a few hundred to over a thousand dollars. Depending on the car, you might also need extra parts like new hubs or rotors. It’s a good investment if you’re after better performance but can get pricey.
Performance Benefits:
Disc brakes offer much better braking power, especially when you need to stop fast or drive in wet conditions. They’re also more reliable under heavy use, like going downhill or during hard braking. If safety and performance matter, they’re definitely a step up.
When Conversion Kits Make Sense:
If you drive a classic car or plan on using your vehicle for high-performance driving, a conversion kit might be a smart choice. However, if your current drum brakes work fine and you’re not pushing your car to its limits, it might not be worth the cost.
In the end, it’s all about what you need. If you want better brakes and are willing to invest, disc brakes are a great option. Just make sure the upgrade is right for your car and your driving needs.
Common Issues & Troubleshooting Tips
Working on drum brakes can be a bit tricky, but with a little patience, you can handle most issues. Here are some common problems I’ve run into and how to fix them.
Drum Won’t Come Off
One issue I’ve faced is when the drum won’t come off. If this happens, spray the hub with penetrating oil and let it sit for a bit. This helps loosen up any rust. Next, back off the brake adjuster and ease the pressure off the bolt. If it’s still stuck, gently tap the edges with a hammer or screwdriver. This should help it come loose.
Uneven Braking or Squeaking After Install
If you notice uneven braking or squeaking after the install, it’s often because the shoes aren’t aligned right. Make sure the brake shoes are correctly placed, and check that all the springs are properly connected. If the issue persists, try adjusting the shoes through the backing plate until there’s a slight drag on the drum.
Parking Brake Not Holding
If your parking brake isn’t holding, the cable might need adjusting. Check if it’s tight enough, and also inspect the springs and the cable for any wear or rust. A quick adjustment should do the trick.
Brake Pedal Feels Spongy
A spongy brake pedal usually means there’s air in the brake lines. This happens if you’ve opened them during the process. The fix? Bleed the brakes to remove the air. Just top up the brake fluid and bleed the lines in order, starting with the furthest brake from the master cylinder.
These issues are common but easy to fix. A little attention can go a long way in making sure your drum brakes work just right.
FAQs – Everything You’ve Asked About Drum Brakes
Is it difficult to replace drum brakes?
Replacing drum brakes isn’t too hard if you follow the steps carefully. With the right tools and patience, you can complete the job. Just make sure you’re ready to take your time.
Can I change my own drum brakes?
Yes, you can change your own drum brakes. As long as you have the right tools, follow instructions, and take safety precautions, replacing drum brakes is a manageable DIY task.
Do you need special tools to change drum brakes?
Yes, you will need a few special tools like a brake spring tool, a jack, and penetrating oil. These tools help with safely removing and installing the drum and brake components.
How much does it cost to replace drum brakes?
The cost to replace drum brakes varies depending on your car and location. On average, you can expect to pay between $200 and $500 for parts and labor. Doing it yourself can save you money.
How to tell if drum brakes are bad?
Signs your drum brakes are bad include squeaking, grinding noises, or a soft brake pedal. If your car pulls to one side or you notice uneven braking, it may be time to replace them.
How hard is it to swap drum brakes to disc brakes?
Swapping drum brakes to disc brakes is a more complicated and expensive job. You’ll need a conversion kit, and the process involves more parts and labor. It’s a good upgrade for performance but not always necessary for everyday driving.
My Final Thoughts on DIY Drum Brake Replacement
If you’re someone who enjoys getting hands-on with your car, DIY drum brake replacement could be a rewarding project for you. Sure, it takes some time and patience, but the satisfaction of doing it yourself and saving money is worth it. I’ve personally found it to be a great learning experience and a chance to understand my car better. With the right tools and safety precautions, you can do it too! If you have any questions or need advice, feel free to drop a comment. I’d love to hear about your experience!