
This article was updated in October 28, 2026 with new products and information by Mark S. Taylor
You crank the AC and get a face full of dust, or worse, that damp-basement smell nobody wants riding shotgun. Here’s the fix: a dry-first cleaning order for the dust, and a filter-plus-evaporator fix for the smell, since they’re not the same problem. Scroll down for both, in the exact order that won’t push dust or moisture deeper into your dash.
Now, you might be wondering why there are two different procedures here instead of one. Dust is a surface problem. A musty smell almost always means something biological is growing deeper in the system, and spraying cleaner at the vent face won’t touch it.
Contents
What You’ll Need
- A vacuum with a crevice or brush attachment
- A soft-bristle detailing brush
- A microfiber cloth (keep it damp, not wet)
- Cotton swabs or foam detailing swabs for tight corners
- An interior-safe cleaner, mild soap and water works, or a dedicated interior detailer
- Optional: a can of compressed air, a small screwdriver if your vents pop out for deeper access
Part 1: The Dust and Grime Clean
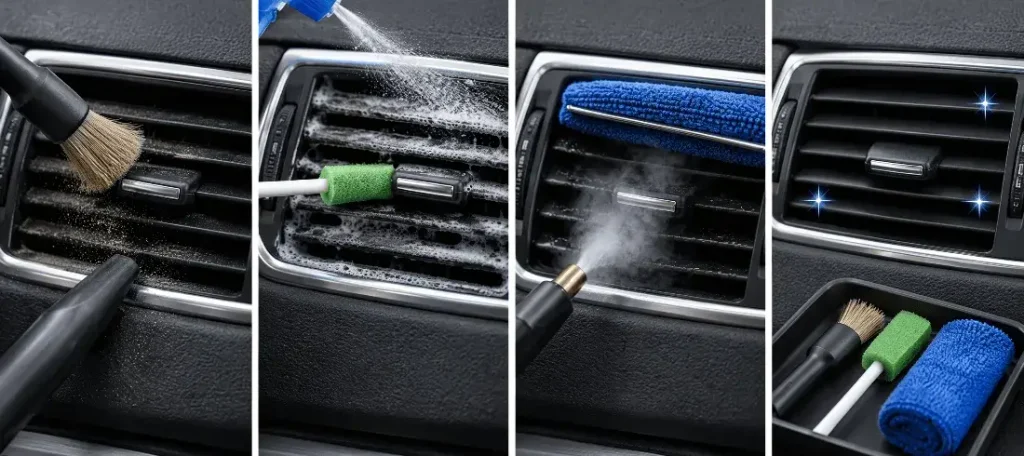
Here’s the catch most guides skip: the order matters as much as the products. Spraying liquid directly into the vent, or wiping before you’ve removed the loose dust, pushes grit into the ductwork and turns dry dust into paste. Work dry first, wet last.
- Open the vents fully and set the fan to off. Move the louvers so you can reach both sides of each fin.
- Vacuum the vent face first. Run the crevice attachment across the surface to pull off loose dust before a brush touches it. This cuts down how much debris you’re spreading around in the next step.
- Dry-brush between the louvers. Short strokes with a soft-bristle brush, top to bottom, working into the channels between fins where a vacuum alone can’t reach. Keep the vacuum nozzle close so it catches what comes loose.
- Hit tight corners with a cotton swab or compressed air. For narrow gaps and seams the brush can’t reach, a swab or a short blast of compressed air clears what’s left. Direct air outward, not deeper into the vent.
- Dampen the cloth, not the vent. Spray your interior cleaner onto the microfiber cloth or the brush, never straight into the vent opening. Wipe each visible surface, then follow with a dry section of cloth to pick up any residue.
- Finish with a light protectant on the surrounding plastic, not the vent fins themselves. This slows future dust buildup and helps keep the plastic from cracking under UV exposure.
For a deeper clean, some vents pop out by hand; others need a small screwdriver to release the housing from the dash. That gets you access to wipe further into the duct opening, but don’t force a vent that resists, not every model is designed to come out easily.
Part 2: The Musty Smell Fix
The truth is, a damp, musty, or mildew smell is a different problem than dust, and no amount of vent brushing fixes it. That smell almost always comes from mold or bacteria growing on the evaporator core, in the cabin filter housing, or in the condensate drain, not from the vents themselves.
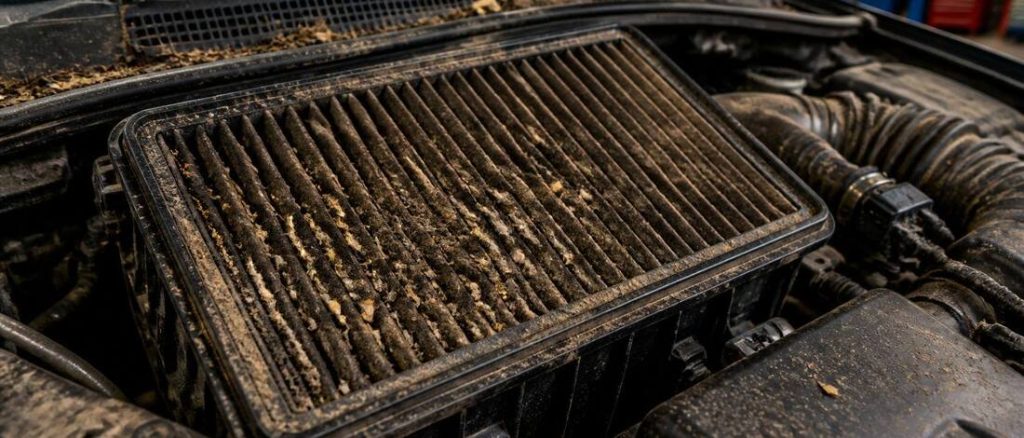
- Check the cabin air filter first. It’s the single most commonly contaminated part, and it’s often the quickest fix. If it’s dirty, damp, or hasn’t been changed in a year or more, replace it before anything else. Running air through a clean filter while the rest of the system is still dirty just defeats the point.
- Run the blower without the AC for a few minutes before shutting the car off. Several detailers recommend this specifically to dry out residual moisture on the evaporator and reduce the damp environment mold needs to grow.
- Switch to fresh air mode, not recirculate, while treating the system. Recirculation pulls cabin air back across a contaminated coil and concentrates the smell instead of clearing it.
- Apply an AC-safe foaming or aerosol cleaner through the air intake (commonly found near the base of the windshield, under the hood) while the fan runs, following the product’s instructions. This is what actually reaches the evaporator core, which a vent-level cleaning can’t touch.
- Check the condensate drain if the smell persists. A clogged drain tube lets moisture pool instead of draining out from under the car, which keeps feeding the mold. This one’s easier for a shop to clear than most DIYers.
- Give it time to dry with the windows down after treatment before sealing the car back up.
Is This a Health Issue?
On the flip side, a little dust is cosmetic. Mold and bacteria in the HVAC system are a different category entirely. Breathing recirculated, contaminated cabin air at close range for long drives is a real concern, especially for anyone with allergies, asthma, or other respiratory sensitivity. Sneezing, congestion, itchy eyes, or a headache that eases once you’re out of the car are worth paying attention to, not dismissing as a coincidence.
If the smell comes back within days of a filter swap and cleaning, or you find standing water or a damp carpet near the passenger floor, that points to something past a simple filter issue, a clogged drain or deeper evaporator contamination, and it’s worth having a shop look at it rather than repeating the DIY cycle.
When to Call a Professional
- The musty smell returns quickly after a filter change and cleaning
- You see water under the dash or a damp passenger-side carpet
- The smell is severe, or you suspect heavy mold rather than everyday dust and mustiness
- You’d rather not deal with accessing the evaporator core yourself
What It Costs
These are U.S. ranges from detailing, repair, and parts sources as of late 2026, not quotes.
| Service | Typical U.S. range | Notes |
|---|---|---|
| DIY dust cleaning | Under $20 in supplies if you don’t already own a brush and microfiber cloths | Vacuum and basic cleaner you likely already have |
| Cabin air filter, DIY part only | Roughly $10 to $40 | Prices climb if the filter is hard to reach and needs a shop to swap it |
| Cabin air filter, shop replacement (parts and labor) | Roughly $40 to a few hundred dollars | Depends heavily on how buried the filter is in your specific vehicle |
| Professional evaporator or duct cleaning | Roughly $80 to $300 | Price scales with mold severity and whether a drain clearing is bundled in |
| Full professional mold remediation (severe cases) | Can run over $1,000 in serious cases | Reserved for heavy, established mold rather than routine musty-smell maintenance |
DIY or pro? The dust-cleaning routine and a filter swap are reasonable DIY jobs for almost anyone. A musty smell that keeps coming back, or any sign of standing water, is where a shop’s evaporator access and drain-clearing tools start to earn their cost.

Common Mistakes
- Spraying cleaner directly into the vent. It drives liquid toward the ducting, electronics, and insulation behind the vent instead of cleaning the surface.
- Wiping before you vacuum and brush. A damp cloth on dry dust just turns it into paste and pushes it into the vent channel.
- Treating a musty smell like a dust problem. Brushing the vent face does nothing for mold growing on the evaporator core.
- Masking the smell with an air freshener instead of fixing the source. It covers the symptom and does nothing for the air quality issue underneath.
- Replacing the cabin filter but skipping the evaporator treatment when the smell is already established. Both often need to happen together.
Pro Tips
- Clean vents in this order: top vents, then lower ones, so falling dust lands on surfaces you haven’t cleaned yet instead of ones you just finished.
- Do a full clean on a dry day so residual moisture doesn’t linger in a sealed cabin overnight.
- A quick dry-brush-and-vacuum pass every month or two keeps dust from building into a bigger job later.
- If you’ve just bought a used car with a stale or smoky cabin smell, a filter swap plus an evaporator treatment is worth doing before you assume the smell is permanent.
FAQs About Car Air Vents: The Step-by-Step Cleaning Guide
What’s the right order to clean car air vents?
Vacuum first to remove loose dust, then dry-brush between the louvers, then handle tight corners with a swab or compressed air, and only then wipe with a lightly damp microfiber cloth. Wiping before the dry steps turns dust into paste and pushes it deeper into the vent.
Why do my vents smell musty even after cleaning them?
A musty smell almost always comes from mold or bacteria growing on the evaporator core, in the cabin filter housing, or in a clogged condensate drain, not from the visible vent surfaces. Cleaning the vent face won’t reach any of those. Replacing the cabin air filter and treating the evaporator through the air intake addresses the actual source.
Is it safe to spray cleaner directly into my car’s air vents?
No. Spraying liquid straight into the vent opening can send it toward the ducting, wiring, and electronics behind the dash. Apply cleaner to your brush or cloth instead, and work it into the vent from there.
Can a dirty cabin air filter cause a musty smell?
Yes, it’s one of the most common causes. A clogged or damp filter traps moisture and debris and can recirculate contaminated air back into the cabin. Replacing it is often the fastest and cheapest fix, though a persistent smell may point to mold on the evaporator core instead.
How much does it cost to professionally clean car air vents?
A straightforward cabin filter replacement commonly runs $40 to a few hundred dollars depending on the vehicle. A full evaporator or duct cleaning for a musty smell commonly runs $80 to $300. Severe, established mold cases can cost significantly more.
Bottom Line
- Dust and musty smell are two different problems with two different fixes. Don’t treat one like the other.
- For dust: vacuum, then dry-brush, then wipe. Never spray cleaner straight into the vent.
- For smell: check the cabin air filter first, then treat the evaporator through the air intake, not the vent face.
- A smell that keeps coming back, or any sign of water under the dash, is worth a shop visit rather than another round of DIY cleaning.