
This article was updated in August 28, 2026 with new products and information by Mark S. Taylor
Replacing rear brake pads is a job many experienced DIYers can handle, but rear brakes have one important complication that front brakes often don’t: the parking-brake mechanism.
Some vehicles use a conventional mechanical parking brake, while many newer cars use an electronic parking brake (EPB). On EPB-equipped vehicles, the rear caliper may need to be placed into a manufacturer-specified service or maintenance mode before the piston can be retracted. Trying to force the piston back without following the correct procedure can damage the caliper or parking-brake mechanism.
So before you start, identify which rear-brake system your vehicle uses.
Quick answer: How to change rear brake pads, safely raise and support the vehicle, remove the rear wheel, place the parking-brake system in the correct service position, remove the caliper and old pads, inspect the rotor and hardware, retract the piston using the correct vehicle-specific method, install the new pads, reassemble everything to the manufacturer’s specifications, restore the parking-brake system, pump the brake pedal, verify the fluid level, and perform a careful brake test. The exact piston-retraction and EPB procedure varies by vehicle.
Contents
- 1 Before You Start: Identify Your Rear Brake Setup
- 2 Tools and Supplies
- 3 Step 1: Prepare the Vehicle
- 4 Step 2: Safely Raise and Support the Vehicle
- 5 Step 3: Remove the Rear Wheel
- 6 Step 4: Inspect the Brake Assembly
- 7 Step 5: Put the Parking Brake in the Correct Service Position
- 8 Step 6: Remove the Caliper
- 9 Step 7: Remove the Old Brake Pads
- 10 Step 8: Inspect the Rotor and Hardware
- 11 Step 9: Retract the Caliper Piston Correctly
- 12 Step 10: Install the New Brake Pads
- 13 Step 11: Reinstall the Caliper
- 14 Step 12: Reinstall the Wheel
- 15 Step 13: Restore the Parking-Brake System
- 16 Step 14: Pump the Brake Pedal
- 17 Step 15: Check the Brake Fluid
- 18 Step 16: Perform a Careful Brake Test
- 19 Do You Need to Replace the Rear Rotors With the Pads?
- 20 How Long Does It Take to Change Rear Brake Pads?
- 21 How Much Does It Cost to Change Rear Brake Pads?
- 22 Common Rear Brake Pad Replacement Mistakes
- 22.1 1. Working under a car supported only by a jack
- 22.2 2. Forcing an EPB caliper piston backward
- 22.3 3. Hanging the caliper by the brake hose
- 22.4 4. Getting grease on the pads or rotor
- 22.5 5. Reusing damaged hardware
- 22.6 6. Guessing torque specifications
- 22.7 7. Forgetting to pump the brake pedal
- 22.8 8. Driving without checking the brake pedal
- 22.9 9. Ignoring uneven pad wear
- 22.10 10. Assuming every rear caliper works the same way
- 23 DIY or Mechanic?
- 24 FAQs About How to Change Rear Brake Pads
- 24.1 Can I change rear brake pads myself?
- 24.2 Do rear brake pads need to be replaced in pairs?
- 24.3 Do I need a special tool to change rear brake pads?
- 24.4 Can I use a C-clamp on rear brake calipers?
- 24.5 Do I need to open the brake-fluid bleeder when changing pads?
- 24.6 How do I know if I need new rear rotors?
- 25 FINAL VERDICT
Before You Start: Identify Your Rear Brake Setup
Not every vehicle uses the same rear brake design.
You may have:
Conventional rear caliper
The parking brake may use a mechanical cable and a caliper mechanism.
Electronic parking brake
The parking brake uses an electric actuator.
Some EPB systems require a scan tool or a specific vehicle procedure to retract the mechanism before replacing the pads. Manufacturer procedures show that this can include putting the system into a dedicated brake-pad replacement or maintenance mode and performing an initialization procedure afterward.
Important
Do not assume that a procedure for one vehicle works on another.
The piston-retraction method, caliper hardware, torque specifications, and EPB reset procedure can all vary.
Tools and Supplies
You’ll typically need:
- Floor jack
- Two appropriately rated jack stands
- Wheel chocks
- Lug wrench or breaker bar
- Ratchet and sockets
- Torque wrench
- Brake piston compression or wind-back tool
- Brake cleaner
- Suitable brake lubricant
- Wire brush
- Safety glasses
- Gloves
- Correct replacement rear brake pads
For some EPB-equipped vehicles:
- Scan tool with the required EPB service function
Use the correct brake pads for your exact year, make, model, engine, and brake configuration.
Step 1: Prepare the Vehicle
Park on a solid, level surface.
Put the transmission in Park for an automatic transmission or in the appropriate gear for a manual transmission.
Apply the parking brake only if your vehicle’s service procedure allows it. For an EPB system, you may need to release it and place it into service mode before beginning the brake work.
Chock the wheels that remain on the ground.
Before lifting the vehicle, loosen the rear wheel lug nuts slightly.
Step 2: Safely Raise and Support the Vehicle
Use the vehicle’s specified lifting points.
Raise the rear of the vehicle and place it securely on jack stands at approved support points.
Never rely on the floor jack alone while working on the brakes.
Once the vehicle is supported, give it a careful stability check before removing the wheel.
Step 3: Remove the Rear Wheel
Remove the loosened lug nuts and take off the wheel.
Set it aside where it won’t interfere with your work.
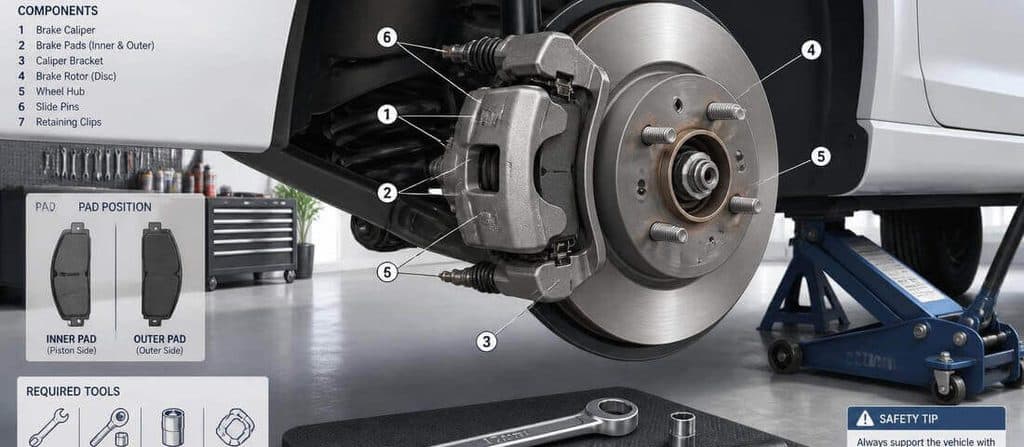
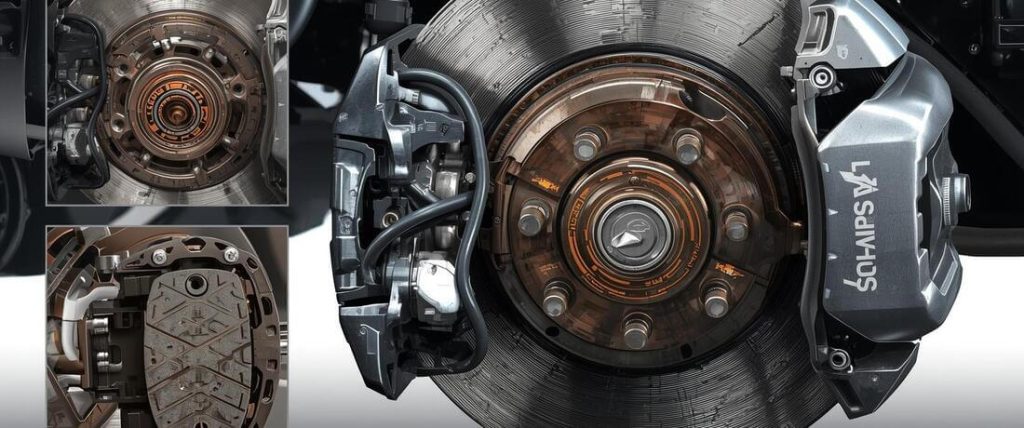
Now you should be able to see:
- Brake rotor
- Caliper
- Brake pads
- Caliper bracket
- Brake hose
- Parking-brake mechanism
Take a moment to inspect everything before removing anything.
Step 4: Inspect the Brake Assembly
Look at the rotor and pads.
Check for:
- Uneven pad wear
- Cracks
- Deep grooves
- Heavy rust scaling
- Blue or overheated areas
- Fluid contamination
- Torn caliper boots
- Damaged brake hose
- Sticking slide pins
If one rear pad is dramatically thinner than the other, don’t simply install new pads and ignore the cause.
Uneven wear can point toward:
- Sticking slide pins
- A sticking caliper
- Parking-brake mechanism problems
- Hardware problems
Step 5: Put the Parking Brake in the Correct Service Position
This is the step that separates many rear brake jobs from front brake jobs.
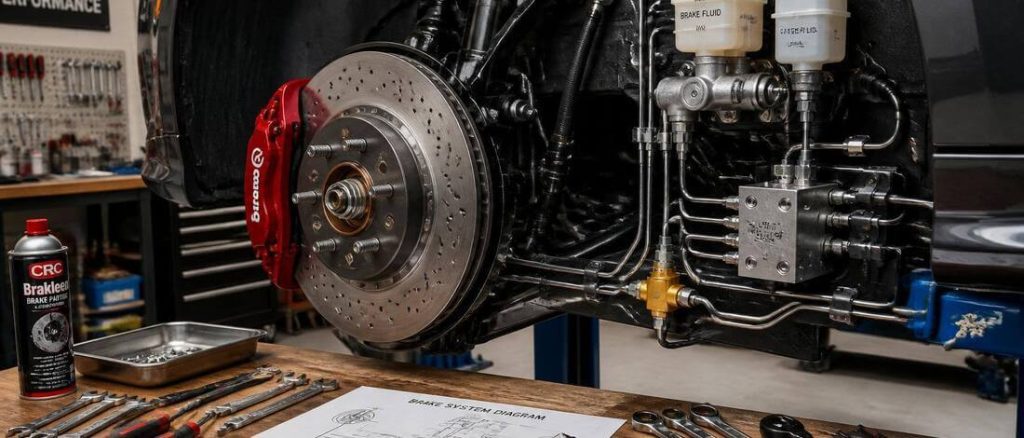
If your vehicle has an electronic parking brake
Follow the vehicle-specific EPB service procedure.
Some vehicles require a scan tool to command the brake into service mode.
Others provide a manufacturer-specific procedure using the vehicle controls.
Do not guess.
For example, Nissan service documentation requires a specific “START BRAKE PAD REPLACEMENT” process before certain rear-pad procedures and a corresponding finish/initialization process afterward.
Mitsubishi’s documented procedure similarly requires maintenance mode on applicable electric-parking-brake vehicles before rear-pad replacement.
Never assume:
“EPB means I can just push the piston in.”
That’s exactly the assumption you want to avoid.
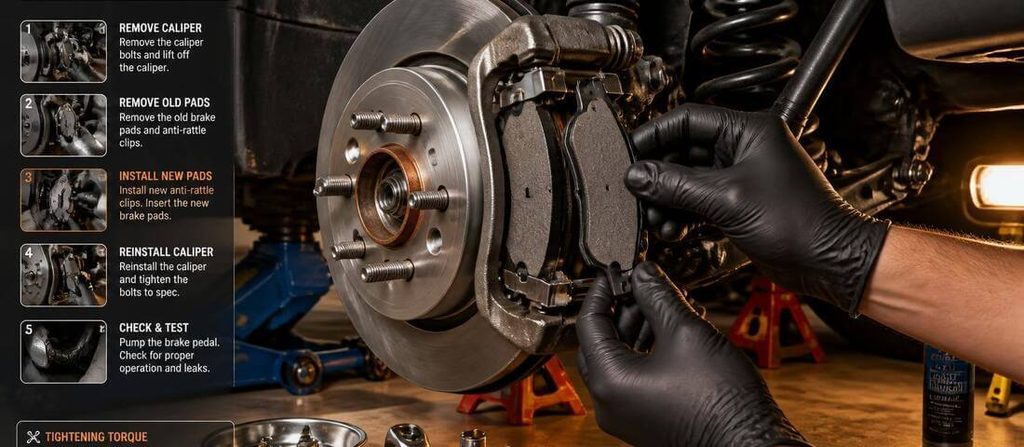
Step 6: Remove the Caliper
Follow your vehicle’s service procedure to remove the caliper bolts or pins.
Once the caliper is free:
Do not let it hang from the brake hose.
Support the caliper with an appropriate hook, wire, or other safe support.
A manufacturer rear-brake procedure specifically instructs technicians to support the caliper to prevent damage to the brake hose or parking-brake cable.
Step 7: Remove the Old Brake Pads
Remove the old pads and any associated clips, shims, or hardware that the service procedure calls for replacing.
Pay attention to how the old hardware is positioned.
If the pads have wear indicators, note their location before removing them.
Do not reuse hardware if the vehicle manufacturer specifies replacement.
Step 8: Inspect the Rotor and Hardware
Before installing new pads, inspect the rotor.
A rotor may need replacement if it is:
- Below the manufacturer’s minimum thickness
- Severely scored
- Cracked
- Heat-damaged
- Excessively corroded
- Uneven beyond the manufacturer’s limits
Don’t automatically replace rotors just because you’re replacing pads.
Likewise, don’t automatically reuse them.
Measure and inspect them according to the vehicle manufacturer’s specifications.
Step 9: Retract the Caliper Piston Correctly
This is another area where vehicle-specific instructions matter.
Some rear calipers require the piston to be pushed straight back.
Others require the piston to be rotated while being pushed back because the parking-brake mechanism is integrated into the caliper.
And EPB-equipped systems may require electronic retraction before mechanical piston work.
Forcing the wrong type of piston backward can damage the caliper.
A documented Mitsubishi rear-brake procedure, for example, specifies using the vehicle’s maintenance mode before pushing the piston back on applicable electric-brake systems.
Do not guess which method your vehicle uses.
Check the factory service information for your exact vehicle.
Step 10: Install the New Brake Pads
Install the new pads and hardware in the correct positions.
Make sure:
- Pads are seated correctly
- Clips are installed correctly
- Wear indicators are positioned correctly when applicable
- Pad friction surfaces are clean
- Rotor friction surfaces are clean
Keep grease and brake lubricant away from the pad friction material and rotor.
Manufacturer brake procedures specifically warn against contaminating those surfaces.
Step 11: Reinstall the Caliper
Carefully position the caliper over the new pads.
Install the caliper hardware according to the vehicle’s service procedure.
Use the manufacturer-specified torque.
Don’t use a generic torque value from another vehicle.
Brake-caliper hardware can differ substantially between applications.
Step 12: Reinstall the Wheel
Install the wheel and hand-tighten the lug nuts.
Lower the vehicle enough to prevent the wheel from turning, then torque the lug nuts using the manufacturer’s specification and correct tightening pattern.
Step 13: Restore the Parking-Brake System
If your vehicle has an EPB, complete the manufacturer’s service-mode exit and initialization procedure.
This step can be just as important as entering service mode.
Some manufacturer procedures require finishing the brake-pad replacement function and performing an initialization or calibration procedure before normal operation.
Step 14: Pump the Brake Pedal
Do not drive away immediately after installing the pads.
With the vehicle stationary, press the brake pedal several times until it becomes firm.
This allows the caliper pistons and pads to return to their normal operating position.
A manufacturer brake procedure explicitly instructs technicians to depress the brake pedal several times after a pad replacement so the pads return to their normal operating position.
Step 15: Check the Brake Fluid
Check the brake-fluid reservoir.
The level may change as the caliper pistons are retracted.
If the reservoir is unusually full, piston retraction can potentially cause fluid to rise or overflow.
Don’t simply remove or add fluid without understanding why the level changed.
Use only the brake fluid specified by the vehicle manufacturer.
Step 16: Perform a Careful Brake Test
Before entering traffic:
- Start the vehicle.
- Confirm the brake pedal feels firm.
- Confirm the parking brake releases and applies normally.
- Check for warning lights.
- Move slowly in a safe area.
- Apply the brakes gently.
- Confirm the vehicle stops normally.
- Listen for unusual noises.
- Check for pulling or abnormal pedal feel.
If the pedal feels soft or the vehicle doesn’t brake normally:
Do not continue driving.
Stop and diagnose the problem.
Do You Need to Replace the Rear Rotors With the Pads?
Not automatically.
Inspect and measure the rotors.
Replacement may be appropriate if they are:
- Below minimum thickness
- Severely damaged
- Cracked
- Excessively corroded
- Heat-damaged
- Outside manufacturer specifications
A good rule is:
Replace the rotor based on its condition and specifications—not simply because the pads are being replaced.

How Long Does It Take to Change Rear Brake Pads?
For an experienced DIYer working on a familiar, conventional rear-brake system, a simple rear-pad replacement may take around 1–2 hours.
Allow more time if:
- The vehicle has an EPB
- Bolts are seized
- Hardware is rusty
- The caliper needs servicing
- Rotors need replacement
- You’re unfamiliar with the procedure
Don’t choose a repair based solely on a claimed “30-minute job.”
Brake work deserves enough time for proper inspection and testing.
How Much Does It Cost to Change Rear Brake Pads?
DIY cost depends mainly on the pad set and whether additional parts are needed.
A shop will charge for:
- Brake pads
- Labor
- Inspection
- Possible hardware
- Possible rotor replacement
- Possible EPB service/reset
Prices vary considerably by vehicle and location.
If a shop quotes you for pads and rotors, ask whether the rotors are actually below specification or damaged.
Common Rear Brake Pad Replacement Mistakes
1. Working under a car supported only by a jack
Never do this.
2. Forcing an EPB caliper piston backward
This can damage the parking-brake mechanism.
3. Hanging the caliper by the brake hose
Support it properly.
4. Getting grease on the pads or rotor
Brake friction surfaces must remain clean.
5. Reusing damaged hardware
Replace hardware when the manufacturer or pad kit requires it.
6. Guessing torque specifications
Use the exact vehicle specification.
7. Forgetting to pump the brake pedal
The pedal may initially travel much farther than normal.
8. Driving without checking the brake pedal
Always verify firm pedal feel before moving into traffic.
9. Ignoring uneven pad wear
Uneven wear can indicate a caliper, slide-pin, parking-brake, or hardware problem.
10. Assuming every rear caliper works the same way
This is perhaps the most important mistake.
Rear brake systems vary.

DIY or Mechanic?
| Situation | Recommendation |
|---|---|
| Conventional rear brakes, experienced DIYer | DIY possible |
| First-ever brake job | Consider professional help |
| Electronic parking brake | DIY only with correct vehicle procedure/tools |
| Seized caliper/slide pins | Mechanic recommended |
| Damaged brake hose | Mechanic recommended |
| Soft pedal after repair | Stop driving and diagnose |
| Brake warning light remains on | Diagnose before driving normally |
| Unsure how to retract piston | Mechanic recommended |
| Hydraulic brake system opened | Professional inspection strongly recommended |
FAQs About How to Change Rear Brake Pads
Can I change rear brake pads myself?
Yes, if you have the correct tools, safe lifting equipment, and the vehicle-specific procedure. Rear brake systems vary, particularly when an electronic parking brake is involved.
Do rear brake pads need to be replaced in pairs?
Yes. Replace the rear pads on both sides of the axle rather than replacing only one side. Manufacturer brake procedures explicitly specify replacing both rear pads as a set.
Do I need a special tool to change rear brake pads?
Possibly. Some rear calipers require a piston wind-back tool, while EPB-equipped vehicles may require an electronic service procedure or compatible scan tool.
Can I use a C-clamp on rear brake calipers?
Not universally. Some rear calipers can be compressed directly, while others require rotation or electronic retraction. Using the wrong method can damage the caliper.
Do I need to open the brake-fluid bleeder when changing pads?
Not normally for a routine pad replacement. Follow the vehicle-specific service procedure. Opening the hydraulic system introduces additional bleeding and contamination considerations.
How do I know if I need new rear rotors?
Measure rotor thickness and inspect its condition against the manufacturer’s specifications. Don’t replace rotors solely because the pads are worn.
FINAL VERDICT
Changing rear brake pads is a reasonable DIY job only when you understand the brake system on your specific vehicle.
The basic mechanical process is straightforward, but the rear parking-brake mechanism can change the procedure significantly. On EPB-equipped vehicles, follow the manufacturer’s service-mode procedure rather than forcing the caliper piston backward.
If you aren’t certain how your rear caliper retracts, stop before forcing anything.