
To mount a headache rack without drilling, use a no-drill mounting kit that securely attaches the rack to the truck bed. Here’s how to install a headache rack without drilling and damaging your truck.
If you’re looking for a headache rack for your truck but want to avoid drilling holes in your truck bed, there is a solution. With a no-drill mounting kit, you can easily and securely attach a headache rack to your truck without causing any damage.
Whether you use your truck for work or pleasure, a headache rack provides added protection for your cab and cargo. In this guide, we will walk you through the process of mounting a headache rack without drilling, allowing you to enjoy the benefits of this essential truck accessory without any hassle or potential damage to your truck.
Credit: danasafetysupply.com
Contents
- 1 Understanding The Benefits Of A Headache Rack
- 2 Choosing The Right Headache Rack For Your Truck
- 3 Preparing Your Truck For Headache Rack Installation
- 4 Installing Your No-Drill Headache Rack
- 5 Testing And Adjusting Your Headache Rack
- 6 Maintaining And Caring For Your Headache Rack
- 7 Exploring Additional Accessories For Your Headache Rack
- 8 Frequently Asked Questions For How To Mount A Headache Rack Without Drilling
- 9 Conclusion
Understanding The Benefits Of A Headache Rack
A headache rack is an excellent addition to any truck, providing numerous benefits that can significantly enhance your driving experience. Whether you’re a professional trucker or an avid adventure enthusiast, understanding these advantages will help you make an informed decision before mounting a headache rack without drilling.
Protecting Your Cab And Rear Window
- Shielding your truck’s cab and rear window from cargo shifting during sudden stops or accidents is one of the primary benefits of a headache rack.
- Accidents happen, but with a headache rack, you can minimize the risk of damage by preventing heavy cargo from crashing into your truck’s cabin.
- The headache rack acts as a sturdy barrier, absorbing the force of shifting cargo and ensuring the safety of both you and your passengers.
Increased Storage And Organization
- If you frequently transport equipment or supplies, a headache rack offers additional storage space. This feature proves to be highly valuable when your truck’s bed isn’t large enough to accommodate everything needed for your journey.
- You can easily mount toolboxes, racks, and other accessories onto the headache rack, providing efficient organization and easy access to your gear.
- With everything neatly secured and within reach, you can optimize your workflow and maximize productivity on the road.
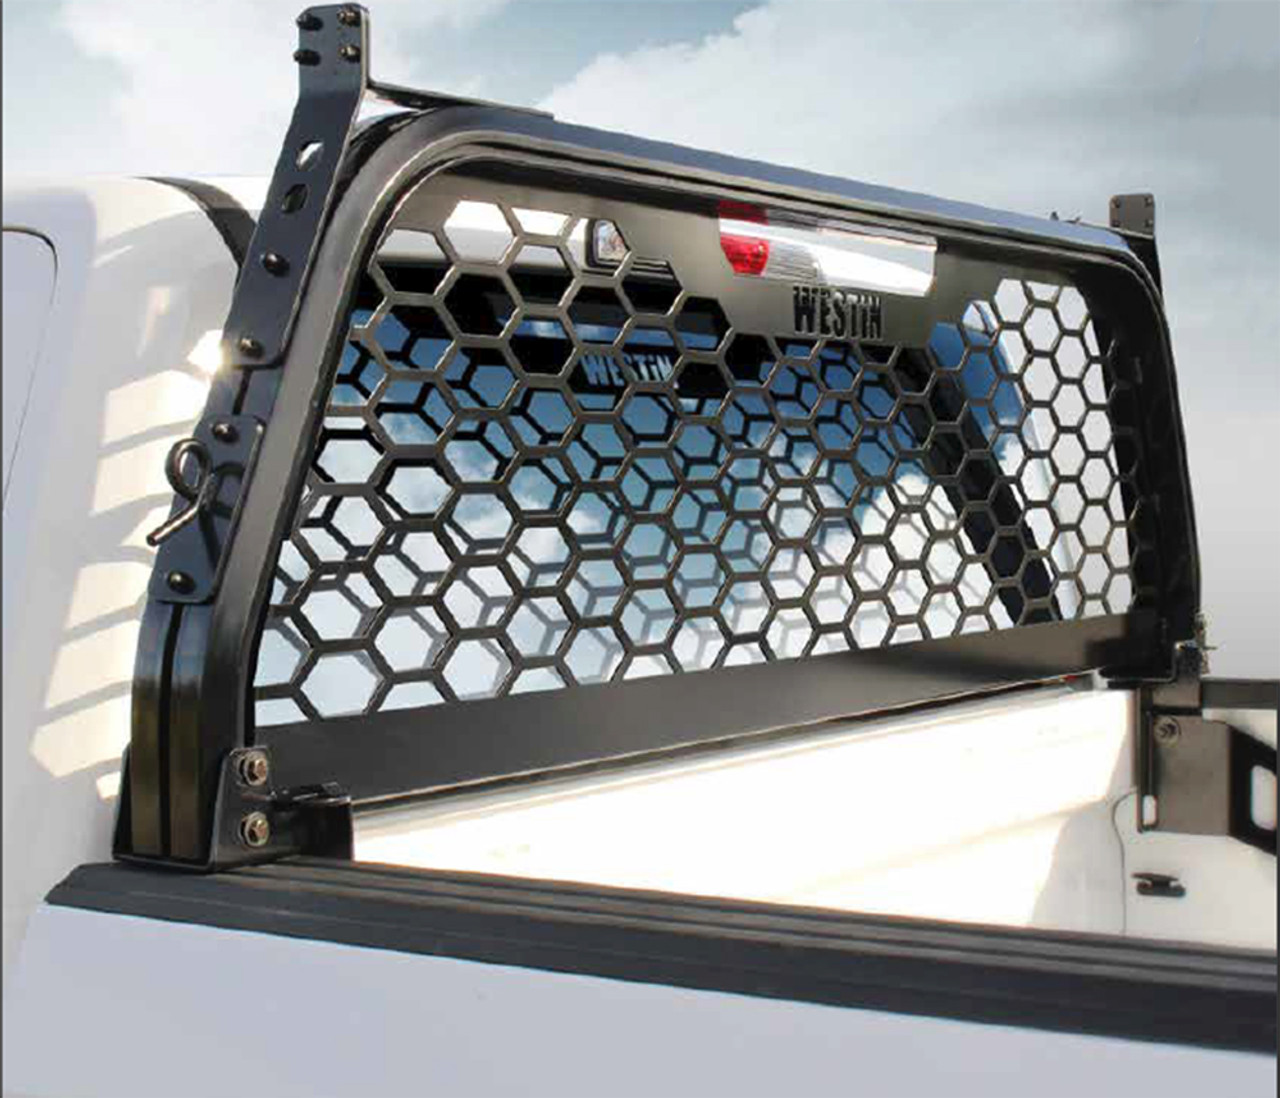
Enhancing The Overall Look Of Your Truck
- Beyond its functional advantages, a headache rack also adds an appealing aesthetic to your truck, giving it a rugged and customized appearance.
- Available in various materials, finishes, and designs, headache racks offer customization options to complement your personal style and truck’s overall look.
- Whether you prefer a sleek and modern design or a more traditional and robust appearance, there’s a headache rack to suit every taste and truck model.
By understanding the benefits of a headache rack, you can make an informed decision when considering how to mount one without drilling. The added protection for your cab and rear window, increased storage and organization capabilities, and enhanced aesthetic appeal make a headache rack a valuable investment for any truck owner.
So, why compromise when you can enjoy all these advantages in one easy-to-install accessory?
Choosing The Right Headache Rack For Your Truck
When it comes to mounting a headache rack without drilling, choosing the right rack for your truck is crucial. There are a few key factors to consider before making a decision. Whether you have a ford, chevy, ram, or any other make and model, here are some important considerations to keep in mind:
Consider your truck’s make and model: Different trucks have different bed dimensions and configurations, so it’s important to ensure that the headache rack you choose is compatible with your specific truck. Take note of the bed length and width, as well as any special features or mounting points unique to your truck.
Material options: Steel, aluminum, or stainless steel: headache racks come in a variety of materials, each with its own pros and cons. Steel racks are known for their durability and strength, but they can be heavier and more prone to rust. Aluminum racks are lightweight and resistant to corrosion, but they may not be as strong as steel. Stainless steel racks offer the best of both worlds, combining strength and corrosion resistance, but they can be more expensive.
Ensuring proper fit and compatibility with your truck’s bed: Before making a purchase, be sure to check the compatibility of the headache rack with your truck’s bed. Look for features like adjustable width, height, and mounting options to ensure a proper fit. Additionally, consider the design of the rack and how it will interact with your truck’s bed liner, tonneau cover, or other accessories.
By considering these key points, you can choose a headache rack that not only fits your truck perfectly but also meets your specific needs and preferences. Remember to take into account your truck’s make and model, the material options available, and the compatibility with your truck’s bed.
With the right headache rack in place, you can protect your cab and cargo while maintaining the sleek and functional look of your truck.
Preparing Your Truck For Headache Rack Installation
Before mounting a headache rack on your truck without drilling, it is important to prepare the truck bed for a seamless installation. This involves clearing out any debris or equipment from the truck bed, cleaning the truck bed surface for proper adhesion, and measuring and marking the rack placement to ensure proper alignment.
Clearing Out Any Debris Or Equipment From The Truck Bed
- Remove any loose items, such as tools, equipment, or debris, from the truck bed.
- Store these items in a safe location to ensure they don’t interfere with the installation process or potentially cause damage.
- Clearing out the truck bed allows for a smoother and more efficient installation of the headache rack.
Cleaning The Truck Bed Surface For Proper Adhesion
- To ensure proper adhesion, begin by thoroughly cleaning the truck bed surface. This will remove any dirt, grime, or grease that may prevent the rack from adhering properly.
- Use a mild detergent and water to clean the truck bed, and scrub any stubborn stains or residue with a brush or sponge.
- Rinse the truck bed surface thoroughly and allow it to dry completely before proceeding with the installation.
- Cleaning the truck bed surface ensures a strong bond between the rack and the truck bed, providing a secure and stable mounting.
Measuring And Marking The Rack Placement To Ensure Alignment
- Take precise measurements of the truck bed’s width and length to determine the optimal placement for the headache rack.
- Use a tape measure to measure the distance from the front and sides of the truck bed to ensure proper alignment.
- Mark the determined measurements using a pencil or tape to easily identify the rack’s exact placement during installation.
- Double-check the measurements and alignment to avoid any misplacements or inaccuracies that could affect the functionality of the headache rack.
By following these preparation steps, you can ensure a hassle-free installation of a headache rack without the need for drilling. Clearing out any debris or equipment, cleaning the truck bed surface for proper adhesion, and measuring and marking the rack placement will set the stage for a successful installation process.
Installing Your No-Drill Headache Rack
Ready to install your headache rack without drilling? Follow these simple steps to secure your rack in no time!
Assembling The Headache Rack Components:
- Start by unpacking the headache rack components and laying them out in an organized manner.
- Follow the instructions provided by the manufacturer to assemble the rack correctly.
- Ensure that all the pieces fit together tightly and securely.
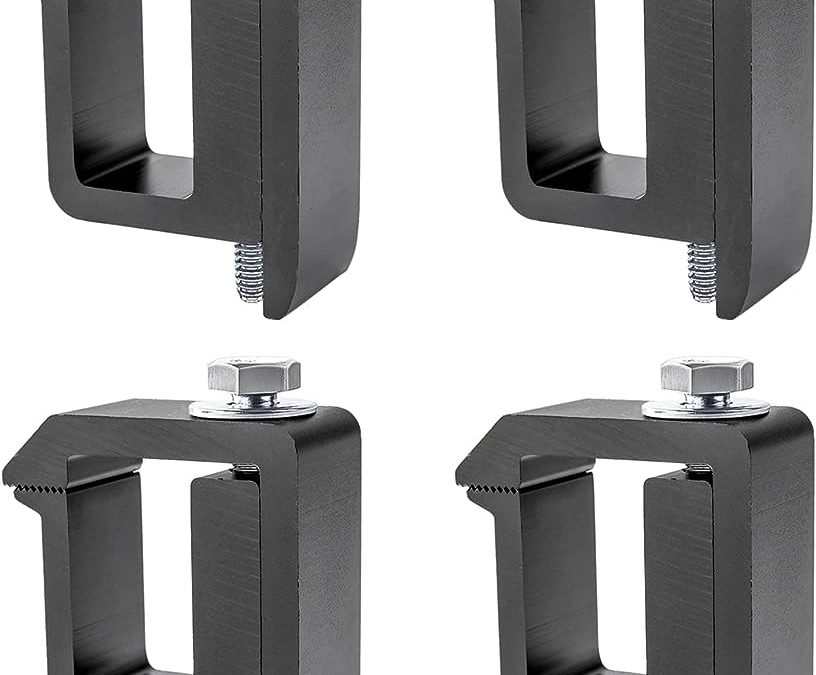
Securing The Rack To Your Truck Bed Using The Clamps And Brackets Provided:
- Position the headache rack on your truck bed, aligning it with the desired location.
- Attach the clamps and brackets to the truck bed, making sure they are properly secured.
- Use a torque wrench to tighten the bolts, ensuring a firm grip on the truck bed.
Adjusting The Rack For A Snug And Secure Fit:
- Once the headache rack is securely attached, check for any gaps or loose connections.
- Make any necessary adjustments to ensure a snug fit.
- Double-check that the rack is level and centered.
Remember, the key to mounting a headache rack without drilling is following the manufacturer’s instructions and using the clamps and brackets provided. By assembling the components, securing the rack with the clamps, and adjusting it for a secure fit, you can enjoy the benefits of a headache rack without the need for drilling into your truck bed.
Testing And Adjusting Your Headache Rack
Mounting a headache rack without drilling is not only convenient but also protects your truck and cargo. However, it is crucial to test and adjust the rack to ensure its stability, durability, and functionality. Here’s how you can do it:
Confirming the rack’s Stability And Durability
- Check the rack’s attachment points: Make sure the headache rack is securely attached to the truck bed without any loose or unstable elements.
- Inspect the joints and connections: Ensure that all joints and connections are tight and properly aligned to guarantee the rack’s overall stability.
- Perform a weight test: Add some weight to the rack, ideally resembling the weight of the cargo you intend to carry, and observe any excessive movement or stress on the rack.
Verifying That The Rack Does Not Interfere With Existing Truck Features
- Check rear visibility: Ensure that the headache rack does not obstruct your rearview mirror, back window, or blind spots. This will help you maintain safe visibility while on the road.
- Test cargo access: Make sure the headache rack does not hinder your ability to load or unload cargo from the truck bed. Ensure that you can easily access your tools, equipment, or any items you frequently carry.
Making Any Necessary Adjustments For Optimal Functionality
- Adjust the rack’s height: If the headache rack obstructs the truck’s cab or tailgate, consider adjusting its height to achieve proper clearance.
- Modify mounting brackets: Check if any alterations are necessary to ensure a snug fit of the rack. This could involve adjusting the brackets or using different mounting hardware.
- Evaluate tie-down points: Assess whether the headache rack provides adequate tie-down points for securing your cargo. Consider making adjustments or adding additional tie-downs if needed.
Every truck is different, so adjusting and testing your headache rack is vital to its safe and optimal performance. By following these steps, you can ensure the rack fits securely, does not interfere with essential truck features, and meets all your cargo-carrying needs.
Maintaining And Caring For Your Headache Rack
Mounting a headache rack without drilling holes can be a convenient option for many truck owners. However, once you have successfully installed your headache rack, it’s essential to maintain and care for it properly to ensure its longevity and effectiveness in protecting your cab.
Regular cleaning, inspection for damage or wear, and re-tightening bolts and brackets are key tasks for maintaining your headache rack.
Regular Cleaning And Polishing To Prevent Rust And Corrosion
To keep your headache rack in top condition, regular cleaning and polishing are essential. Here are some key points to remember:
- Use a mild soap and water solution to clean the surface of your headache rack. Avoid using harsh chemicals that can cause damage to the rack’s finish.
- Pay close attention to any areas with dirt or grime buildup and use a soft brush or cloth to remove it effectively.
- After cleaning, ensure you dry the rack thoroughly to prevent water spots or rust formation.
- Apply a suitable metal polish or protective coating to the headache rack to prevent rust and corrosion. Follow the manufacturer’s instructions for the best results.
Inspecting The Rack For Any Signs Of Damage Or Wear
Regular inspection of your headache rack is crucial to identify any signs of damage or wear that may compromise its structural integrity. Here are the key points to consider:
- Inspect all areas of the headache rack, including joints, welds, and brackets, for any signs of cracks, rust, or loose connections.
- Look for any bent or deformed parts that may need immediate attention or replacement.
- Check the rack for any missing or damaged accessories, such as tie-downs or hooks.
- If you notice any damage or wear during an inspection, take appropriate measures to address the issue promptly. This may include repairing, replacing, or reinforcing any affected components.
Re-Tightening Bolts And Brackets Periodically For Secure Installation
Ensuring that your headache rack remains securely attached to your truck bed is vital for both safety and functionality. Follow these key points for periodic re-tightening of bolts and brackets:
- Set a regular maintenance schedule to inspect and re-tighten all bolts and brackets, typically every three to six months, depending on usage.
- Use the appropriate tools and torque specifications provided by the manufacturer to tighten the bolts correctly.
- Check for any signs of loose bolts or brackets during routine inspection, such as vibration or rattling.
- Pay particular attention to high-stress areas, such as where the rack connects to the truck bed or where vertical supports meet horizontal bars.
- If you discover any loose bolts or brackets, tighten them immediately to ensure a secure installation.
By following these maintenance and care tips, you can greatly extend the lifespan of your headache rack and ensure its continued functionality in protecting your truck cab. Regular cleaning and polishing, thorough inspection for damage or wear, and periodic re-tightening of bolts and brackets are crucial steps in preserving the effectiveness of your headache rack.
Exploring Additional Accessories For Your Headache Rack
When it comes to your headache rack, there are several optional add-ons that can enhance its functionality and help you optimize your truck’s storage space. Consider these additional accessories to take your headache rack to the next level:
Tool Holders
- Tool holders are a practical and convenient accessory for your headache rack. They provide a designated space to store your tools securely, keeping them within easy reach when you need them most.
- With tool holders, you can organize your tools efficiently, saving time and effort. Whether you’re a handyman or a professional contractor, having your tools readily available can significantly improve your workflow.
Ladder Racks
- If you frequently transport ladders or other lengthy items, a ladder rack is an excellent addition to your headache rack. It allows you to securely carry bulky objects without compromising the space inside your truck bed.
- Ladder racks are adjustable and can accommodate various sizes of ladders and other long items. By installing a ladder rack, you can free up valuable space in your truck bed for other equipment or materials.
Understanding the benefits and installation requirements of each accessory is crucial. Here’s what you need to know:
Benefits And Installation Requirements
Tool holders:
Benefits:
- Keep your tools organized and easily accessible.
- Improve your workflow and efficiency.
- Maintain a clutter-free truck bed.
Installation requirements:
- Tool holders are typically designed to be easily mounted on your headache rack.
- Look for tool holder options that offer adjustable positions to fit your specific needs.
Ladder racks:
Benefits:
- Securely transport bulky items such as ladders, pipes, or lumber.
- Maximize the space in your truck bed for other cargo.
- Maintain safety by preventing items from shifting or falling during transport.
Installation requirements:
- Ladder racks usually require the headache rack to be installed first.
- Ensure the ladder rack is compatible with your specific headache rack model.
- Follow the manufacturer’s instructions for proper installation.
Customizing your headache rack to meet your specific truck needs is essential. Here are some tips for personalizing your rack:
Customization For Specific Truck Needs
- Assess your requirements: Consider your specific transport and storage needs to determine which accessories would be most beneficial for your truck.
- Material choices: Depending on your preferences and usage, headache racks are available in various materials such as aluminum or steel. Select the one that suits your truck and desired durability.
- Compatibility: Ensure that any additional accessories you install are compatible with your existing headache rack. Check the manufacturer’s recommendations for compatibility to avoid any installation issues.
- Consider aesthetic preferences: Some headache rack accessories come in different finishes or customizable designs, allowing you to add a personal touch to your truck.
With the right combination of accessories, your headache rack can become a versatile tool for securing cargo and optimizing storage space. Evaluate your needs, explore the available options, and customize your headache rack accordingly.
Frequently Asked Questions For How To Mount A Headache Rack Without Drilling
How Do You Mount A Headache Rack Without Drilling?
To mount a headache rack without drilling, you can use a clamp-on headache rack or a magnetic headache rack. These options allow you to secure the rack to your truck without the need to drill any holes.
How do you bolt down a headache rack?
To bolt down a headache rack, follow these steps:
- Measure and mark the exact spots on your truck’s bed where you want to install the rack.
- Use mounting brackets designed for your headache rack model.
- Secure the brackets to the marked spots with bolts and nuts using an adjustable wrench and a socket set.
- Attach protective pads to the brackets to prevent any damage to your truck’s bed.
- Carefully place the headache rack onto the mounting brackets and ensure it’s level.
- Fasten the rack in place by tightening the bolts with an adjustable wrench.
- Double-check the stability of the headache rack to ensure it won’t wobble during use.
Are headache racks worth it?
Yes, headache racks are worth it for truck owners. These racks offer several benefits, such as:
- Protection: Headache racks protect the rear window of your truck from shifting cargo, reducing the risk of damage.
- Safety: They prevent loose items from entering the cab during sudden stops or accidents.
- Style: Headache racks add a rugged and stylish look to your truck.
- Versatility: You can attach various accessories to them, like lights and tool holders.
Considering these advantages, headache racks are a valuable addition to your truck.
What is the purpose of a headache rack?
The primary purpose of a headache rack is to provide protection and safety for your truck. It serves as a barrier between the truck’s cab and the cargo in the bed. The key functions include:
- Protecting the Rear Window: It shields the rear window from cargo shifting during transportation, preventing damage.
- Safety: Headache racks keep loose items from entering the cab, enhancing safety during sudden stops or accidents.
- Enhanced Style: They contribute to the truck’s aesthetics, giving it a more rugged and attractive appearance.
- Accessory Attachment: You can customize your headache rack by adding accessories like lights, tool holders, and more to suit your needs.
How long does it take to install Backrack?
The installation time for a Backrack, or any headache rack, can vary depending on your experience and the tools you have at your disposal. On average, it can take a few hours to install a headache rack. With the right tools and a systematic approach, you can complete the installation process relatively quickly. It’s essential to follow the manufacturer’s instructions and ensure that the rack is securely mounted to your truck for safety and effectiveness.
Conclusion
Mounting a headache rack without drilling is not only convenient but also a practical solution for protecting your vehicle and improving its functionality. With the various options available, such as using brackets or clamps, you can easily install a headache rack without the need to drill into your vehicle.
By following the step-by-step instructions outlined in this blog post, you can confidently mount a headache rack and enjoy the benefits it brings. In addition to providing protection and adding a rugged look to your vehicle, headache racks offer a secure space for carrying tools and equipment.
This can be particularly useful for those in the construction or landscaping industries. No matter what your specific needs may be, opting for a headache rack installation without drilling allows you to preserve the integrity of your vehicle while still enjoying the advantages of this practical accessory.