
To install a headache rack, begin by positioning the rack on your truck bed and securing it with bolts. Then, tighten the bolts to ensure the rack is firmly attached.

Contents
- 1 Choosing The Right Headache Rack
- 2 Preparing For Installation
- 3 Step-By-Step Installation Guide
- 4 Ensuring Proper Alignment And Fit
- 5 Securing Additional Cargo
- 6 Maintenance And Care Tips
- 7 Advantages Of Installing A Headache Rack
- 8 Frequently Asked Questions
- 9 Frequently Asked Questions On How To Install A Headache Rack
- 10 Conclusion
Choosing The Right Headache Rack
Installing a headache rack on your truck is a great way to protect your vehicle’s rear window and add a touch of style. However, with so many options available in the market, it can be overwhelming to choose the right headache rack for your specific needs.
Here are some factors to consider before making your decision.
Factors To Consider When Selecting A Headache Rack:
- Purpose: Determine why you need a headache rack. Are you using it purely for protection or do you also want to enhance the aesthetics of your truck? Knowing the purpose will help you narrow down your options.
- Truck bed size: Consider the dimensions of your truck bed before selecting a headache rack. Measure the width and height of your bed to ensure a proper fit.
- Material: Headache racks are available in various materials, including steel, aluminum, and stainless steel. Each material has its own advantages and disadvantages.
- Style: Different headache racks come in different styles, such as open center, mesh, or louvered. Choose a style that complements the overall look of your truck.
- Installation: Some headache racks require professional installation, while others can be easily installed by yourself. Consider the level of technical expertise required before making your choice.
- Compatibility: Check if the headache rack you are considering is compatible with any accessories you have, such as tonneau covers or roof racks.
Different Types Of Headache Racks Available In The Market:
- Full-size: These headache racks span the entire width of your truck bed and provide maximum protection. They are great for heavy-duty use and offer additional storage options.
- Half-size: As the name suggests, these headache racks cover only half of your truck bed width. They offer a more streamlined appearance and are suitable for lighter-duty use.
- Cab-mounted: Cab-mounted headache racks are attached directly to the rear of your truck cab. They provide excellent protection for the rear window and are often favored for their sleek design.
Pros And Cons Of Steel, Aluminum, And Stainless Steel Headache Racks:
Steel:
- Pros: Offers maximum strength and durability, ideal for heavy-duty use. Provides excellent protection against impacts and debris.
- Cons: Heavier compared to other materials, which may affect fuel efficiency. Susceptible to rust if not properly maintained.
Aluminum:
- Pros: Lightweight yet sturdy, making it a good choice for fuel efficiency. Resistant to rust and corrosion.
- Cons: Not as strong as steel, making it less suitable for heavy-duty use. May dent or deform under extreme impacts.
Stainless steel:
- Pros: Highly resistant to rust and corrosion. Offers good strength and durability.
- Cons: Can be more expensive compared to steel and aluminum options. Slightly heavier than aluminum.
Remember to carefully consider these factors and weigh your options when selecting a headache rack for your truck. It’s important to choose one that not only meets your needs but also enhances the overall look and functionality of your vehicle.
Preparing For Installation
Installing a headache rack on your truck can provide added protection for your rear window, as well as a convenient platform for mounting additional accessories. Before diving into the installation process, it’s important to properly prepare your truck bed. By following these steps, you’ll ensure a smooth and successful installation.
Gathering The Necessary Tools And Materials:
- Wrench or socket set
- Tape measure
- Marker or chalk
- Cleaning supplies (soap, water, and a cloth)
- Screwdriver or drill with appropriate bits
- Mounting hardware (provided with your headache rack)
- Optional: Rubber grommets or adhesive pads for added stability
Prior to beginning the installation, gather all the necessary tools and materials. Having everything within reach will save you time and frustration during the process.
Measuring The Truck Bed For A Perfect Fit:
- Measure the width of your truck bed between the inner sides. Note down this measurement.
- Measure the height from the top of your truck bed to the desired position of the headache rack. Keep in mind any accessories or cargo you plan to carry.
- Use a tape measure, marker, or chalk to mark the measurements on your truck bed. This will serve as a guide during installation.
Taking accurate measurements ensures the headache rack will fit your truck properly. A perfect fit not only enhances the aesthetics but also maximizes functionality and safety.
Cleaning The Truck Bed And Removing Any Obstacles:
- Thoroughly clean the truck bed using soap, water, and a cloth. Remove any dirt, dust, or debris that may hinder the installation process.
- Inspect the truck bed for any obstacles such as tie-down points, toolboxes, or bed liners that may interfere with the installation of the headache rack.
- Remove any obstacles by detaching or relocating them, providing a clear and unobstructed space for the installation.
A clean and obstacle-free truck bed ensures a secure and stable installation. It also prevents any potential damage to your truck or headache rack caused by protruding obstacles.
Following these steps will set the stage for a successful headache rack installation. By gathering the necessary tools, measuring accurately, and ensuring a clean and obstacle-free truck bed, you’ll be well-prepared to move on to the next step of the installation process.
Step-By-Step Installation Guide
So you’ve decided to install a headache rack on your truck. A headache rack is a must-have accessory for any truck owner, providing protection for the rear window and cab of your vehicle. But how do you go about installing one?
Don’t worry, we’ve got you covered! Follow our step-by-step installation guide below to easily and securely install your headache rack.
Removing the truck’s Bed Rail Caps
Before you can begin the installation process, you’ll need to remove the truck’s bed rail caps. These are the plastic covers that sit on top of the truck bed rails. Removing them is crucial as it allows for a proper and secure fit of the mounting brackets.
Here’s how you can do it:
- Locate the screws holding the bed rail caps in place.
- Use a screwdriver or a socket wrench to remove the screws.
- Gently pull the bed rail caps off, being careful not to damage them.
- Set the bed rail caps aside in a safe place for future use, if desired.
Installing The Mounting Brackets
Once the bed rail caps are removed, it’s time to install the mounting brackets for your headache rack. These brackets will provide the necessary support for the rack. Follow the steps below to install them correctly:
- Start by placing the mounting brackets on the inside of the truck bed, near the front.
- Make sure the brackets are aligned with the bed rails and secure them in place using the provided screws or bolts.
- Repeat the process for the brackets on the other side of the truck bed, ensuring they are symmetrical.
- Double-check that the brackets are tightly secured to prevent any movement.
Attaching The Headache Rack To The Mounting Brackets
With the mounting brackets securely in place, you can now attach the headache rack to them. The headache rack should come with pre-drilled holes that align with the brackets. Follow these simple steps to attach the rack:
- Carefully lift the headache rack and position it on top of the mounting brackets.
- Align the pre-drilled holes on the rack with the brackets.
- Insert the bolts or screws through the holes and into the brackets.
- Tighten the bolts or screws using a wrench or socket set until the rack is firmly attached to the brackets.
Securing The Headache Rack To The Truck Bed
Now that the headache rack is attached to the mounting brackets, it’s time to secure it to the truck bed. This step is crucial to ensure that the rack remains stable while driving. Follow these final steps to secure the rack:
- Use a level to check that the headache rack is properly aligned and adjust as needed.
- Locate the provided mounting hardware, which includes additional bolts or clamps.
- Securely fasten the headache rack to the truck bed using the mounting hardware.
- Double-check that all bolts and clamps are tightened to avoid any movement during travel.
And there you have it! By following this step-by-step installation guide, you’ll have your headache rack securely installed on your truck. Enjoy the added protection and functionality that a headache rack provides. Happy driving!
Ensuring Proper Alignment And Fit
Checking The Alignment Of The Headache Rack
Installing a headache rack properly requires ensuring that it is aligned correctly. Here are a few key points to consider when checking the alignment:
- Start by positioning the headache rack against the back of your truck’s cab, making sure it is centered. This will provide the best balance and stability.
- Check that the rack is level both horizontally and vertically. Use a level tool to ensure that it is not tilted or slanted in any direction.
- Pay attention to the alignment of the mounting brackets. They should align with the pre-drilled holes or slots on your truck’s bed rails or stake pockets.
- Double-check the clearances. Ensure that the rack is not interfering with any existing hardware, such as truck bed liners, toolboxes, or utility lights.
- Confirm that the headache rack is positioned at the ideal height, allowing for maximum visibility through the rear window but still providing adequate protection.
Taking the time to check the alignment of your headache rack will ensure a proper fit and functionality.
Making Adjustments For A Snug Fit
Proper adjustments are essential for achieving a snug fit with your headache rack. Consider the following points:
- If the rack seems loose or wobbly after installation, tighten the mounting bolts or brackets. This will help enhance stability and prevent unnecessary movement.
- Ensure that the rack is secured tightly against the back of your cab. Use a tape measure to measure the gap between the rack and the cab, and adjust accordingly.
- Some headache racks come with adjustable brackets or sliding mechanisms. Take advantage of these features to customize the fit to your truck’s specific dimensions.
- If necessary, use shims or washers to fill any gaps between the rack and the truck bed rails. This will help create a snug connection and prevent rattling or movement during use.
- Consider covering any exposed metal edges or sharp corners with rubber or foam padding. This will not only protect your truck’s finish but also provide an additional layer of stability.
By making the right adjustments, you’ll achieve a tight and secure fit for your headache rack, ensuring optimal performance and protection.
Ensuring the rack’s Stability And Security
To guarantee the stability and security of your headache rack, keep these points in mind:
- Double-check all nuts, bolts, and fasteners after installation. Ensure they are securely tightened and periodically inspect them for any signs of loosening.
- Regularly inspect the rack for any signs of damage or wear. Replace any worn-out or damaged parts promptly to maintain the rack’s stability and structural integrity.
- If your headache rack has a latched or locking mechanism, ensure that it functions properly. Test the lock and latch system to confirm that it securely holds the rack in place.
- Consider using specialized lock nuts or thread-locking compounds to prevent the loosening of bolts and fasteners due to vibrations or continuous usage.
- Regularly clean and maintain your headache rack. Removing dirt, debris, and rust will not only enhance the rack’s appearance but also prolong its lifespan.
- If you frequently transport tall or heavy cargo, consider additional reinforcements such as cross-support bars or side braces. These accessories can further enhance the rack’s stability during transportation.
By prioritizing stability and security, you’ll ensure that your headache rack remains reliable and performs its function effectively.
Securing Additional Cargo
When it comes to maximizing the functionality of your headache rack, there are several ways to secure additional cargo and enhance its utility. Whether you need to transport tools, equipment, or other items, utilizing tie-down points, installing accessories, and properly loading and securing cargo is crucial for a safe and efficient experience.
Utilizing Tie-Down Points On The Headache Rack
Tie-down points are essential for securing cargo on a headache rack, preventing it from shifting or falling off during transit. Here are the key points to remember:
- Identify the tie-down points on your specific headache rack model. These are typically located on the top and sides of the rack.
- Use sturdy straps or bungee cords to secure the cargo. Make sure the straps are properly tightened to prevent any movement.
- I distributed the weight of the cargo evenly across the tie-down points to maintain balance.
- Double-check the stability of the cargo before hitting the road to ensure it is firmly secured.
Installing Accessories Such As Toolbox Brackets Or Ladder Racks
Installing additional accessories can enhance the functionality of your headache rack by expanding its storage capacity. Consider these points when installing accessories:
- Toolbox brackets can be attached to the headache rack, providing a secure storage solution for tools and other smaller items. Follow the manufacturer’s instructions for proper installation.
- Ladder racks can also be added to the headache rack, allowing you to transport ladders safely. Ensure that the ladder rack is securely fastened to the headache rack.
- Assess the weight capacity of the accessories and make sure they are compatible with your headache rack model.
- Regularly inspect the attachments and accessories for any signs of wear or damage. Replace or repair as necessary to maintain their functionality.
Safely Loading And Securing Cargo Onto The Headache Rack
Properly loading and securing cargo onto the headache rack is crucial to prevent accidents and ensure the safety of your vehicle and others on the road. Consider the following points:
- Determine the weight capacity of your headache rack and ensure the cargo does not exceed it.
- Place heavier items at the bottom and distribute the weight evenly to maintain stability.
- Use padding or protective coverings to prevent damage to the cargo or the rack.
- Secure the cargo with straps or bungee cords, ensuring that they are properly tightened and that there is no movement.
- Regularly inspect the cargo and tie-downs during stops to ensure they remain secure throughout the journey.
By utilizing the tie-down points on your headache rack, installing compatible accessories, and safely loading and securing cargo, you can make the most of your rack’s functionality. Following these guidelines will not only ensure that your additional cargo is safely transported but also contribute to a smooth and hassle-free journey.
So, get ready to hit the road with confidence and bring along all the gear you need!
Maintenance And Care Tips
Cleaning And Maintaining The Headache Rack
Taking care of your headache rack is essential to ensure its longevity and optimal performance. Regular cleaning and maintenance routines will not only keep your rack looking good but also protect it from damage.
Here are some key points to remember when cleaning and maintaining your headache rack:
- Remove any debris: Start by removing any dirt, leaves, or other debris that may have accumulated on the rack. Use a soft brush or cloth to gently sweep away the particles.
- Use a gentle cleanser: To clean the rack, use a mild soap or a dedicated metal cleaner. Avoid harsh chemicals or abrasive cleaners as they can damage the finish of the rack. Dilute the cleanser in water according to the manufacturer’s instructions.
- Scrub gently: With a soft brush or sponge, scrub the rack gently to remove dirt and grime. Pay attention to any hard-to-reach areas or corners. Avoid applying excessive pressure to prevent scratches.
- Rinse thoroughly: After scrubbing, rinse the rack thoroughly with clean water. Ensure that no soap residue is left behind, as it can lead to staining or corrosion.
- Dry the rack: Once rinsed, dry the rack completely using a soft cloth or allow it to air dry. Avoid leaving the rack wet, as moisture can contribute to rust and corrosion.
Inspecting For Any Damage Or Wear
Regular inspections of your headache rack are crucial to identify any signs of damage or wear. This allows you to address issues promptly and prevent further damage. Consider the following points during your inspection:
- Check for cracks or dents: Carefully examine the rack for any cracks, dents, or other signs of damage. These can weaken the structure and compromise its effectiveness. If any damage is detected, consult a professional or contact the manufacturer for repair options.
- Inspect welds and joints: Inspect the welds and joints of the rack for signs of weakness or separation. These areas are critical to the stability of the rack and should be intact. If any issues are found, seek professional assistance to properly repair or reinforce the affected areas.
- Ensure secure attachment: Verify that the headache rack is securely attached to your vehicle. Loose or improperly fastened racks can pose a safety risk and may cause damage to your truck or other objects in transit. Double-check the mounting hardware and consult your vehicle’s manual or a professional for guidance if needed.
Protecting The Rack From Rust And Corrosion
Rust and corrosion can significantly impact the lifespan and appearance of your headache rack. To protect it from these issues, consider the following tips:
- Apply a protective coating: Consider applying a suitable protective coating to the rack’s surface. Industrial-grade paints or specialized coatings can help guard against rust and corrosion. Follow the manufacturer’s instructions for proper application.
- Avoid exposure to moisture: Limiting the exposure of your headache rack to moisture can prevent rust. Whenever possible, park your vehicle in a covered area or use a waterproof cover to shield the rack from rain or other sources of moisture.
- Clean and dry regularly: Regularly cleaning and drying your headache rack, as mentioned earlier, is key to preventing rust and corrosion. By removing dirt and moisture promptly, you reduce the chances of these issues occurring.
- Monitor for signs of rust: Keep a close eye on your rack for any signs of rust or corrosion. If you notice any areas with rust, address them immediately by gently removing the rust with a brush or sandpaper, and applying a rust inhibitor or primer to prevent further damage.
By following these maintenance and care tips, you can ensure your headache rack remains in excellent condition and provides reliable protection for your truck. Remember, proper and timely maintenance not only extends the lifespan of your rack but also ensures your safety on the road.
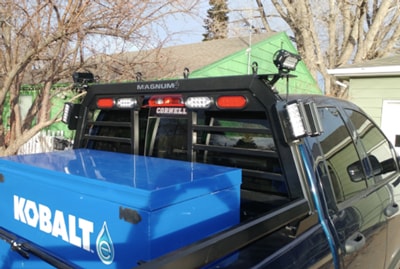
Advantages Of Installing A Headache Rack
Increased Safety And Protection For The Truck’s Cab
Installing a headache rack on your truck brings numerous advantages that go beyond just enhancing the overall appearance. One of the significant benefits of installing a headache rack is the increased safety and protection it provides for the truck’s cab.
Here are the key points to consider:
- Prevents injuries: A headache rack acts as a barrier between the truck’s cab and any loose cargo in the truck bed. It helps prevent items from crashing through the rear window, potentially causing injuries to you or your passengers.
- Protects against sun glare: The sturdy structure of a headache rack also shields the rear window from direct sunlight, reducing sun glare and enhancing visibility while driving.
- Adds structural strength: Headache racks add additional strength and reinforcement to the truck’s cab, improving its overall structural integrity. This can be particularly important if you often carry heavy loads or tow trailers.
- Acts as a mounting point: Many headache racks come with integrated mounts, allowing you to easily attach additional accessories such as spotlights, toolboxes, or even bike racks. This not only increases the functionality of your truck but also keeps things organized and readily accessible.
Remember, your safety should always be a top priority when operating your truck. Installing a headache rack provides an added layer of protection, ensuring a safer driving experience for you and your passengers.
Improved Organization And Storage Capabilities
Another advantage of installing a headache rack is the improved organization and storage capabilities it offers. Here are a few points to consider:
- Secure cargo storage: Headache racks often come with built-in racks or tie-down points. These features enable you to secure cargo more efficiently, preventing it from shifting during transit. You can easily strap down items such as ladders, lumber, or camping gear without worrying about them sliding around in the truck bed.
- Maximizes truck bed space: By utilizing the vertical space of your truck bed, a headache rack allows for more effective use of the available storage area. This means you can carry more items without sacrificing legroom or passenger comfort.
- Keeps items within reach: Need quick access to your frequently used equipment or tools? A headache rack with integrated tool holders or accessory mounts keeps everything within arm’s reach, saving you time and effort.
- Reduces clutter: Tired of items rolling around, cluttering your truck bed? With a headache rack, you can keep everything neat and organized. It acts as a barrier, preventing smaller items from shifting or falling out of the truck bed.
A well-organized truck not only improves efficiency but also makes it easier for you to find what you need when you need it. With a headache rack, you can say goodbye to the hassle of searching for misplaced items or dealing with a cluttered truck bed.
Enhanced Truck Aesthetics And Resale Value
Aside from the practical benefits, installing a headache rack also enhances your truck’s aesthetics and resale value. Consider the following:
- Stylish design options: Headache racks come in various styles and finishes, allowing you to choose one that complements the overall look of your truck. Whether you prefer a sleek, modern design or a rugged, industrial appearance, there is a headache rack to suit your taste.
- Personalization: Many headache racks offer customization options, such as adding your logo or personalized graphics. This enables you to make a unique statement and showcase your personal style.
- Increased resale value: Investing in a headache rack can increase the resale value of your truck. Potential buyers will appreciate the added functionality, safety features, and the well-maintained condition of the truck’s cab.
- Protects the rear window: By shielding the rear window from potential damage caused by shifting cargo or debris, a headache rack helps preserve the truck’s value over time. Repairing or replacing a rear window can be expensive, so having a headache rack in place is a wise investment.
Installing a headache rack not only adds practicality and functionality to your truck but also enhances its overall appeal. The combination of improved safety, organization capabilities, and enhanced aesthetics makes it a valuable addition that can positively impact the resale value of your vehicle.
Frequently Asked Questions
Common Questions About Headache Rack Installation
Installing a headache rack can be a beneficial addition to your truck for both safety and functionality. However, if you’re new to installing a headache rack, you may have a few common questions. Here are some frequently asked questions about headache rack installation:
- What tools do i need for headache rack installation? : To install a headache rack, you’ll typically need a few basic tools, including a wrench or socket set, drill with appropriate drill bits, measuring tape, and a level. Additionally, you may need specific hardware provided with the headache rack.
- Do i need any special skills to install a headache rack? : While professional installation is an option, installing a headache rack can be done by individuals with basic mechanical skills. Following the manufacturer’s instructions and taking necessary precautions is essential to ensure a successful installation.
- Can i install a headache rack on any type of truck? : Headache racks are designed to be compatible with most truck models and sizes. However, it’s crucial to check compatibility with your specific truck before making a purchase. This information can usually be found in the product description or by contacting the manufacturer.
- How long does it take to install a headache rack? : The installation time can vary depending on several factors, including the complexity of the rack design and the individual’s mechanical aptitude. On average, it can take anywhere from 1-2 hours for a headache rack installation.
- Do i need to make any modifications to my truck for the installation? : In most cases, headache racks are designed to be bolted onto existing mounting points on the truck bed or stake bed pockets. This means that you typically won’t need to make any modifications to your truck for installation.
Tips For Troubleshooting Common Installation Issues
Even with proper preparations, you may encounter some common issues during headache rack installation. Here are a few tips to troubleshoot these problems:
- Uneven or unstable installation: Ensure that the headache rack is properly aligned and leveled using a measuring tape and a level. Adjust the position and tighten the bolts evenly to achieve stability.
- Missing or incompatible hardware: Double-check that you have all the necessary hardware provided with the headache rack. If any components are missing or incompatible, contact the manufacturer for assistance or replacement parts.
- Difficulty drilling holes: If you’re having trouble drilling holes into the truck bed, ensure that you’re using the appropriate drill bit for the material. Lubricating the drill bit with cutting oil can also help make the drilling process smoother.
- Inadequate instructions: If the instructions provided with the headache rack seem unclear or insufficient, consider reaching out to the manufacturer’s customer support for clarification or consult online resources for additional guidance.
Safety Precautions To Keep In Mind During Installation
While installing a headache rack, it’s important to prioritize safety. Here are some safety precautions to keep in mind throughout the installation process:
- Use personal protective equipment (ppe): Wear safety goggles, gloves, and appropriate footwear to protect yourself from potential injuries while handling tools and materials.
- Beware of sharp edges and corners: Headache racks often have sharp edges and corners. Take caution to avoid cuts or injuries during installation. Consider using gloves when handling the rack to minimize the risk of accidental cuts.
- Secure the truck: To prevent any accidental movement of the truck during the installation, engage the parking brake and use wheel chocks to stabilize the vehicle.
- Seek assistance if needed: Some headache racks may be heavy or require additional manpower during installation. If necessary, ask a friend or family member to assist you in lifting and holding the rack in place to avoid strain or accidents.
- Follow safety guidelines: Always follow the manufacturer’s safety guidelines and instructions provided with the headache rack. Read and understand all warnings before starting the installation.
By considering these common questions, troubleshooting tips, and safety precautions, you’ll be better equipped to install a headache rack on your truck with confidence and efficiency.
Frequently Asked Questions On How To Install A Headache Rack
What Is A Headache Rack And Why Do You Need It?
A headache rack is a metal structure installed on the back of a truck to protect the cab from shifting cargo. It helps prevent damage to the truck and injury to passengers by acting as a barrier. Installing a headache rack is essential for truck owners who frequently transport heavy or bulky loads.
How does a headache rack attach to a truck?
A headache rack typically attaches to a truck by mounting it to the bed of the vehicle. The process involves drilling holes into the bed, aligning the rack, and securing it with bolts and screws provided in the rack kit. This installation ensures a secure fit and prevents movement during transit.
How do you wire lights into a headache rack?
Wiring lights into a headache rack can vary depending on the specific rack and lighting setup. In general, you’ll need to run wires from your truck’s electrical system to the lights on the rack. This may involve connecting wires to your vehicle’s battery or existing electrical connections, depending on the type of lights you’re installing. It’s essential to follow the manufacturer’s instructions to ensure proper installation and safety.
Do headache racks work?
Yes, headache racks are highly effective and serve multiple purposes. They provide added safety by protecting the cab of your truck from shifting cargo in the bed. Additionally, they can serve as a mounting point for accessories like lights, toolboxes, or cargo tie-downs. The improved safety and utility they offer make headache racks a valuable addition to any truck.
Why do I need a headache rack?
You need a headache rack for several reasons. Firstly, it enhances the safety of your truck by preventing cargo from shifting forward into the cab during sudden stops or collisions. Secondly, it adds a stylish and rugged look to your vehicle. Furthermore, headache racks can provide additional storage or mounting options for accessories, making them a practical choice for truck owners.
Conclusion
So there you have it – a step-by-step guide on how to install a headache rack. By following these instructions, you can ensure that your truck is equipped with this essential accessory in a safe and efficient manner. The headache rack not only provides protection for your rear window and cabin but also allows you to secure and transport cargo without worry.
From selecting the right headache rack for your truck to properly positioning and securing it, this blog post has covered all the necessary information you need to get the job done. So, why wait? Take action today and enhance the functionality and safety of your truck with a headache rack.
Happy trucking!