
This article was updated in October 19, 2023 with new products and information by Mark S. Taylor
Installing a light bar on a headache rack is a simple process that can be completed in a few easy steps. In this guide, we will walk you through the process of installing a light bar on your headache rack, providing you with the necessary information and instructions to complete the installation successfully.
By following these steps, you can enhance the visibility and functionality of your vehicle’s lighting system while maintaining a sleek and professional appearance. So, let’s dive into the steps required to install a light bar on a headache rack.

Credit: www.ledequipped.com
Contents
Why You Should Install A Light Bar On Your Headache Rack
Enhance visibility and safety on the road:
- A light bar on your headache rack significantly improves visibility, especially during night drives or in adverse weather conditions.
- The powerful led lights offer a wider and brighter beam, increasing your ability to see and be seen by other drivers.
- With increased visibility, the risk of accidents is reduced, making your journeys safer for both you and other road users.
Improve aesthetics of your truck:
- Installing a light bar on your headache rack not only enhances functionality but also adds a sleek, stylish look to your truck.
- The sleek design and modern look of the light bar can instantly elevate the overall appearance of your vehicle.
- Whether you use your truck for work or leisure, the addition of a light bar can give it a more visually appealing and rugged appearance.
Easy installation process with expert guidance:
- Installing a light bar on your headache rack may seem daunting, but with expert guidance, it becomes a straightforward process.
- Many light bars come with detailed instructions and mounting brackets tailored specifically for headache racks, ensuring an easy installation process.
- With expert guidance and a few basic tools, you can have your light bar securely mounted onto your headache rack in no time.
By installing a light bar on your headache rack, you not only enhance visibility and safety on the road but also improve the overall aesthetics of your truck. With an easy installation process and expert guidance, it’s a worthwhile addition that can elevate both form and function.
So, why wait? Enhance your truck today with a light bar on your headache rack.
Tools And Materials Needed
When it comes to installing a light bar on a headache rack, you’ll need a few essential tools and materials to get the job done right. Here are the key items you’ll need:
- Drill: You’ll need a drill to create the necessary holes for mounting brackets and wiring.
- Screwdriver: A screwdriver will be essential for securing the mounting brackets and light bar in place.
- Wiring harness: A wiring harness is necessary to connect the light bar to your vehicle’s electrical system.
- Wire connectors: These connectors will help you join the wiring harness with the light bar and the vehicle’s electrical system securely.
- Electrical tape: Electrical tape is used for insulating and protecting the wiring connections.
- Zip ties: Zip ties are handy for securing loose wires and keeping everything organized.
Now let’s dive deeper into each item and its role in the installation process:
Light Bar
- The light bar is the main component of your setup, providing a bright and focused beam of light.
- It typically comes with mounting brackets and a wiring harness included.
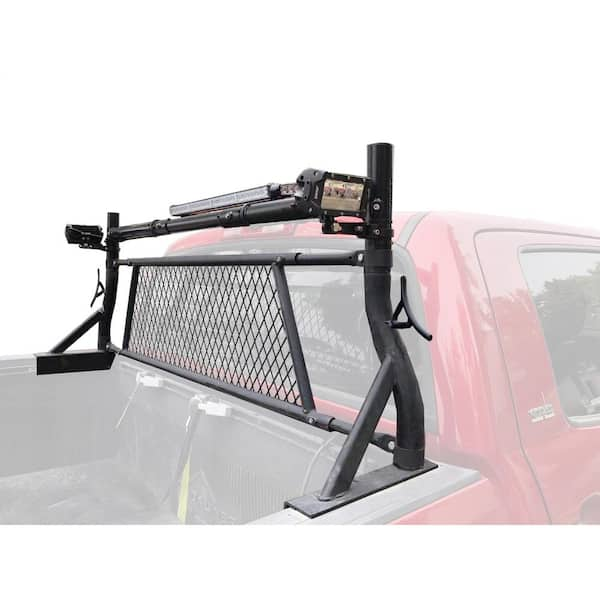
Headache Rack
- The headache rack is a protective barrier installed at the rear of your truck’s cab.
- It provides a sturdy frame for mounting accessories like light bars and ensures a clean and secure installation.
Mounting Brackets
- Mounting brackets are necessary to attach the light bar to the headache rack.
- They come in various shapes and sizes, specific to the light bar and headache rack type.
Wiring Harness
- The wiring harness is a bundle of wires with connectors designed to make electrical connections easier.
- It simplifies the process of connecting the light bar to your vehicle’s electrical system.
Wire Connectors
- Wire connectors are essential for joining the wires from the light bar to the wiring harness and the vehicle’s electrical system.
- They provide a secure and reliable connection, ensuring proper functioning of the light bar.
Drill
- A drill is needed to create holes in the headache rack for mounting the brackets and wiring.
- Make sure to choose the appropriate drill bit size for the specific bolts and brackets you’ll be using.
Screwdriver
- You’ll need a screwdriver to fasten the brackets onto the headache rack securely.
- It’s important to tighten the screws adequately to prevent the light bar from shaking or coming loose during use.
Electrical Tape
- Electrical tape is used to insulate and protect the electrical connections.
- Before connecting any wires, wrap them with electrical tape to ensure safety and avoid potential short circuits.
Zip Ties
- Zip ties are handy for tidying up the wiring and keeping it organized.
- Use zip ties to secure any loose wires, preventing them from dangling and potentially getting damaged.
By gathering these tools and materials, you’ll be well-prepared for the installation process. Let’s move on to the next section where we’ll guide you through the step-by-step process of installing a light bar on a headache rack.
Step-By-Step Guide To Installing A Light Bar On A Headache Rack
Preparation And Planning
Before you start installing a light bar on your headache rack, it’s essential to make some preparations and plan out the installation process. Here are the key points to keep in mind:
- Measure your headache rack and light bar for proper fit:
- Measure the width of your headache rack to ensure it can accommodate the light bar.
- Measure the length of your light bar to ensure it fits within the dimensions of the headache rack.
- Determine the mounting location on the headache rack:
- Choose the optimal spot on your headache rack to mount the light bar.
- Consider factors such as visibility, functionality, and aesthetics when selecting the mounting location.
- Plan the wiring route for a clean and organized installation:
- Figure out the best way to route the wiring from the light bar to the truck’s electrical system.
- Aim for a clean and organized installation by planning the wiring route in advance.
Installing The Mounting Brackets
After the necessary preparations and planning, you can proceed with installing the mounting brackets for the light bar on your headache rack. Here’s what you need to do:
- Attach the mounting brackets to the light bar:
- Use the provided hardware to securely attach the mounting brackets to the light bar.
- Make sure the brackets are evenly placed on both sides of the light bar for stability.
- Position the brackets on the headache rack:
- Place the light bar with the attached brackets onto the selected mounting location on the headache rack.
- Ensure the brackets align properly with the rack’s structure.
- Secure the brackets using the provided hardware:
- Tighten the bolts or screws to secure the mounting brackets firmly to the headache rack.
- Double-check that the brackets are securely fastened to prevent any movement or damage during use.
Wiring The Light Bar
Once the mounting brackets are in place, it’s time to wire the light bar for proper functionality. Follow these steps:
- Connect the wiring harness to the light bar:
- Plug the wiring harness into the designated connector on the light bar.
- Ensure a secure and snug connection between the harness and the light bar.
- Route the wiring through the headache rack:
- Choose the most concealed and protected path to route the wiring through the headache rack.
- Avoid areas prone to physical damage or excessive heat.
- Connect the wiring harness to the truck’s electrical system:
- Locate the truck’s wiring harness or battery terminals for connection.
- Follow the instructions provided with the light bar to connect the wiring harness to the truck’s electrical system.
- Use zip ties and electrical tape to secure and protect the wiring:
- Bundle any excess wiring using zip ties to maintain a neat and organized appearance.
- Use electrical tape to secure the wiring to prevent it from getting snagged or damaged.
Testing And Adjustments
After completing the installation process, it’s crucial to test the light bar and make any necessary adjustments. Here’s what you need to do:
- Test the light bar to ensure proper functionality:
- Turn on the light bar and verify if all the leds illuminate correctly.
- Verify that the light bar operates in sync with the truck’s electrical system.
- Adjust the positioning of the light bar if needed:
- Assess the light bar’s positioning and adjust it to obtain the desired beam angle and coverage.
- Ensure the light bar’s position does not obstruct any other vehicle components or impede driver visibility.
- Double-check all connections and secure any loose components:
- Review all the connections, including the wiring harness and mounting brackets, to ensure they are secure.
- Tighten any loose components as necessary to prevent vibration or detachment during use.
By following this step-by-step guide, you’ll be able to install a light bar on your headache rack successfully. Enjoy enhanced visibility and functionality while adding a stylish touch to your truck.
Safety Tips And Precautions
When installing a light bar on a headache rack, it’s important to prioritize safety. The following safety tips and precautions should be followed to ensure a smooth and secure installation:
- ### always disconnect the battery before starting the installation
- Disconnecting the battery is crucial to prevent any accidental electrical shock or damage during the installation process.
- It is recommended to remove the negative (-) terminal first to minimize the risk of electrical sparks.
- ### use caution when handling electrical components
- When working with electrical components, it is essential to exercise caution to avoid injury or damage.
- Avoid touching exposed wires with bare hands to prevent electric shock.
- Use insulated gloves or tools when handling electrical connections.
- ### secure all wiring properly to avoid damage or interference
- Ensure that all wiring connections are properly secured to prevent any damage or interference with other vehicle components.
- Bundle and route the wires away from any moving parts, sharp edges, or areas prone to excessive heat.
- Use zip ties or wire looms to organize and protect the wiring, minimizing the risk of damage from vibrations or rough driving conditions.
- ### follow manufacturer guidelines for maximum load and power requirements
- It is important to adhere to the manufacturer’s guidelines regarding the maximum load and power requirements of your light bar.
- Exceeding these specifications can lead to electrical issues, decreased performance, or even damage to the light bar.
- Carefully read the installation instructions to ensure a proper and safe installation.
Remember, prioritizing safety during the installation process not only protects you but also ensures the longevity and optimal performance of your light bar. By following these safety tips and precautions, you can confidently install your light bar on a headache rack without any issues.
Frequently Asked Questions (Faqs)
Can I Install A Light Bar On Any Headache Rack?
Adding a light bar to your truck’s headache rack can significantly enhance its functionality and style. However, there are a few factors to consider before diving into the installation process. Here are the key points you need to know:
- Compatibility: Not all headache racks are designed to accommodate light bars. Before purchasing a light bar, make sure it is compatible with your specific headache rack model. Check the manufacturer’s instructions or reach out to their customer support for guidance.
- Weight capacity: Light bars can vary in size and weight. Ensure that your headache rack can handle the weight of the light bar you intend to install. Exceeding the weight capacity may compromise the structural integrity of the rack and potentially cause damage.
- Mounting options: Different headache racks have distinct mounting configurations. Some racks come with pre-drilled holes specifically designed to accommodate light bar brackets or mounts. If your rack doesn’t have these provisions, you might need to purchase additional mounting brackets or modify the rack to ensure a secure and proper installation.
- Electrical considerations: Light bars require electrical connections to power them. Check if your headache rack has provisions for running wiring or if modifications are necessary. It’s essential to route the wiring properly to prevent any interference with other truck components and to ensure a neat and professional installation.
What Type Of Light Bar Should I Choose For My Truck?
Choosing the right light bar for your truck can greatly impact its performance and appearance. Consider the following points when selecting a light bar:
- Size and shape: Light bars come in various sizes and shapes, such as straight, curved, or rectangular. Select a size and shape that complements your truck’s aesthetics and fits well on your headache rack.
- Light output: The brightness and beam pattern of a light bar are essential factors to consider. Determine the type of lighting you need, whether it’s a flood or spot beam pattern, or a combination of both. Additionally, check the light bar’s lumens rating to assess its brightness.
- Build quality: Opt for a light bar with sturdy construction and efficient heat dissipation properties. Look for features like durable housing materials (e.g., aluminum or stainless steel) and effective cooling mechanisms (e.g., finned heatsinks or cooling fans) to ensure longevity and optimal performance.
- Waterproof and dustproof rating: Considering the challenging outdoor conditions your truck may face, choose a light bar with a high waterproof and dustproof rating (e.g., ip68). This will ensure that the light bar remains functional and protected even in harsh weather or off-road conditions.
Do I Need Any Special Tools For The Installation?
Installing a light bar on a headache rack generally requires standard tools commonly found in most households. Here are the essential tools you may need for a successful installation:
- Socket wrench set
- Screwdrivers (both phillips and flathead)
- Wire cutters/strippers
- Electrical tape
- Zip ties
- Mounting hardware (specific to your light bar and headache rack)
- Drill and drill bits (if modifications are necessary)
- Wire connectors and crimping tool (for electrical connections)
Ensure that you have these tools readily available to make the installation process smoother and more efficient. It’s always a good idea to refer to the light bar and headache rack installation instructions for any additional or specific tool requirements.
Can I Install A Light Bar Without Professional Help?
Installing a light bar on a headache rack can be a diy project for those with basic mechanical skills and the right tools. Here are a few factors to consider before deciding whether to tackle the installation yourself:
- Time and effort: Installing a light bar may require some disassembly and modifications to your headache rack, routing electrical wires, and securing the light bar properly. It’s important to assess your time and the effort you’re willing to invest in the installation.
- Wiring expertise: Ensuring proper electrical connections and avoiding any potential damage to your truck’s electrical system requires basic wiring knowledge. If you are unfamiliar with wiring or feel unsure, it may be best to seek professional help to avoid any electrical mishaps.
- Warranty concerns: Installing the light bar yourself may void the warranty provided by the manufacturer. Be sure to check the warranty terms and conditions before proceeding with the installation.
If you are confident in your abilities and have the necessary tools, installing a light bar on your headache rack can be a rewarding diy project. However, if you have any doubts, it’s always recommended to consult a professional to ensure a safe and proper installation.
Remember, always refer to the specific instructions provided by the light bar and headache rack manufacturers for accurate and detailed installation guidelines.
Frequently Asked Questions Of How To Install A Light Bar On A Headache Rack
How Do You Install A Light Bar On A Headache Rack?
To install a light bar on a headache rack, start by securing the brackets to the rack using the provided hardware. Then, connect the wiring harness to the light bar and route it through the rack to the battery. Finally, mount the light bar onto the brackets and adjust the angle as desired.
Can you mount a light bar to a roof rack?
Yes, you can mount a light bar to a roof rack. Ensure that the roof rack is sturdy and can support the weight of the light bar. Follow the manufacturer’s instructions for installation, and be sure to wire it correctly for safe operation.
Can I wire a light bar directly?
Yes, you can wire a light bar directly, but it’s important to follow safety guidelines. Use the appropriate wiring harness and connect it to your vehicle’s power source, typically the battery. Ensure that you include a fuse in the circuit to protect against electrical issues. It’s recommended to consult the manufacturer’s instructions to ensure a safe and proper connection.
Where is the best place to put a light bar?
The best place to put a light bar depends on your specific needs. Common locations include:
- On the headache rack, for rear-facing illumination.
- On the roof rack, for overhead lighting.
- On the front bumper, for forward-facing illumination. Choose a location that provides the lighting angle and coverage you require.
Conclusion
Installing a light bar on a headache rack is a great way to enhance the functionality and safety of your vehicle. By following the step-by-step guide outlined in this blog post, you can easily and successfully complete the installation process.
Remember to gather all the necessary tools and materials beforehand and take your time to ensure a secure and professional installation. It is essential to attach the light bar securely to your headache rack to prevent any accidents or damage.
Additionally, don’t forget to test the light bar after installation to ensure it is functioning correctly. With the proper installation, your light bar will provide increased visibility and make your vehicle stand out on the road. So, why wait? Start installing your light bar on your headache rack and enjoy the benefits it brings to your vehicle.