

This article was updated in September 21, 2023 with new products and information by Mark S. Taylor
Installing outback bike racks for cars is easy. Simply follow the step-by-step instructions provided by the manufacturer for a hassle-free installation process.
Outback bike racks are designed to securely attach to the rear of your car, providing a safe and convenient way to transport your bicycles. These racks are compatible with most car models and can hold multiple bikes at once. Whether you’re heading out for a weekend adventure or simply need a way to transport your bikes around town, outback bike racks offer a reliable solution.
With their durable construction and user-friendly design, you’ll be hitting the road with your bikes in no time.
Contents
Why Use Outback Bike Racks For Cars?
Versatility And Compatibility
Outback bike racks for cars offer exceptional versatility and compatibility, making them the ideal choice for any bike enthusiast. Here are the key reasons why you should consider using outback bike racks for your car:
- Adjustable features: Outback bike racks are designed with adjustable features that allow you to transport different types and sizes of bikes. Whether you have a mountain bike, road bike, or a kid’s bike, these racks can accommodate them all.
- Multiple bike capacity: If you enjoy biking with friends or family, outback bike racks provide the option to transport multiple bikes at once. With their sturdy construction and proper securing mechanisms, you can trust that your bikes will remain safe throughout the journey.
- Car compatibility: Outback bike racks are designed to fit most car models, ensuring that you can easily install them on your vehicle. Whether you have a sedan, suv, or hatchback, there’s a suitable bike rack option available.
- Hitch and roof mount options: Outback offers both hitch and roof mount bike racks, providing flexibility based on your car’s specifications and your personal preferences. Hitch mount racks are great for easy loading and unloading, while roof mount racks maximize storage space within the car.
- Compatibility with accessories: Outback bike racks are also compatible with various accessories such as locks and adapters. This allows you to further enhance the security and convenience of transporting your bikes.
Durability And Security
When it comes to durability and security, outback bike racks for cars exceed expectations. Here’s why they are an excellent choice:
- Robust construction: Outback bike racks are built to withstand tough road conditions and frequent use. Made from high-quality materials such as aluminum or steel, these racks offer exceptional strength and durability.
- Secure fastening systems: Outback bike racks feature secure fastening systems that hold your bikes firmly in place during transportation. With adjustable straps, clasps, and locks, you can ensure that your bikes are safe and secure throughout the journey.
- Anti-theft measures: Outback bike racks come equipped with anti-theft features such as locks and cables. These additional security measures provide peace of mind, knowing that your bikes are protected from theft and unauthorized access.
- Weather resistance: Outback bike racks are designed to withstand various weather conditions, including rain, snow, and uv exposure. Their weather-resistant coatings and materials help prevent rust and maintain the racks’ integrity over time.
Easy Installation Process
Installing an outback bike rack for your car is a hassle-free process that requires minimal effort. Here’s why the installation is quick and easy:
- User-friendly design: Outback bike racks are designed with user-friendliness in mind. They come with clear instructions and intuitive features that make installation a breeze, even for beginners.
- Tool-free installation: Most outback bike racks can be installed without the need for special tools. They often come with pre-assembled parts, allowing you to simply attach and secure the rack to your vehicle.
- Quick-release mechanisms: Outback bike racks utilize quick-release mechanisms that enable swift installation and removal. This is particularly convenient when you need to switch between using the rack and storing it.
- Adjustable and flexible: The adjustable components of outback bike racks ensure a customizable fit for your car. You can easily adjust the position, height, or angle of the rack to achieve the perfect configuration for your bikes.
Outback bike racks for cars offer exceptional versatility and compatibility, durability and security, as well as an easy installation process. Consider investing in an outback bike rack to transport your bikes with confidence and convenience.
Preparing Your Vehicle For Installation
Choose The Appropriate Bike Rack Model
When it comes to installing outback bike racks for cars, the first step is to choose the right model. Outback offers a variety of bike rack options to suit your specific needs. Consider factors such as the number of bikes you plan to transport, the type of vehicle you have, and your budget.
Here are some popular models to choose from:
- Outback hitch-mounted bike rack: This model attaches to your vehicle’s hitch receiver and can carry multiple bikes securely. It offers easy installation and removal.
- Outback roof-mounted bike rack: Ideal for vehicles with roof rails or crossbars, this model allows you to transport bikes on top of your car. It provides easy access and does not obstruct rear visibility.
- Outback trunk-mounted bike rack: If you don’t have a hitch or roof rails, this model is a great option. It attaches to the trunk or hatch of your car using straps and can carry one or multiple bikes.
Clean And Inspect The Car’S Roof
Before installing a roof-mounted bike rack, it is crucial to clean and inspect your vehicle’s roof. Here are some key steps to follow:
- Thoroughly wash your car’s roof to remove any dirt, dust, or debris that may affect the installation and damage the rack.
- Inspect the roof for any signs of damage or wear. Look out for scratches, dents, or other imperfections that may compromise the rack’s stability. If necessary, consult a professional to repair any damages.
Measure And Adjust For Compatibility
To ensure a proper fit and compatibility between your vehicle and the bike rack, precise measurements and adjustments are necessary. Follow these steps:
- Measure the width and length of your vehicle’s roof to determine the available space for the bike rack.
- Consider the height of your vehicle when adding the rack to avoid clearance issues with low bridges or garage entrances.
- Check the weight capacity of your vehicle’s roof and compare it to the weight of the bike rack and bikes you plan to transport. Make sure it meets safety standards.
Gather Necessary Tools And Equipment
Before starting the installation process, gather the necessary tools and equipment to ensure a smooth setup. Here’s what you’ll need:
- Wrench or socket set: Depending on the rack model, you may need to loosen or tighten bolts for installation.
- Tapes and markers: Use these to mark reference points or make alignment indicators on your vehicle to assist with future installations.
- Cleaning supplies: Have a bucket, sponge, and car wash soap to clean the car’s roof thoroughly.
- Measuring tape: This will help with accurate measurements of the roof and bike rack components.
- Safety equipment: Consider wearing gloves and safety glasses throughout the installation process to protect yourself from any potential harm.
With the appropriate bike rack model chosen, a clean and inspected car roof, proper measurements, and the necessary tools in hand, you are ready to install your outback bike rack. Following these steps will ensure a successful and hassle-free installation process.
Happy biking!
Step-By-Step Installation Guide
Installing outback bike racks on your car can be a breeze with the right know-how. In this step-by-step installation guide, we’ll walk you through the process to ensure a secure and hassle-free installation. Let’s get started!
Position The Bike Racks On The Car’S Roof
Before installing the bike racks, it’s essential to find the optimal position on your car’s roof. This will ensure proper weight distribution and optimal stability during transit. Here’s how to position the bike racks:
- Identify the centerline of your car’s roof.
- Place the bike racks parallel to the centerline, ensuring there is enough space for the bikes.
Align The Rack With Factory-Installed Roof Rails
If your car already has factory-installed roof rails, aligning the bike rack with these rails is crucial for a secure fit. Follow these steps for alignment:
- Align the bike rack’s clamps or brackets with the roof rails.
- Make sure the rack is centered and securely positioned on the roof rails.
Adjust The Rack’S Position For Proper Weight Distribution
Achieving proper weight distribution is key to a safe and smooth ride. Follow these steps to adjust the bike rack’s position:
- Move the bike rack forward or backward to distribute weight evenly.
- Ensure there is enough clearance between the rack and the car’s roof.
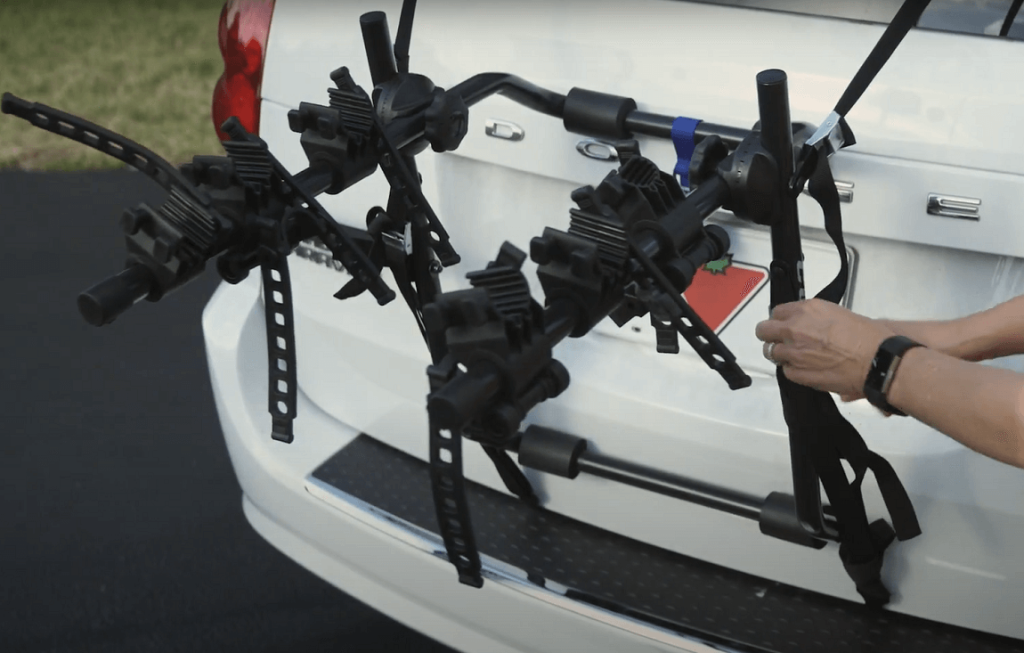
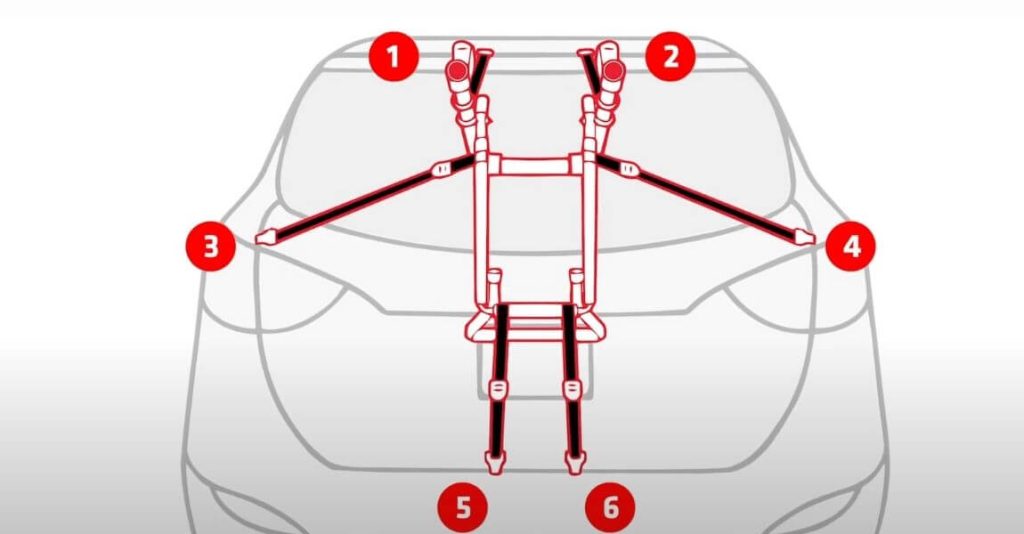
Secure The Bike Racks To The Car’S Roof
Securing the bike racks to your car’s roof is an important step in the installation process. Here’s how to do it:
- Attach the rack to the roof rails using clamps or brackets.
- Tighten the clamps or brackets securely.
Attach The Rack To The Roof Rails Using Clamps Or Brackets
To ensure a tight and secure fit, attaching the rack to the roof rails is crucial. Follow these steps for a proper attachment:
- Place the clamps or brackets around the roof rails.
- Tighten the clamps or brackets securely, ensuring a snug fit.
Ensure A Tight And Secure Fit
After attaching the bike racks, it’s important to double-check for a tight and secure fit. Here’s what you should do:
- Test the stability of the bike racks by gently moving them.
- Make any necessary adjustments to ensure a tight fit.
Mount The Bikes Onto The Bike Racks
Now that the bike racks are securely in place, it’s time to mount the bikes. Follow these steps for a proper bike mounting:
- Lift the bikes onto the rack’s arms or cradles.
- Position the bikes securely on the rack, ensuring they are balanced.
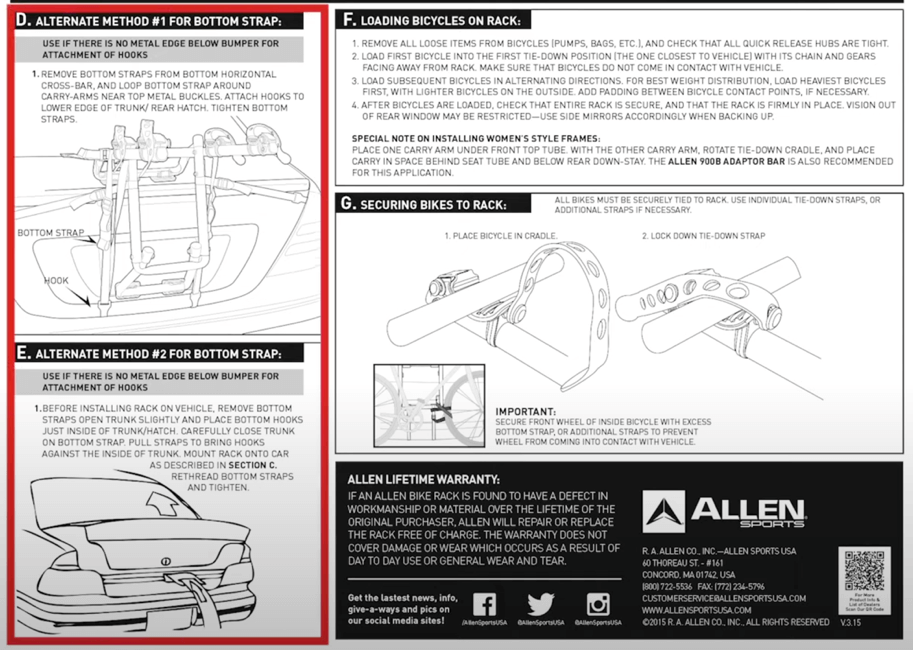
Secure The Bikes Using Straps Or Ratchets
To keep your bikes stable and secure during transit, it’s essential to use straps or ratchets. Here’s how to secure the bikes:
- Place the straps or ratchets around the bikes’ frames.
- Tighten the straps or ratchets to securely hold the bikes in place.
Perform Final Checks And Adjustments
Before hitting the road, it’s crucial to perform final checks and adjustments. Follow these steps to ensure everything is in order:
- Ensure the bikes are tightly secured to the bike rack.
- Double-check all connections and attachments for security.
- Confirm the stability of the bike racks, ensuring they can withstand the journey.
By following this step-by-step installation guide, you can easily install outback bike racks on your car. Enjoy your cycling adventures with peace of mind knowing your bikes are safe and secure on the road. Happy trails!
Tips For Ensuring A Safe And Secure Installation
Installing outback bike racks for cars requires attention to detail and adherence to safety guidelines. To ensure a safe and secure installation, follow these essential tips:
Follow The Manufacturer’S Instructions:
- Familiarize yourself with the installation instructions provided by the manufacturer. Each rack may have specific requirements and guidelines that must be followed.
- Read the instructions carefully before starting the installation process to ensure you have all the necessary tools and components.
- Pay close attention to any weight limits, vehicle compatibility, and specific instructions for securing the bike rack.
Double-Check All Connections And Attachments:
- Before mounting the bike rack on your vehicle, ensure that all connections and attachments are properly secured and tightened.
- Inspect each mounting point, making sure bolts and clamps are securely fastened.
- Check that the rack is centered and aligned correctly to maintain stability during transportation.
Test The Stability Of The Bike Racks Before Driving:
- Once the bike rack is installed, test its stability by gently shaking and pulling on it. Ensure that it is firmly attached to your vehicle and doesn’t wobble or shift.
- Make any necessary adjustments if you notice any instability or movement.
- Testing the stability before hitting the road will help prevent any accidents or damage to your bikes.
Regularly Inspect The Racks And Bikes During Transportation:
- While driving, periodically check the bike racks and bikes to confirm they remain secure.
- Look out for any signs of loosening or shifting, such as rattling noises or visible movement.
- Ensure that the bikes are still firmly attached to the rack and that the straps or clamps are holding them securely in place.
Remember, proper installation and regular inspections are crucial for ensuring the safety and security of your bikes during transportation. By consistently following these tips, you can enjoy worry-free travel with your outback bike rack.
Frequently Asked Questions Of How To Install Outback Bike Racks For Cars
How to Attach a Bike Rack to Your Car?
Attaching a bike rack to your car typically involves the following steps:
Select the Right Bike Rack: Choose a bike rack that is compatible with your vehicle and suits your biking needs. Consider factors like the type of rack (hitch-mounted, roof-mounted, or trunk-mounted) and the number of bikes you want to transport.
Gather Tools: Depending on the type of rack, you may need tools like wrenches, screwdrivers, or Allen keys.
Prepare Your Car: Ensure your car is clean and free of debris in the areas where the rack will be attached.
Follow Manufacturer Instructions: Read the installation instructions provided by the bike rack manufacturer carefully.
Install the Rack: Depending on the type of rack:
For hitch-mounted racks, you’ll need to locate and assemble the hitch, attach it to your car, and secure the bike rack.
For roof-mounted racks, position the rack on the roof, attach it to the roof rails, and secure it properly.
For trunk-mounted racks, choose a rack that suits your vehicle’s trunk and install it following the manufacturer’s instructions.
Secure Bicycles: Once the rack is installed, secure your bicycles to the rack using the provided straps, clamps, or supports. Make sure they are stable and won’t shift during transit.
Perform Safety Checks: Double-check that the rack is securely attached and that your bicycles are well-secured. Ensure that the rack doesn’t obstruct your taillights, license plate, or rearview mirror.
Test Drive: Take a short test drive to ensure the rack and bicycles are stable while in motion.
Regular Maintenance: Periodically inspect and tighten all bolts and fasteners, and clean the rack and bicycles after each use.
How to Install a Saris Bike Rack on Subaru Outback
To install a Saris bike rack on your Subaru Outback, follow these general steps:
- Choose a Saris bike rack model that suits your vehicle and needs.
- Gather the tools and materials mentioned in the installation manual.
- Carefully read and follow the manufacturer’s instructions provided with the Saris bike rack.
- Install the rack according to the instructions, ensuring it is securely attached to your Subaru Outback.
- Secure your bicycles onto the Saris rack, following the provided guidelines.
- Perform a safety check to ensure everything is properly installed and secured.
Can a Subaru Outback Have a Bike Rack?
Yes, a Subaru Outback can certainly have a bike rack. Subaru Outbacks are known for their versatility and are well-suited for carrying bike racks. You can choose from various types of bike racks, such as hitch-mounted, roof-mounted, or trunk-mounted, depending on your preferences and biking needs. Just ensure that you select a compatible bike rack and follow the installation instructions to safely and securely attach it to your Subaru Outback.
How to Install a Thule Bike Rack on Subaru Outback
For installing a Thule bike rack on your Subaru Outback, here are the general steps to follow:
- Select the Thule bike rack model that matches your vehicle and biking requirements.
- Assemble the necessary tools and materials mentioned in the Thule bike rack installation instructions.
- Carefully read and adhere to the installation guidelines provided by Thule.
- Install the Thule bike rack following the manufacturer’s instructions, ensuring it is firmly attached to your Subaru Outback.
- Secure your bicycles onto the Thule rack, making sure they are stable and properly fastened.
- Conduct a safety check to confirm that both the rack and bicycles are securely installed.
Conclusion
Installing outback bike racks for cars is a simple and effective way to transport your bikes safely and conveniently. By following the step-by-step instructions outlined in this blog post, you can ensure a secure fit and hassle-free travel experience. Whether you are planning a family vacation or a weekend adventure, having a reliable bike rack on your car is essential for avid cyclists.
Optimized for performance and durability, outback bike racks are designed to withstand various weather conditions and road surfaces. With their easy installation process and adjustable features, these bike racks offer versatility and compatibility with different vehicle models. Remember to double-check your installation and always prioritize safety by properly securing your bikes before hitting the road.
Embrace the freedom and joy of biking while ensuring the protection of your precious equipment with outback bike racks for cars.